Pages

Sunday, September 29, 2013

Alabama Chanin Anna's Garden Corset and Long Skirt

I have always liked the hand-stitched corset from Alabama Stitch Book. For whatever reason, I never made one didn't think I would. That was until I saw a version made by  Nixxi, on Craftsy. She embroidered the June's Spring design to her sand colored fabric and stitched it using a baby blue colored embroidery floss. I think her end product is delightful and it brought this pattern back into play for me.

Even after making my beaded sampler top, I decided to change my entry for the mini wardrobe contest to include a corset. I had a white cotton jersey sheet in my stash that would serve as my fabric source.  I stenciled my fabric in "Anna's Garden" using  grey paint I blended. 

Painting the fabric
The pattern for the corset is from the Alabama Stitch Book and includes all the instructions to create this corset top and a multitude of other garments. They are sized xs-xl. I traced and I cut the size medium.


 I find A.C. necklines too low for my tastes so  I raised it about 1 inch. I sewed my corset with double stitching; once to secure it then again to top stitch. I had my seams fell to the inside of the top.    I chose to bind my neckline and armholes using a strip of white jersey fabric.  I secured the binding with a herringbone stitch using slate button and craft thread.
Anna's Garden Corset Front
  I really like the rounded hem on this.

 I am glad I raised the neckline and think it could still go up just a smidge more.
Herringbone stitch on bindings
Stencil close up
I am happy with my corset and the fact that the only significant alteration to the pattern was raising the neckline. It was really quick to stitch and I will certainly be making more.

To go with this lovely top, I needed a coordinating skirt. I selected the Long Skirt option from Alabama Studio and Sewing and Design. 

I had not made this pattern and thought it went great with the top. I love that the front is shorter than the back which has a train. Again, I made this by re-purposing the white jersey bed sheet. I traced and cut the pattern and began sewing.

The construction was easy but a tiny bit tedious. The seams are super long and needed to be stitched once with the seams inside, then, stitched again on the outside. After the sides were stitched up, I added fold over elastic (foe) to the top waistband. The pattern called for 1 1/2 in foe, but I didn't have any. I bought a spool 3/4 of  foe elastic on sale and a ridiculous price years ago and decided to use what I had on hand.

It was a bit fiddly to work with, but basting it in place instead of pinning, solved that problem. I attached it using a parallel stitch.
 Here is the finished product.
Skirt Front
 
Skirt back (I am stooping so the curve can be seen better.)

I really like this outfit! I will be making this again, and again. As we come upon the holiday season, this has been added to my gift giving list. Are you my friend?

Happy Sewing,
Bianca

Thursday, September 26, 2013

My Version of the Alabama Full Dress

Don't you just love this dress!


Image

The multiple seam lines, the fitted bodice and flared skirt. I love the denim color of the jersey cotton. What I do not love is the price. It is a whooping $955! Well worth the time and effort I am sure, but as a friend said,  "Where are you going to wear a $1000 dress?" My answer was simple, "Kroger!" Who cares where I am going to wear it? It is gorgeous and I would rather have it and not need it, than not have it need it, right?

While I am not in a position to buy this dress, I have do have the tools to make it. I found McCalls 6504 which seems like a fair match. I am still working on entries for the Pattern Review Mini Wardrobe Contest, so I thought this dress would work as my dress component. I want this to coordinate with my other pieces so I am making it using black cotton jersey.
I began stitching the front of the dress following the pattern instructions to match the correct pieces together. This part required some planning on felling the seams. The seams needed to be stitched wrong sides together, then top stitched with the seams felled to the sides of the body.  I did not want my knots exposed so I focused on beginning and ending my threads on the sides that would be felled.
Knot ends to be hidden by the felling of the seam.
 After stitching the front together I trimmed the seam allowance down to about 1/4 inch. I repeated this for the back and pinned it to my dress form.

Trimming seams

After pinning, I see it is too big in the sides so I increased the seam allowance in the sides.

Increasing the seam allowance.

Still too big
Not fitted enough
Even after increasing the seam allowance if felt so frumpy. It was not giving me the look I wanted. I decided to cut the middle front piece in half to add a seam and pull it in even more. That turned into a disaster! When I felled the seam, the symmetry was uneven and it looked awful! What to do, what to do....? I decided to remove the middle front seam all together and it proved to be a great solution.

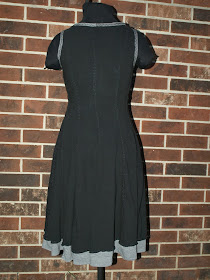
Once I was comfortable with the fit, it was time for the finishing touches. I added bias binding to the neck and armholes and bound it with a herringbone stitch. I also added a border of grey jersey to the bottom of the dress. I am 5'8 and felt the length was too short for my liking. 

I am glad I did not use my denim jersey to figure this one out. With all of the adjustments I had to make on this dress I would have stressed to much. That said, I am very pleased with this end result.
Front
Back
Bindings

Contrast border

I am excited to make my replica of the Alabama Chanin Full dress in denim when I get some time. In the meantime, I would love to know what you think of this one.

Happy Sewing,
Bianca

Saturday, September 21, 2013

Vogue Jacket made Alabama Chanin style

I have wanted to make a blazer in Alabama Chanin style for a while now. I have been waiting on the perfect pattern and hadn't found it until now. Vogue 8932 has some really fabulous seam lines and look at the curve of the neckline. I think I can work this one up in time for fall.
V8932


The details of the back are impressive and I couldn't wait to begin. I purchased some slate grey cotton jersey fabric and used some of it in my beaded sampler. I decided to use the remainder fabric in creating this jacket. My plan was to stitch it up with the seams exposed and adding top stitching. I like the idea of exposed seams felled to the outside. That said, I  haven't made one like this and wanted to have a fall back plan if it didn't work out like I hoped. I decide to stitch it with wrong sides together. That way I have the choice to wear it with the seams felled to the inside if I choose.

I also wanted the jacket to be fitted. That meant winging it and adjusting the size on my custom dress form as I went. My I cut the size 10 and stitched it up using a tip from the Craftsy class, Hand-Embellishing Knit Fabric. I marked my seam allowances before stitching. This really helped me keep the lines straight in this pattern where the lines are key.

  I got to work on it and was making quick work of it.

front only stitched

back stitched, but not attached

Front and back attached.

Love the details of the back

I was having trouble attaching the sleeves. I could not figure out why one sleeve would go in with no problem, but the other was a mess. It would gather and bunch at the middle of the bicep. It is a two part sleeve, so just adjusting the gathers would not solve the problem. 

After a short break I finally figured out the sleeve. I cannot say what the problem was for certain. I am sorry this may not be helpful to you if you make this one. I think my orientation of the pieces was thrown off because I positioned  fabric wrong sides together (intentionally), and didn't mark them (unintentionally). I also think it makes a difference which side of the sleeve you stitch up first. I un-stitched the side I had stitched, flipped it and attached it to the opposite side. That worked! My suggestion to you is to simply mark the wrong and right sides of each sleeve piece before stitching.

Here are the photos of the completed jacket. I love the finished product!


Jacket front
Jacket back
Neckline and binding with the herringbone stitch
Back Neckline
Front binding
Shoulder
 Here is a review of the pattern with the changes I made.

MISSES' JACKET AND VEST: Semi-fitted, unlined jacket or vest has raised neckline, seam detail and shaped hemline. A: front-button closing. A and B: two-piece sleeves. B and C: raw edge finish, seams stitched on right side of fabric, and front snap closing.

Pattern Sizing: (4-12)
I cut the 10 of view B I used larger seam allowances on the sides when I realized it would not be a fitted as I would have liked. Next time I would cut an 8. I wear a 6 in RTW.


Did it look like the photo/drawing on the pattern envelope once you were done sewing with it?
Yes with the exception of my changes.

Were the instructions easy to follow?
They were easy to follow. I believe the problem I had with the sleeves was due to operator error.

What did you particularly like or dislike about the pattern?
Like: I love the seam lines in the back and the curved lines of the front. I also like that the back hem rises higher than the front.

Dislike: From the line drawings there does not appear to be gathers in the sleeves. There is gathering and they are bulky in front. Because they are two part sleeves I cannot space them out the way I like. After fixing my problem with the sleeve, I still do not like the gathers there; it is not a deal breaker though.


Fabric Used: Double Layer of Slate Grey Jersey Cotton. Slate Grey button and craft thread.

Pattern alterations or any design changes you made: 


  • I made it to be fitted my body. I cut my size, to be safe, but ended up using an 1.5 seam allowance in the side  seams (next time I will cut an 8).
  •  I used a double layer of fabric throughout. I hand-sewed the entire jacket in Alabama Chanin style. 
  • The seams are stitched once, then felled to the inside and top stitched.
  •  I omitted the facing pieces and instead bound the front and neckline with a strip of jersey secured with a herringbone stitch.
  • I adjusted the snap positions to be sure the front lay the way I wanted.
Would you sew it again? Would you recommend it to others? I like this pattern. I may make it in wool in my regular size and on a machine. I would recommend it for those interested in sewing it in Alabama Chanin style.

Conclusion: I love the lines of this jacket. I am tremendously pleased with the way it turned out. I used my dress form continuously throughout the process of making of this jacket.  The combination of making it fitted and in cotton jersey added a challenge I am not sure I would have overcome otherwise.


Happy Sewing,
Bianca

Monday, September 16, 2013

Beaded Alabama Chanin Polka Dot Sampler

Hello, my name is Bianca and I am an addict. All the readers say "Hi Bianca!" In my varied and storied career I have spent some time as an Addictions Counselor, Case Manager, and Group Leader, so I know the signs. I can unequivocally say I am addicted to sewing Alabama Chanin garments. They are beautiful, creative, and wonderfully detailed. I work multiple garments at a time relishing the various techniques required for each. I have many garments cut and queued waiting their turn to be stitched. I have a longer queue of garments I dream of sewing, but have yet to cut. 
I am in constant need of a fix. I was at a doctor's appointment and required to wait. The waiting grew longer and more difficult to endure because I didn't have anything to sew! I kept thinking, I could have stitched four circles by now! Call my name! (BREATHE).  I recall the tools I have been trained to use and I have learned to always have something handy. :)
 
There is a Mini Wardrobe Contest running over on Pattern Review.com. The contest requires participants to complete four garments that must combine (without adding additional garments) to create at least 4 looks. I have entered and plan to  sew a mini Alabama Chanin Wardrobe. I plan to make a dress, a jacket, a top, and skirt to produce the following 4 looks: Dress; dress/jacket; skirt/top; skirt/top/jacket.

The kicker is that I have one month to do it! I know it is insane. I have been working on this dress for almost a year; what am I thinking? In any case, I started mentally planning my entries when the contest was announced. On September 1, I began my sewing of the top entry.

I wanted to work on my beading techniques and decided to  use my top as a sampler. I used the t-shirt pattern from the Alabama Chanin Studio Sewing and Design book. I used my polka dot stencil to add the shapes to a single layer of slate grey cotton jersey.

Polka Dot Stencil

Dots applied.
I got to work on the embellishments. I used red embroidery floss to work reverse back stitches to serve as the foundation of the polka dots. I then used an assortment of seed, chop, bugle, beads and sequins to create various beaded arrangements.


These patterns combined to create this finished top. It is hand-stitched with slate button and craft thread. The seams are felled to the inside and top-stitched. The neckline is bound using a Cretan stitch.

I am satisfied with the outcome of the top at this point. I may add more sequins and beads in the spaces over time. If I get the other entries completed, I may add them before the contest ends! Bahahahaha! What grandiose thinking! I need a meeting!

Happy Sewing!
Bianca