Thursday, April 21, 2022

My New Book Represent! Embroidery

I am really excited to announce the news of my first book on embroidery due out in September. 

I am so proud of the projects, stories, and designs to stitch. I hope you will love and embrace it!

-Big thanks to C & T Publishing for bringing my dream to life.

From the publisher:
Bianca Springer brings you 10 projects and more than 100 designs in her upcoming book, Represent! Embroidery, to be released on September 25, 2022.

Finally, an embroidery book for everyone! The fun motifs feature people in a full range of skin tones, hair textures and shapes. The designs are culturally relevant and tells a part of our shared stories. A robust collection of finished projects that readers of all colors can stitch up to reflect themselves and loved ones without painstaking alteration to the motifs.

"Toni Morrison once said, 'If there’s a book that you want to read, but it hasn’t been written yet, then you must write it.' These are the designs we want to stitch. These are the stories we want to tell. I hope makers will discuss, embrace, and celebrate this book with me." - Bianca Springer
PRE-ORDER Represent! Embroidery: https://www.ctpub.com/represent-embroidery/


Happy Sewing,
Bianca 

Tuesday, February 1, 2022

The Good Night's Sleep Dress Vogue 1234


Oh, don't you just love an interesting pattern? I have had Vogue 1234 in my pattern stash for quite a while. 
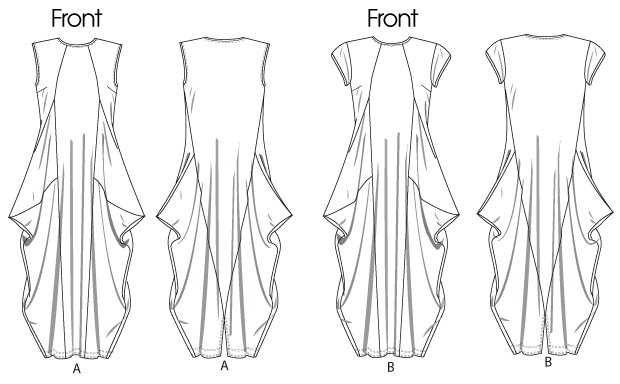
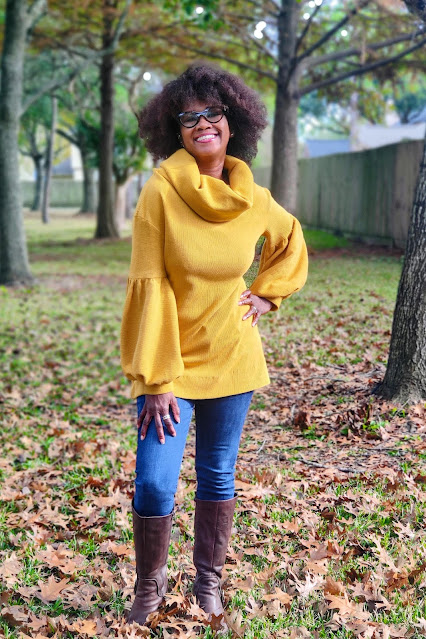
The global pandemic and the struggle to make useful, wearable pieces with limited places to wear them are in constant conflict for me. When I think about what to make lately, I am getting bored with the idea of making basics. I was looking for a challenge and this pattern is a good palate cleanser and a return to weird and wonderful making. How can you not love the angles and all the funky seamlines of this dress. 


Once the decision was made, I spent a lot of time contemplating fabric choices and placement options. I have seen this dress made up on pattern review in solids, prints, and inspiring color-blocked options. For my first foray into this pattern, I chose to do a print and solid mix. I shopped Nature's Fabrics for two coordinating fabrics. I went with tan distressed dots for the print and black bamboo spandex jersey for the solid. I chose to highlight the print on the center front and back, the sleeves and the neckline.

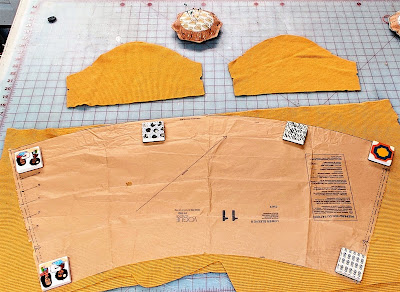
I made size C based on my bust measurement. This pattern makes no accommodation for lengthening or shortening so I cut it as is. After cutting the pattern and the fabric out, I had planned to begin construction immediately. 

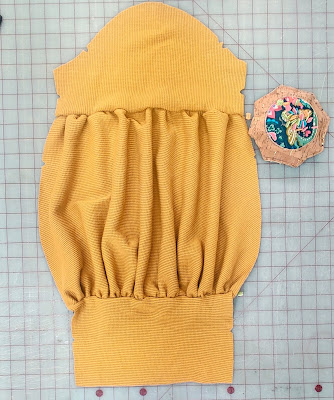
The pattern instructions are different from those of typical patterns. Due to the fabric shapes and construction details additional work is needed to mark the pattern so the pieces fit together correctly. It was a little frustrating for me to take the extra step of numbering the pieces as the designer wanted. Why didn't the pattern company preprint the numbers in advance? After adding the markings and reading the instructions, I knew I could not undertake making this late in the day as I had planned. With illustrations like this, I knew it needed a good night's sleep, a clear head and a full cup of coffee.

With a clear head and determined focus, I dove in. In the end, it was not as difficult as it initially appeared. It came together in an afternoon. The additional markings made all the difference, don't skip this step. 

The only thing that was a bit time consuming was the recommendation to wait until the garment was significantly constructed before using your serger to edge finish the seams. With typical knit garments, I usually do those steps simultaneously. This was a wise recommendation so you have fewer threads to unpick if you mismatch the placement. I made this mistake and unpicking a zigzag stretch stitch is no joke! I could not imagine having to unpick a serger seam.

I made no modifications to the pattern. The only change  was I used my cover-stitch machine to finish the hem and neckline.


I love the drapey goodness of this dress! It is so comfy and came out exactly as I hoped. 


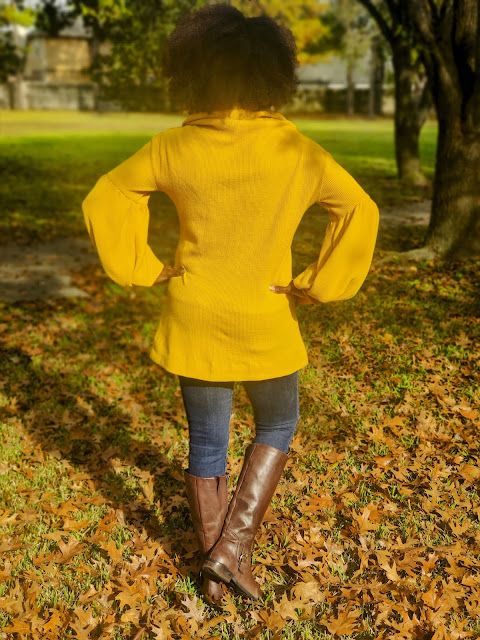
The fun continues on the back.

I like this version and hope to make another this summer with color-blocking and decorative hand-stitching.


Many people commented about this pattern on my Instagram post. Many have it, but have hesitated to make it because of the intimidating looking instructions. I am here to say, it's different, not difficult; do it!


Happy sewing,
Bianca


Wednesday, December 8, 2021

Ankara Bound Luxe Cuddle Lamb Blanket

My son is obsessed with soft fabrics.  I have had the pleasure of working with Shannon Fabrics for several articles for Sew News Magazine and recently, I joined their brand ambassador team. They are a very generous company and I received several welcome packages with their yummy fabrics. With every delivery, my son wraps himself in the cuddly fabrics to enjoy the softness. Every attempt for me to disentangle him, has been met with reluctance because he constantly wants to be enrobed in them. On more than one occasion, I've had to unravel him from 6 yards of fabric.

When Shannon Fabrics heard that he routinely wears the single-sided fleece garments inside out, to feel the softness, they told me about the double-sided options. They sent him several yards to celebrate his recent birthday.

Top of his list of projects for me to make was a blanket. I decided to make a bound option using Ankara fabric that he selected from my stash. This is a quick and easy project that gives a lot of comfort and character with a little bit of effort.

Here's a quick tutorial

Supplies:
2.5 yards Double-sided Lamb Cuddle Luxe (54/56" x 90")
1.5 yards Ankara fabric or 45" fabric of your choice
Walking foot
A heap of pins 
A sharp rotary cutter
A rotary mat
6" quilting ruler
Iron and board
All purpose thread

If you are buying yardage, the 2.5 yards of Cuddle Luxe is ready to go. If you have more than that you will need to cut it down. I like to lay the fabric on carpet because the fibers keep everything from shifting. Measure 90" down the length of the fabric and cut across the width.

Use a quilting ruler to cut 8 strips of binding the length of your fabric (45") x 6" wide. If you are using wider fabric, you will require fewer strips.


With right sides together and raw edges even, stitch/serge the short ends together, Repeat on all strips, press open if stitched, to one side if serged.


Press .5" on both long sides of the binding. Fold long edges in to meet and press to create a long center crease.


Slide binding under one edge of the fleece so the edge meets the center crease.

Pin through layers of binding and fleece to secure in place. Allow the binding to extend beyond the fleece.


Tuck the binding under so the center seam meets the edge of the fleece. Adjust the corner to smooth the fabric and form a point.


View from backside.


Fold the binding to the front and adjust your corner to create a mitered corner. Pin in place. 


Continue to pin the binding  around the perimeter of the blanket. When you get to the beginning overlap and tuck the fabric ends in place. I pinned the entire perimeter before I began sewing. If your blanket feels too bulky and heavy this way, I suggest you pin then stitch each edge before continuing to the next.

Clear the area to the left of your sewing machine so there is room for the blanket to rest on the table. It can be unwieldy if the blanket hangs in front of the machine. Install the walking foot on your machine. Adjust the stitch length to the longest length. Align the edge of the binding to the edge of the foot and use it as your seam allowance guide. Stitch binding in place. Backstitch at the beginning and end, pivot at the corners. 


Press binding and enjoy!

Happy sewing,
Bianca

Friday, December 3, 2021

From Pinterest to Pleased. My Chunky Sweater Dreams


I don't know about you, but I have thousands of pins on my 100+Pinterest boards. Many of my pins are aspirational and interesting, but I have rarely taken the next step to execute them. I have had a chunky sweater dress with a voluminous sleeve on one of my boards for a few years. I love the chunky cowl, the texture of the fabric, and the big sleeves of this Fall staple.


The sweater is available for purchase, in synthetic fibers and on what looks like a fast fashion website. Those factors did not appeal to me so I decided to make my own.

I was hoping for a wide wale ribbed knit fabric like that shown in the photo. I went to the Nature's Fabric  and was tempted away from my original plan by the wide range of colors of organic cotton thermals they offer. I chose the Honey for the yummy color and texture.


I hit my extensive pattern stash and pulled two patterns, one vintage one current with the plan to hack them to get what I want. I chose this vintage simplicity turtleneck pattern because I really wanted some drama with the neckline. (If you have a mock/turtleneck pattern on hand, extend the cowl to 17in. for a similar look.)

 
For the sleeves, I chose Vogue 1700 for the streamlined then, voluminous sleeve option of this top. It is perfect for the look I was hoping to achieve.
The construction was pretty straightforward. I kept the front and back bodice and upper sleeve of the of the vintage Simplicity dress. I cut the balloon sleeve and lower cuff of the Vogue pattern. I had 2 yards of fabric to work with. As you can see in the photo, I positioned the pattern to fit, not adhere to the grainline direction. Because it is a knit fabric, the fit will not be affected by this adjustment. I would not do this with a woven fabric, however.  


The balloon panel is gathered to fit between the sleeve and cuff. (The pictured pattern weights and pincushion pattern are available in my Etsy store.)


I stitched the sleeve in flat and sewed it with my serger.


I have a cover-stitch machine and am trying to use it more frequently on knit fabrics. For this project however, I opted to use a blind-hem stitch so as to not draw a line across the hemline. 


I am so in love with this sweater! It is just what I wanted and more.


I love the interest of the sleeve!


The fullness and drama of the cowl is wonderful


and a tiny bit silly.


The back is pretty simple with no shaping for a loose fit.


It is December on the calendar which means we are having mild Fall weather here in Texas (if you watch the news you know cuckoo bananas is the way of things down here!). I am looking forward to a few months of sweater, jeans and boots for my go to dressing. I will be adding a few more of these to my closet. The way Little Miss has been eyeing this one, I am sure I will need to add a few to her closet as well.
 

Happy Sewing,
Bianca

Tuesday, October 5, 2021

New Work From Home Fabric!


When I feel like wearing sweats or yoga pants but I must wear a dress, this is the dress for me! I love when I make something and it surprises me. This dress did just that! My go-to outfits most of this homebound year have had casual comfort as the paramount feature. Few of them have been dresses. With this make that is going to change. When I chose this bullet knit from Nature's Fabrics I knew it would be comfortable. When I paired it with this pattern, I didn't know I would want to wear it all the time.


I love this faux wrap dress with ruched details. I chose to make view D with the the gathers at the shoulders. The construction was easy and I sewed it mainly on my serger. The bullet knit is a stable knit, so it can be sewn on a standard machine if you don't own a serger. 


I have used bullet knit  to make dresses, tops and cardigans. I love all of them. When I was planning this project, I started to feel you might get bored with more of this fabric from me. In the end, I went ahead because I want you get into this fabric! 

This is the dress you wear when you have to look like you care, but you want to feel like you're lounging. It's the perfect dress when you want to be comfy, but need to pop on a Teams meeting or a Zoom call.


This is the dress I wish I had when I was pregnant and nursing my babies. The stretch of the fabric would have easily accommodated my growing belly and the neckline would have made it perfect for breastfeeding. I am not going down that road anymore. I will however, make this dress again and possibly modify it for tops.


In terms of sizing, I cut my regular size and could have gone down by one because of the stretch of this knit. I have seen other versions that have zero ease, but that is not my style. Because of the folds, tucks and gathers I am happy with the fit. 

I don't remember when I bought this pattern, but it is now out of print. There are a few available for sale if you want this exact pattern. If you are open to a suggestion Burda 6211 is a good match.


I am planning my Fall and Winter projects and it will be all about comfort. Do you have a secret pajamas pattern that you love?

Happy Sewing,

Bianca