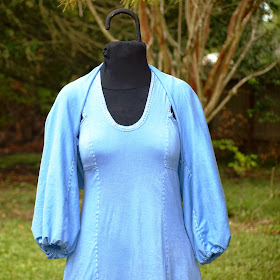
There is a Vintage Contest over on Pattern Review that was a perfect chance to sew retro with an A.C. twist. I dove into my pattern cabinet and found this Vogue Americana/Carol Horn pattern. It is a high fitted and flared dress in mid-knee or evening length. It has a u-neckline, cut-away square armholes, pockets in side seams and princess seaming and top stitched details.
I love a good maxi dress and decided to make this one in a double layer of blue cotton jersey. This meant I would not need the dress faced so I omitted those pieces. My pattern is a size 10. My size in this pattern and given that I am using jersey, should be a pattern size 8. I chose to omit the zipper and stitch the dress with a 1-inch seam allowance to account for the stretch in the cotton and adjust the size down.
I knew I would sew this in the A.C. style but given the extensive length of the seams I opted to machine sew the interior seams. I lengthened my stitch to the longest possible and used a knit needle. This adjustment solved any wavy fabric problems I might have encountered otherwise. I felled the seams to the inside of the dress and I used white button and craft thread to hand-sew the top-stitching. I also used my leather thimble to help with getting through the layers of fabric in the top-stitching. I found it much easier to do the top-stitching on the seams when the dress was flat. I sewed all but one side seam together, did the top-stitching, then stitched the final seam to close the dress.
 |
| Top-stitching seams while flat |
My handy dandy beading glove was perfect for this. I alternated between a small seed bead, a bugle bead, then a seed bead. I am struggling to find the correct needle size to fit the interior circumference of the bead and will accommodate the thickness of the button and craft thread. I found a needle thin enough to fit the beads, but I had to enlarge the eye of the needle. The needle was so thin it bent as it went through the four layers of fabric. This made the beading slow going. If you have a combination that works, please share.
 |
| The red thread seen in the photo above is my basting thread to secure my binding in place. I find it easier to remove the thread when it is different color |
 |
| Dress Front |
 |
| Dress Back |
 |
| Beaded Neckline |
 |
| Bead details |
 |
| Top-stitching Details |
I found Simplicity 3533 in my stash and thought view E was a suitable choice. It was super fast and easy to sew. I made it in a single layer and did not hem the opening. Beyond that, I made it according to the instructions.
Here is B.I.R.A wearing it. The good thing about having a body double, is that I can have a bad hair day and let her work for me.
Happy sewing!


Hi over from the Vintage Contest and I'll post to see if that's fixed :-) almost midnight here so can't think much and a movie quote? LOL Well I hope I can help test your blog :-) Debbie
ReplyDeleteThanks for commenting :) The quote is from Shawshank Redemption.
DeleteI love what you've done with this dress - it's almost enough to convince me to try beading .......... but I still don't have enough patience.
ReplyDeleteThanks, you should give it a try. The end result is worth it!
DeleteAs usual I love what you have done! The fit is beautiful; great job!
ReplyDeleteThanks so much Amy, I appreciate your encouragement.
DeleteWell done!!! Very UNIQUE!!! FIESTA :)
ReplyDeleteThanks!
DeleteBeautiful, and you've given me an idea for my Mardi Gras dress neckline! (Wasn't the Shawshank Redemption one of the best movies ever?)
ReplyDeleteSo glad to give you an idea! I LOVE that movie. The dialogue runs through my head constantly. "Get busy living, or get busy dying."
DeleteBeautiful, like all your projects. Love that you use vintage patterns. :)
ReplyDeleteHillary
I am seriously just seeing this comment. My love for vintage patterns continues.
DeleteWow!!! Your work is amazing!
ReplyDeleteThanks so much Denise!
DeleteThat dress looks bomb on you, love it! Just started AC style and you are a master at it!
ReplyDelete