Sunday, July 28, 2013

Alabama Chanin Inspired Halter Top

Last week Alabama Chanin had a one day sale on their halter. Instead of $145 it was on sale for $120! It is a simple unembellised darling of a top, perfect for summer.  After stitching away at the last few stenciled pieces, I needed a cool down project. I liked the halter but thought back is too bare for me. I knew I could use the A.C. top as a guide for my own creation. I love sewing retro patterns and knew I had one that would fit the bill.
I flipped through my pattern stash and found this out of print Simplicity 9930 top pattern. I love all of the tops pictured and will surely make the others in time. I especially love the puffed sleeve tee on the woman with the 'fro.


For my A.C. inspired halter, I decided to sew the top here. I love the angle of the neckline and shoulder exposure. The back is cut in the same silhouette.


I bought an embroidery stitches booklet at a resale store. It gives pictorial instructions on completing 100 embroidery stitches. I was familiar with some stitches, but not others and decided this top was a perfect pallet to try a new one.

I decided on the wheatear stitch.


 Here is the finished product!


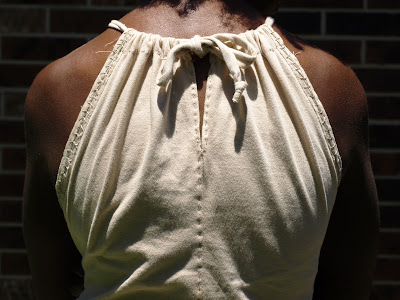
Stitch detail
Back Details


Here is my review:


Pattern Description: Misses’ Tops
Pattern Sizing: 14 with a bust of 36 inches. Based on those measurements I graded down by about four inches around.
Did it look like the photo/drawing on the pattern envelope once you were done sewing with it? Yes.
Were the instructions easy to follow? I didn’t use them as I hand sewed it in Alabama Chanin style.
What did you particularly like or dislike about the pattern?  
I love the angle of the neckline and ease of completing it. It is not a complicated pattern.
Fabric Used: Tan jersey cotton
Pattern alterations or any design changes you made:  I hand sewed it with button/ craft thread and felled the seams to the inside. I bound the armholes with bias strips and secured them using a “wheatear” embroidery stitch. I stitch I learned while making this!  
Would you sew it again? Would you recommend it to others? I am very happy with this top! I will make it again. It was really fast to construct. If I use a stitch I know, I can make one in an evening.
Conclusion: Good pattern to use as an A.C. base and the other intended tops. 

Happy Sewing!
Bianca

Thursday, July 18, 2013

Anna's Garden Alabama Chanin Sleeveless Tee Shirt and Skirt.

So my addiction has gotten the best of me again. Immediately after stitching up my Alabama Chanin Fitted tee and skirt I painted and got to stitching on my new project. This time it is the Anna's Garden fitted sleeveless tee shirt and short skirt. Both patterns are from the Alabama Chanin Studio Sewing and Design book.
I choose a navy top layer and a baby blue jersey cotton bottom layer. I airbrushed the fabric with my Anna's Garden stencil. I knew I would be sewing the design in the outside reverse applique technique. With this technique I make tiny cuts in the top layer shapes to prepare it for cutting out later. When I didn't do this, I found it difficult to separate the layers and risked inadvertently cutting the lower layer.

The stenciled fabric is almost to pretty to cut away!

Stenciled fabric with small cuts in the fabric to be removed.
I have found that stitching with a magnifying glass around my neck helpful as well. I would like to think it is because I stitch in low light, but I have enough Psychology education to not live in denial here; I am getting older and my eyes are failing me! In addition to needing a better visual field, this project took a toll on my hands like never before. My middle right finger got swollen and the knuckle bulged! I developed a numbing pain in my hand and through my wrist. I self-diagnosed that it was a repetitive motion injury that would require rest for healing. In the midst of my pain, I promised myself that I will rest it when this project is complete. (I can honestly tell you as I write this, I did not keep my promise).


Fabric hooped and through my magnifying glass.
Cutting away the top layer with safety scissors and embroidery scissors.
Scraps of painted bits removed.
Front Panel stitched and cut. Cue a chorus of angels singing Handel's Messiah!


I knew that I wanted a coordinating skirt to go with the finished shirt. I decided that the back panel of the shirt would be un-embellished navy jersey. I choose to use the light blue fabric for the shirt. I used the navy button/craft thread to stitch the skirt and felled the seams to the inside. I bound the waistline with fold-over elastic that I stitched using a parallel stitch.

Outfit back on B.I.R.A

Bound Waistline
 Here is the finished product!

Anna's Garden Sleeveless Tee and Skirt


Bound using the cross-stitch
Can you tell I love it!
Here is my review of the pattern:

Pattern Description: 
 
Hand-stitched Sleeveless Tee and Short skirt from Alabama Chanin Studio Sewing and Design
book.  

Pattern Sizing

S,M,L,XL I made a size medium in both.
 

Did it look like the photo/drawing on the pattern envelope once you were done sewing with it?
 

The shirts in the book are not embellished only on the front, but other than that yes. This top is embellished with the Anna's Garden stencil that can be made from the book. The skirt is un-embellished and looks like those in the book.


Were the instructions easy to follow?
 

The books give very clear instructions and inspirations for creating multiple garments. The garment construction is not difficult, but it is time-consuming. (Does time-consuming have a negative implication? It is engrossing, time-dependent, addicting, and repetitive.) The garments in the book require a great deal of work and the results appear complex because of the details, but broken down into smaller parts, easy.  

What did you particularly like or dislike about the pattern?     

I love everything about the patterns in this book. The outside reverse applique stitches up faster than some others in the book. With this stencil, you feel like you are making progress especially since you are working with a running stitch. My hubby says it looks more complicated to work that some of the other techniques.

Fabric Used:
 

Jersey Cotton in Navy and Baby Blue

Pattern Alterations or any design changes you made:
 
No alterations.


Would you sew it again? Would you recommend it to others?  

Yes and yes.

Conclusion: Great books and start to an awesome addiction. 

Happy Sewing!
Bianca

Saturday, July 13, 2013

100 inches of hems! Ultra Wide Leg Pants with a High Waist!

I was born in the nineteen seventy's. I love the fashion and hairstyles of that  and the previous decade. The large print vibrant fabrics, elaborate crewel embroidery on fabrics and the sassy Afro hairstyles all attract me. On one of my many resale/thrift store adventures I found some fantastic fabrics that reminded me of those decades.


Aren't they delightful! I didn't measure the lengths of the fabric, but I guess there is about 25+ yards here! I paid about a dollar a yard for it all! 

I was instantly drawn to this fantastic print. It is delightfully obnoxious with the floral motif and neon colors. I thought I would make some super wide pants in this print to wear with a black tank. 


Before I was willing to cut this fabric however, I decided to make a wearable muslin with the brown floral fabric of which there was about 10 yards.

Next, I needed the perfect pattern. I love to sew with retro sewing patterns! They offer styles slightly outside of mainstream fashion and the instructions are awesome! Short and to the point! I love it! So, I dug into my stash and found this pattern from 1972. A pair of high waist wide leg pants; it was perfect!


This pair of pants required 4 3/8 yards of fabric! Look how wide the legs are. I added a spoon to the picture to show scale.


The pattern is a size 14 and I needed to reduce the size to fit me. These pants are form fitting at the midriff and stomach then widen to the legs. I used my custom dress form to adjust the pattern to get the proper fit.

Pinned and on the stand

Pinned on the stand from the back

Hanging without the stand


After pining the front and back pieces together for my hip width, I needed to get an accurate crotch sizing. I determined that I needed a chuck of the seat removed to fit. I decided to remove this portion and simply taper to the inner thigh to retain the volume in the remainder of the leg.


After getting the proper fit, I thought these pants needed some pockets. So using the pocket pieces from this dress pattern, I added a couple to the side seams.
 

Granted, my usual hand stitching  projects take a long time, this was a super fast project even with the pattern adjustments I made. I think my completed pants a Dyn-o-mite!


Each hem is 50 inches!

Here is my review of the pattern:

Pattern Description: Wide leg pants and halter.

Pattern Sizing: Size 14 (I had to adjust it to fit)

Did it look like the photo/drawing on the pattern envelope once you were done sewing with it? 

Yes.

Were the instructions easy to follow? 

They were very easy to follow and the construction method made the size adjustments I needed to make easy.

What did you particularly like or dislike about the pattern?

I liked the high waist and super wide leg of the pants. In this era of skinny jeans and leggins, I wanted something different.


I disliked that the pattern did not have pockets.

Fabric Used: A retro cotton twill that I scored at a thrift store. There were no markings in the selvedge to identify it better.

Pattern alterations or any design changes you made: I added pockets to the side seams. I installed an invisible zipper and only hemmed it 1/2 inch instead of 1 1/4 inches the recommended.

Would you sew it again? Would you recommend it to others? I plan to make it again as well as the halter in the pattern too. I would recommend it.


Conclusion: Good pattern, fun pants! 


Happy Sewing!
 The Red Point Tailor nominated my blog with Super Sweet Blogging Award!

super-sweet-blogging-award

This is my first nomination! I am so excited that this little blog is getting around!

Now the rules:
THE RULES: Copy & Paste This Whole Post and Replace All Your Information — who awarded you, for example.

1. Thank the Super Sweet Blogger that nominated you.
2. Answer 5 Super Sweet questions.
3. Include the Super Sweet Blogging Award in your blog post.
4. Nominate a baker’s dozen (13) other deserving bloggers.
5. Notify your Super Sweet nominees on their blog.


THE 5 SUPER SWEET QUESTIONS:
1 – Cookies or Cake? Cookies
2 – Chocolate or Vanilla? – Chocolate!
3 – Favourite Sweet Treat? – Cheez it bark by Vanilla Sugar
4 – When Do You Crave Sweet Things The Most? – Every day of my life!
5 – Sweet Nick Name? – Don't have one.

Now the nice part. My nominees! (I know it is nice to nominate others. I really do. But the thing is, I am a blog stalker. I have many blogs I like to read. I have commented on some and not others. I see my blogger stats and blog comments so I know I am not the only one. The thought of posting the nomination on their page makes me feel so anxious! I know it is insane! I write a blog and put myself out there, but it makes me feel exposed. It's like running up to the boy you have a crush on and saying, "Hi, I like you." :) It is so not like me to do that. Then, I reflect on the warm fuzzes I got when The Red Point Tailor told me of the nomination and decided to bite the bullet. :)

So here are my nominees (not 13, but a start,) in no particular order:

Hi, I like you:

Ten Thousand Hours of Sewing 
Vanilla Sugar
Bakerchet
Fancy That
Natural hair rules.
Natural Mommy
Craftiness is not optional
Sew tell me

Don’t forget to notify the bloggers you have nominated!


Have a very sweet week!

Happy Sewing!
Bianca

Wednesday, July 10, 2013

The Tie Neck Top Simplicity 0273

Every time  I begin a blog post I struggle to find a suitable introduction. I feel the need to explain how and why I have come to construct the garment I have made. Am I going to an event? Is it a gift? Who is it for? Let me let you in on a secret, I don't have a reason most days! I love sewing! If I find a pattern or fabric I like, I use them! I am a stay-at-home mom of two; I don't go anywhere! Where I do go usually doesn't require a dress code beyond jeans and a top! When I sew, I do it for the love of sewing. No other reason!
That brings us here to the tie neck top from Simplicity. I purchased this in the early summer and recently made it. As I prepared to write this review, I couldn't find it on their website or on patternreview.com. Turns out it has been repackaged as Simplicity 1661. (Not sure which is chicken and which is egg). Below is my review and my project photos.


Pattern Description: Misses’ Top with Sleeve Variations

Pattern Sizing: 6-14. I cut the 10.

Did it look like the photo/drawing on the pattern envelope once you were done sewing with it? Yes.

Were the instructions easy to follow? They were very easy to follow.

What did you particularly like or dislike about the pattern?


 I liked the details of the top. The peek-a-boo sleeves, the tie neck, pleats and the back slit. I like that there are many variations possible in this pattern.
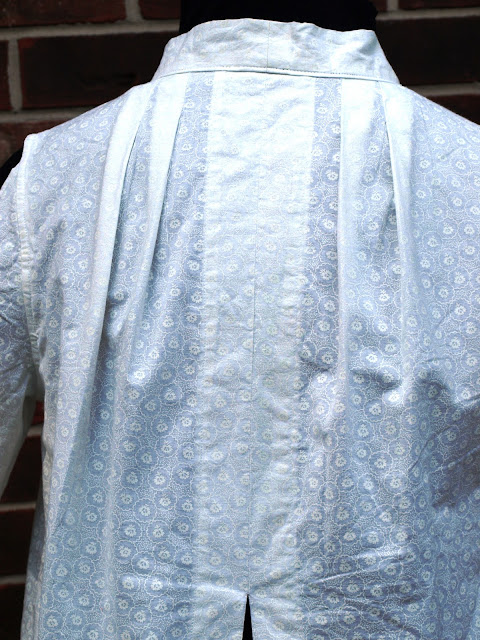
Once I made the top, I decided that I do not like the back slit of the top. I think it goes up too high and causes the fabric to sit in an unflattering way.

Fabric Used: A tone on tone white cotton with a circle, flower motif.

Pattern alterations or any design changes you made:  None.

Would you sew it again? Would you recommend it to others?

  
I will make it again in a lighter weight fabric and I will omit the back slit. I may cut the 8 next time, but I am still on the fence about that. It is a bit billowy in back and I am not sure if that is because of the slit or the size. 

Conclusion: Good pattern with unique variations.
Peek a boo sleeves

Back Slit that I will omit next time.

The slit is really long

Sleeve and neck tie
Pleat details on back on my dress form

All tucked in.
Happy Sewing