Pages

Friday, August 21, 2015

Another Dottie Angel Frock and a Faux Frock for Little Miss


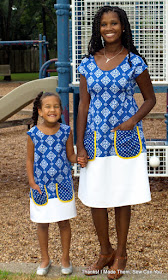
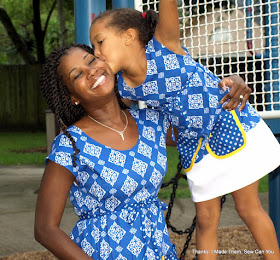
I really enjoyed my recently made Dottie Angel Frock and decided to make another for myself and another for my "Little Miss".


We had lots of fun in our matching Mother's Day dresses so I decided to make identical dresses this go round. The blue fabrics for these dresses are from the Lisette line and purchased from JoAnn fabrics last Fall. The white on her dress is a cotton sateen and the white on mine is a white cotton with a slight texture. 


I made this dress as directed by the pattern this time. I cut the size small in all pieces and sewed it with French seams. I find I prefer the fit of the first dress that was a result of a cutting error. I think the white contrast  portion of the skirt is too wide. It draws undue attention to my toothpicks.


I also feel there is extra fabric under the bust that makes for a less flattering fit. I cut the ties to the length of the large. This length allows me to tie it around the front for an empire look. These fit differences are not deal breakers by any means. I enjoy both dresses, but like I said, prefer the fit of the xsmall- small size combo. 


 To make the dress for "Little Miss", I used Simplicity 1704 as the base with minor modifications. 


I added ties to the side seams.


And yellow bias trimmed pockets 

6-inch wide square with a tin used to shape the curve.


I enlarged the back neckline by a graduated 1.5 inch slope. This allowed me to omit the zipper.
I trimmed the neck and arms of her dress with bias tape rather than the facings suggested by the pattern. 


We love our dresses! She wants to wear it everyday and wants more! I will likely make others for her, but I may be done with this dress for now.

Happy Sewing,
Bianca


Thursday, August 13, 2015

Hand- Sewn Reverse Applique and Applique Tops with Free Image Download.

I wish I was a regular yoga exerciser. I like the idea of being the type of person that is zen. meditative and relaxed. I own a yoga mat and I've attended a few classes. Every time I do I realize it hurts it's not as easy as it looks and I would rather sweat hard for 30 minutes then be silent for an hour.

I recently had reinvigoration of the idea of doing yoga. There I was, downward facing dog, staring at my yoga mat. Sweat beading on my brow, wondering if I would get to the point when this would be fun. Suddenly, it hit me! The mat I have been staring at would make an excellent stencil! With a blast of creative inspiration, my burning limbs and taut muscles suddenly did not hurt so much. 

Using the stencil making steps I previously wrote in this post; I got to work. I photographed my mat and manipulated the image in Publisher to get the 18in x24in image to use as my stencil image (Thanks Dr. Fun).  


I decided to use my stencil for shirts hand-sewn in reverse applique and applique techniques on cotton jersey. I will show the reverse applique shirt to begin with. I decided to use my trusted vintage Simplicity 9300 pattern that I used to make a halter top.


I have an airbrush and love the results painting with it produces. It is however, 100+ degrees in my Texas garage. I was not willing to spend any time in there to paint fabric. I also know you may not have one, so I wanted to show an alternative. 


I applied a light layer of spray adhesive to the back of my stencil and positioned it on top of my fabric. This helps me get crisp edges around the shapes and helps the stencil stay in place when using an airbrush.  Using a 3-1, paint to water ratio, I thinned it out a bit. Using the paint as is, makes the fabric less flexible than I like. (Okay, I really didn't use that ratio. I just poured about an inch and a half into another bottle and added some water and shook it!). sprayed multiple light layers to get the saturation I needed taking care to let each layer dry before the next. 

Next, I cut the front of the shirt and made a tiny hole in each large shape. This makes the cutting out easier later. I then basted it to the red backing layer at the arms and neck.

Stenciled top layer basted to the back
  
Shape with hole to aid in cutting later.

I prefer to join my layers while it is in an embroidery hoop. Using button and craft thread, I sew a running stitch around each shape. I tie a double knot to secure it after each shape. Using the hole I previously cut as an entry, I removed the middles leaving about 1/4 of the silver paint.


Here is the completed shirt.

I sewed the internal seams on my machine and hand-sewed the external seams laying them down toward the back. I really like the curved hem on this.


I bound the neckline with a bias strip and secured it with a herringbone stitch. I am still working on getting it to slant less.


I really do enjoy the puff sleeve on this.


I am very happy with this result. The bold red is very striking when paired with the silver paint and black fabric. This stencil size is large and relatively fast to sew. 
This look can be created using a tried and true t-shirt pattern. Use a dinner plate to cut the curve of the hem and end your stitching about 8-inches up.

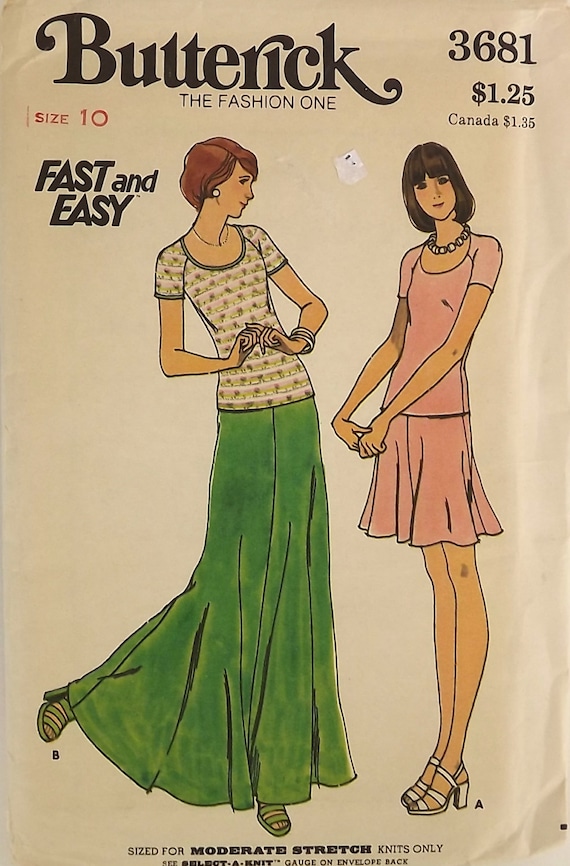
I enjoyed this stencil so much, I made another in the applique technique using vintage Butterick 3681 to make view A. Mccalls 7093  is a currently available close pattern match.


     Vintage 70's Sewing Pattern, Top and Skirt, Size 10

The beginning of the process is the same without cutting a hole in the shape before sewing the layers together. For the applique, I cut around the shapes outside the gold paint by about a 1/4 inch. All the outside fabric is removed.


The internal seams of the top and skirt were machine sewn. The visible seams are laid down and hand-sewn. The neck binding was secured using the herringbone stitch.


I like the depth of the neckline, raglan sleeve with a shoulder dart. The sleeve and bottom hems are left raw; they will curl when washed. Speaking of washing, I machine wash on delicate inside out. The quality of the stitching and paint have not been compromised  in my many hand-sewn garments. 


The texture in this effect is so fun, isn't it? 

If you want to make these tops, or some other garment you can! You can download the pdf image of this stencil for free in My Craftsy Store the link is in the right column. It is a 6-page landscape layout that you can download, piece together and make.  If you use it, please share your projects with me!

Happy Sewing,
Bianca


Sunday, August 9, 2015

What the frock? Simplicity 1080 Dottie Angel Dress

Hello friends, I am back from my brief blog departure. I took a break to have a medical procedure. All is well now, I am feeling great and ready to get back to sewing. 

You all know I like kind of weird, slightly unusual clothing and fabrics. Not out of this world and avant garde, but just slightly quirky. You can refresh your memories with: my adjustable hem Vogue dress, my Ikea button dress my vogue Cirque dresses and my Twister Mat Raincoat.

While out resale shopping last week, I stumbled across this funky fabric. 


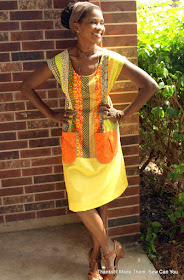
I got four yards for like $3 and couldn't pass it up. The colors were fun the print clearly retro '60's or '70's. It is just slightly ugly and I love it! My ever helpful daughter wondered what I would make and suggested a tablecloth and table runners for Halloween :).  I had something a little more wearable in mind. This Simplicity "granny chic frock" pattern was at the top of my list. Isn't it adorable?


I saw this pattern paired with my fabric to make a nice wearable muslin for future dresses. I quickly got to work finding coordinating fabric. I chose a yellow with white polka dot for the contrast skirt and a small scale orange print for the pocket.


The construction is fairly simple if not slightly different than typical dress construction. 

It calls for bias trim along the pockets. 


Bias trim to finish the neckline and sleeve edges.


It also suggested bias trim along the bodice and contrast seam. I omitted this step and edge finished the seam with a serger. The pattern also called for French seams on the side seams. I chose to omit them and sewed a regular seam. This was a necessity due to error on my part. The sizes for the front pattern are single sized. It was my intention to cut the size small based on my measurements. "Little Miss" came into the sewing room to help and I got distracted. I ended up cutting the extra small for the front and the small for everything else. 

I did not notice this error until it was time to construct. This meant that I needed to make up the fabric loss. To do this, I simply sewed the front to back at the side seams with my serger. I used the distance from the edge of my serger foot to the needle as my seam allowance which resulted in about a 1/4 inch seam that I reinforced on my machine. Given the ease in this dress I don't see it as a major fit problem. As a matter of fact, it fits just right to me.

I like this pattern. I really like the tucks along the bustline to give definition where darts would normally be. In addition, the construction allows you to insert the ties within to tuck and not the side seam.

Tucks and tie. 
I like the wide scoop of the neckline that is not indecent when leaning forward. 


I like this little frock. More than that, I like this pattern. If my fabric choice is not your cup of tea, do not let that dissuade from making this one up. 


I can just see this one with a long sleeved top, tights and boots come Fall. Stay tuned for an upcoming variation in a subtle color scheme.   


Before making this, I polled the Thanks! I Made Them Facebook Page on my fabric and pattern pairing. Some were skeptical others thought it would work. What do you think?

Happy Sewing,
Bianca