Sunday, July 13, 2014

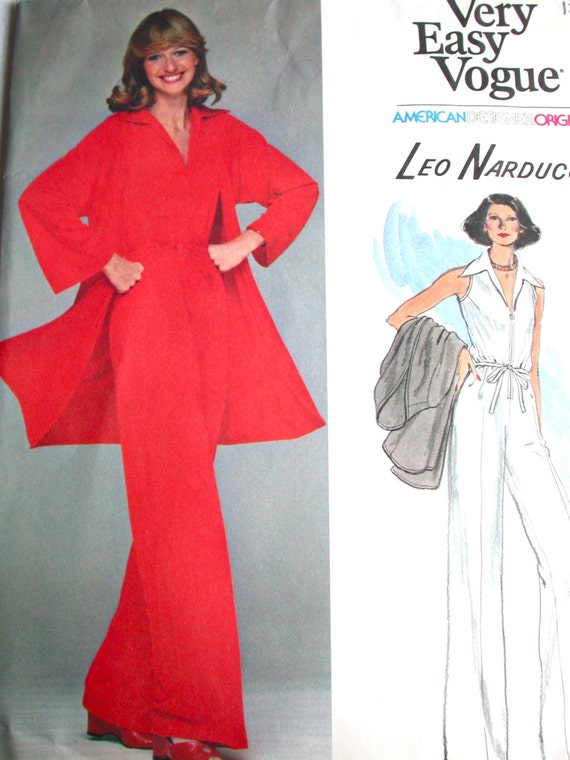
Back in my Time Machine with Leo Narducci Vogue 1389

In my recent quest to find jumpsuit to make, I discovered that I had five vintage patterns in my collection. Some of these were inherited, others bought in a bundle with ones I loved. The Pattern Stash Contest on PR, had me looking in my stash again to make something I was once excited about. I enjoy wearing my Simplicity Jumpsuit  and decided to make another. This time I decided to use my Vogue 1389 Leo Narducci Jumpsuit pattern.

                       Vogue American Designer Pattern No 1389 UNCUT Vintage 1970s Size 12 Bust 34" Very Easy Leo Narducci Sleeveless Jumpsuit Playsuit and Jacket

This sleeveless jumpsuit has shawl collar with front slit, front zipper closing and cutaway armholes with self bias bands. The self belt holds in fullness at waistline. Included is a slightly flared cardigan jacket has front and neckline band, cutaway armholes and full-length sleeves. 

When I first saw this pattern, I liked that the jumpsuit pieces were continuous, without a separation at the waist. Looking at it, I was not crazy about the width of the collar. I chose to sew it as intended before modifying it. I really wanted to make this in a white cotton spandex, but I did not have enough of it in my stash.

If you are a follower of this blog or have liked the Facebook page, you know I have a vast fabric stash. After my recent acquisition of 120 cuts of fabric in various lengths, types and colors, I could not justify purchasing fabric for this garment. I opted to use a navy blue seersucker from my stash. I choose it because I wanted a fabric that would be cool in the Texas heat and need little ironing.


The instructions, as always, were easy to follow. The only exception was the facing illustration. The picture and language were a bit tricky for me. I do not think it would be a problem for most. I am a visual learner and the illustration was simply not clear to me. I just thought about what needed to happen and figured it out fairly quickly.


The instructions required installing a regular zipper I chose to use an invisible zipper. I am torn about the depth of the neckline. I think it is about 1-inch to low for my taste showing cleavage. It does not gape, so with a blue bra, I should be fine. I wanted a deep hem so I added  three inches to the leg length before cutting it out.

This was a fast project to make and I am happy with the result. It is the kind of garment that requires an Afro puff and ginormous sunglasses.


If you want to sew in your time machine, this pattern is available through several Etsy vendors.

Happy Sewing,
Bianca

Tuesday, July 8, 2014

Stash busting with a bit of whimsy!


I love long weekends. They are great for extended family time with my hubby and kids. It is also a great time to put a dent in delayed sewing projects. Here are the fun little projects I worked on.


First up is a jumper I made this out of print Butterick pattern from my stash.
 
I thought this pattern was a fun way to use the button fabric I bought at Ikea earlier this year. It was the last on the bolt and when I bought it, I had no idea how to use it. The fabric was just too cute to pass it up. I made up this dress and wrote a review you can read about here.


It is so fun to wear. It is comfy, fun and makes people smile when they see me in it.


Next up, I made an easy breezy outfit from two more patterns from my stash.

View 3
 

 I love the 1980's feel of this top with the side tie.

For the neckline and sleeves I opted not hem them. I instead chose to edge finish it with a scallop stitch. 


Here is how I did it:

I pinned about 1 inch of wash away stabilizer to the edge.

I then stitched a scallop stitch. I tested the widths and lengths of the stitch options and chose to keep the standard settings.


Once it was all stitched, I trimmed close to the scallops and rinsed the stabilizer away. I did not wash it in the machine, just ran it under the sink and hung it dry. It is a bit scratchy now, but I hope it will softer in the actual wash. It was not so uncomfortable that I could not wear it.


The shorts were made using this fun pattern.


It is three simple pieces with a zipper in back. The construction was simple and just what I was looking for in a summer short pattern. I wrote a brief review that you can read here.


I also got some work in on another jumpsuit that I will share later this week. All in all, it was a fun and productive weekend. I hope you can say the same.

Happy Sewing,
Bianca

Tuesday, July 1, 2014

The Drape Drape Collection


I love surprises. I have very specific tastes and usually have some creative plan in the works. For this reason however, people in my life do not normally surprise me, they simply ask me what I want when they want to give me something. Last week, my friend Hillary sent me a wonderful surprise package in the mail! It was the Drape Drape Collection of books by Hisako Sato.


It was a wonderful surprise and great opportunity to try garments from books I have long admired, but never tried. The patterns in these books appear intimidating and were previously only published in Japanese. Now they are in English and gifted to me, I took the opportunity to dive in.


Full disclosure, I usually have visual orientation and directional issues. For this reason, reading the diagrams in the book was more difficult for me than they would be for most. The illustrations and cutting layouts for some garments make me feel like I did when looking at Magic Eye posters from the 1990’s. I stared at them for a long time until my eyes cross, then for a reason I cannot explain, it suddenly comes into focus and then, I know what needs to happen. 
 
Given that this was my first project from the books, I decided to use Drape Drape 2 to make No. 2 One-piece side drape top.


I like that this is a simple top that looks more stylish and complicated than it is. I liked how easy it was to construct. It has one side seam and two shoulder seams. It is one of the easiest pieces to make in the Drape Drape 2 book. Based on the measurements, I chose to cut the S/M of a lightweight polyester knit I purchased at an estate sale.

I dislike tracing and piecing patterns together. I HATE this part of sewing patterns and have passed on wonderful patterns if this is a requirement. I knew if I wanted to enjoy this great gift I  had to get over it. The patterns are layered upon each other and required careful concentration to identify the correct cutting lines. They are color coded, so that helped a great deal.


I used freezer paper to make the pattern and had no trouble once the lines were identified. I suggest you piece your paper together to accommodate the shapes you are tracing first. You may be tempted to trace the smaller width of your paper then tape them together after. I found it better to work with the larger unmarked sheet than try to match the lines once traced.
The instructions on this top were very easy to follow, but I chose to forgo them for this simple top and stitch it up the way that made the most sense to me.


I stitched the shoulder and side seams together before adding the binding. The pattern suggests doing it differently, but I found it simpler to stitch right sides together and flip binding to inside and then top-stitching.

Serged bias binding before turning it inside.
I cut three and made two of these tops in different weights to experiment with the draping (obsess much?). Here is the Seafoam version with the most drape. I am right-handed and prefer to wear the drape on the left, but it can be worn either way.


I really like this top. It has the comfort and ease of a t-shirt, but with a bit of sass. I  do not think I could get away with wearing this to Kroger for milk. I am sure I would not have to push my cart though ;p . I decided to make a casual one in a heavier cotton jersey. I love it for its everyday wear-ability, though the drape is firmer. 


I LOVE these books! I have flagged so many garments to make in the near future. I am so grateful for this gift. It has pushed me to deal with my least fun part of sewing with great results. This gift has inspired me to pay it forward and send a surprise sewing gift to someone. I am looking forward to brightening someone's day and advancing their  skills as these gifts have done for me. I encourage you to do the same.

Happy Sewing,
Bianca


Wednesday, June 25, 2014

Hand-Stitched Top with Asymmetrical Hem Skirt

So, there has been some very productive napping in our house. I began sewing this hand-stitched top and coordinating skirt two weeks ago and wrote about it here. I expected this project would take me six weeks of hand-sewing, but it went faster than I thought. I finished the top in 2 weeks putting in about 20 hours of stitching. The skirt took considerably less time, only 1 hour.

I had been auditioning a new t-shirt pattern. After not finding a fit I loved, I hit my wardrobe and deconstructed a thread bear shirt I wore into the ground. I used that as a pattern and stenciled grey jersey fabric that I  scored on one of my thrift store trips. I used silver airbrush paint and a home decor stencil my hubby purchased at a craft store. I chose a cranberry colored jersey fabric from my stash  for the bottom layer of my double layer reverse applique shirt.


Airbrushed with silver paint.

Stitching along the outside of the shapes before cutting.
I made quick work of the stitching and was undecided about the sleeve option, cap or sleeveless. I polled my friends on the Thanks! I Made Them, Sew Can You Facebook page. The responses were split and I decided to go with a sleeveless option. I planned on a straight skirt of some kind and felt the sleeveless choice would maintain the silhouette I wanted.

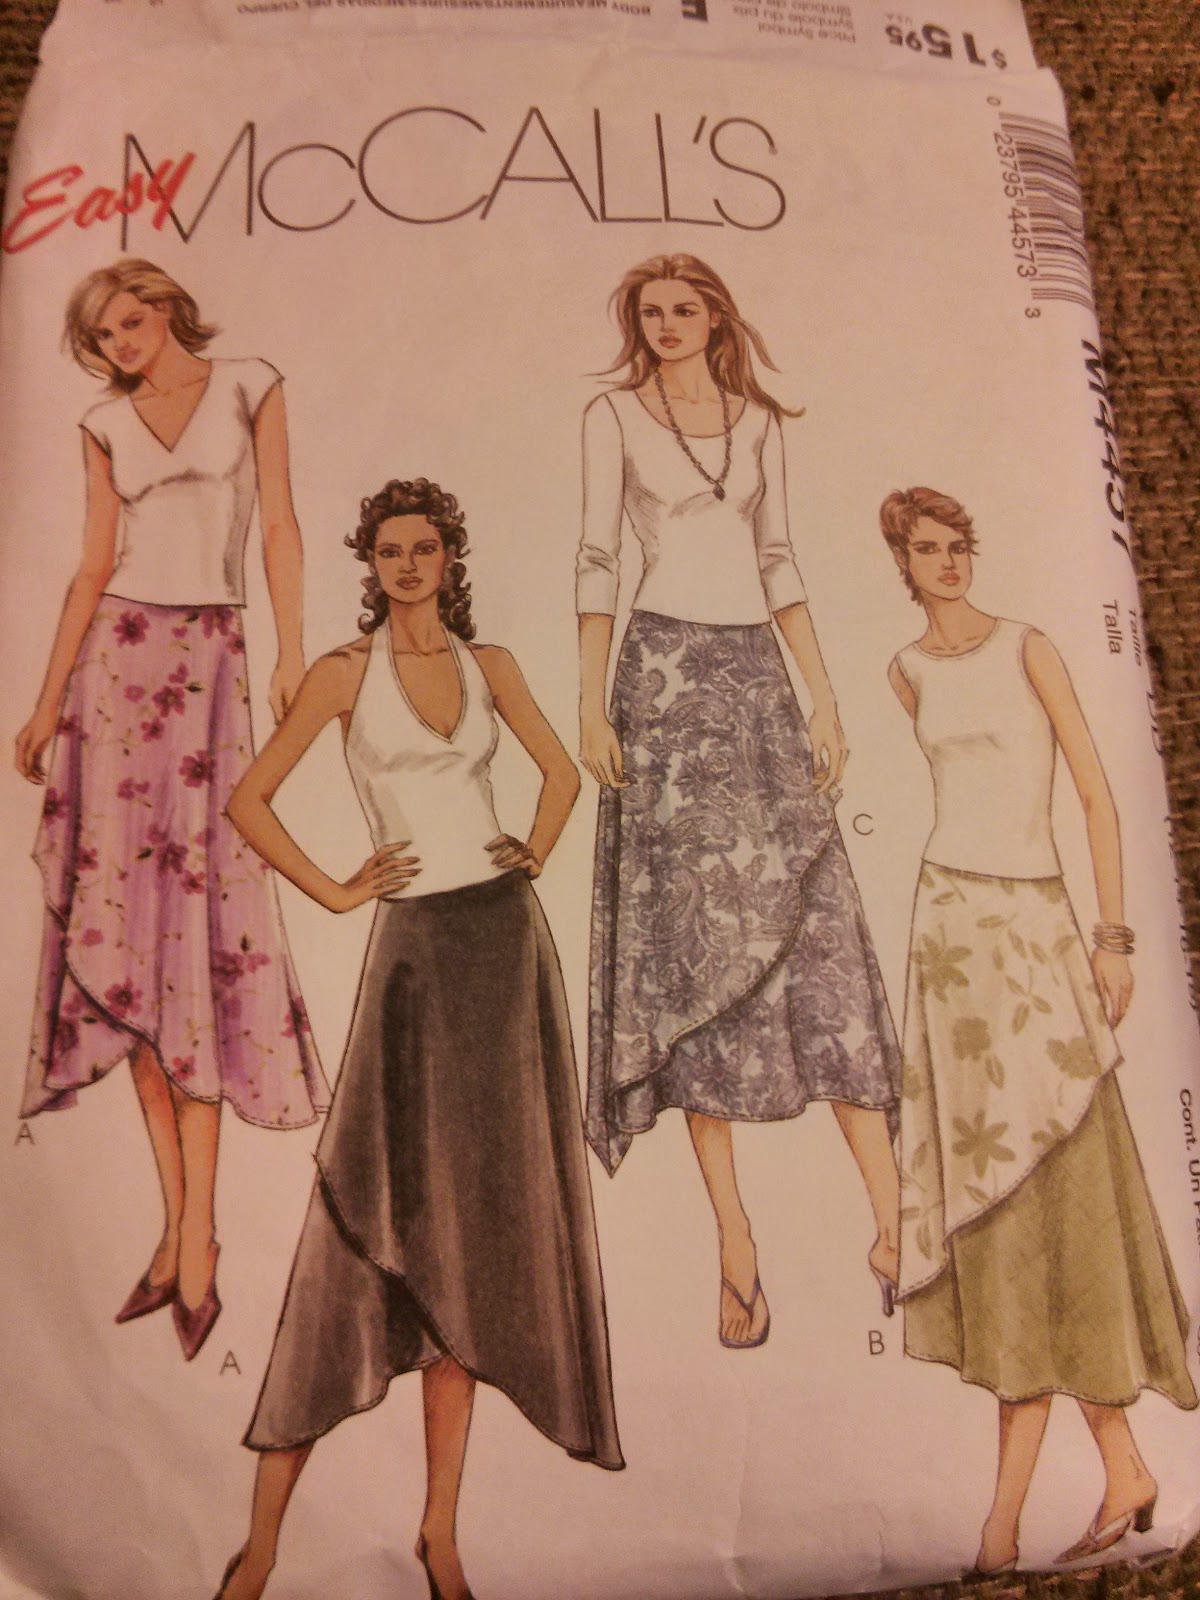
For the skirt, I explored my pattern stash and found McCall's 4457. I decided to make the top portion of view A for an asymmetrical hem skirt.


I hand-stitched the two side seams and applied fold-over elastic to the waistband using a machine applied Cretan stitch. I have a Brother SQ 9000, but other machines will have this stitch.
I chose stitch "51" and increased it to as long and wide as it goes.

The density of the double layer of elastic and jersey was the correct thickness and sewed with ease. This was so fast and easy I may never hand-stitch another waistband. I do not recommend this technique for the bindings because those layers are too thin. They are also visible and the appeal of the hand sewing would be lost.  I left the hem unfinished as it will curl with time.


Machine applied Cretan stitch on fold-over elastic waistband.


Hem left to curl with time.

Here is the finished outfit.


Skirt spun for a high-lo look.


Herringbone Stitch applied to bindings.
I am happy with this new stencil. I have some issues with it, but I want to hold off evaluating it for now. I want to paint another piece to see if my concerns will be resolved with a second run. 

Thanks for stopping by,
Bianca


Thursday, June 19, 2014

Thrifty Thursday

I enjoy shopping for fabric and patterns at resale stores and estate sales. I always feel like I am giving new life to a sewing project for someone who has passed on. The patterns are different than the current fads and the printed fabrics are usually fun. This week I have purchased some real gems.

I am a sucker for a maxi dress!

I like the bodice details here. I like the top and view A in the maxi length without the gathered panel.

Love, love, love the maxi length and those gathered pockets are too cute!

I was on the fence about this one, but I can work with it.
Now, the fabrics!
The first three fabrics can from a local resale store. The other fabrics are from an estate sale and yardages range from 2-5 1/2 yards. I give a special thank you to Rhonda and Donna at Blue Willow Estate Sales for giving me a heads up on this sale. They are great, know what I like and educate me on treasures to be found. 

Embroidered Eyelet knit

Printed linen
Batik

Houndstooth double Knit.

Floral knit

Polyester knit that would work well as a DVF wrap dress.

Rayon print I envision as a tunic with an detailed neckline...

I do not usually sew border prints. This should be fun!


Fun Print

Funny, I did not notice the stripes until I took this photo.

No plan for this beauty yet, but I love the bold flowers.
I see the irony of all this fabric accumulation on my part. I do not have enough time to make them. I can hope that when my fabric stash is being fawned over at a sale, it will be with fondness for the very old lady who did not have time to sew them all.

Happy Sewing,
Bianca