Friday, December 6, 2013

Houdstooth Bow Bum Pants with Invisible Zipper Instructions.

While going to a meeting at church, I spotted a woman in the parking lot wearing a fantastic pair of pants. I had to know more and ask her about them. I made a u-turn and parked to get a closer look. It happens to me a lot, but I felt kinda silly accosting a random woman on the street to talk about her clothes. As I got closer and the person turned, I realized I knew her. Luckily, she is in the in my Sewing for Starfish Kenya Journey Group and knows I am sew crazy. She was wearing a wide leg pant in a multicolored chevron print. They were adorable and I decided I needed a pair.

When I returned home, I immediately searched my stash to find a pattern I could use to create my version. I found a retro Butterick 3272 pattern. I love that this pant is made from a one piece pattern with a back zipper. It also has a casing for elastic in the band. I was not excited element, but I knew I could work around that feature.


I do not have the chevron fabric similar to those of the inspiration pants in my stash so I am shopping around for the perfect fabric. In the meantime, I decided to make a muslin with fabric I had on hand. I had some extra houndstooth fabric leftover from this dress,  and I thought it would work. It is a double knit with just enough stretch to move while keeping its shape.

The pattern instructions were super easy to follow and called for the installation of an invisible zipper. Every time I install one, I have to pull out my instructions to refresh myself on how to do it. I decided to include my steps here for my future reference and yours.
Pin right side of open zipper to the right side of fabric one fabric opening. in this case the right side.


Using your regular zipper foot stitch zipper in place to secure it.
Attach your invisible zipper foot. This is a universal foot you can purchase at any fabric store and attach like your other feet.
Position your zipper teeth in the right side grove and stitch.
When you get close to the zipper pull, keep your needle down and raise your foot to close the zipper. This allows you to sew to the end of the zipper.
Look how close to the teeth it gets.
Repeat the steps on the opposite side.
Voila! All done!
After installing the zipper, I continued construction on the pants. I discovered that they have a higher than expected waist. Additionally, because of my fabric choice and size, I did not need the elastic casing. I fit the pants and had a flash of inspiration! Why not use the casing to add some pizzaz to the back of the pants! I threaded a purchased sequin ribbon tie through it and tied a bow in the back.

B.i.r.a wearing the bow back pants.
Side view.

Full back view
I think this is super cute! For someone with just a little on the back step, I think the bow adds some fun interest. I like that I can change the tie for a pop of color. I can also remove it altogether to wear it flat as seen here in another peplum cardigan  I made using Mccalls 6844. The review for it is here.


So, this began with a quest for some funky chevron pants and turned to these fun Houndstooth Bow Bum pants. I am very pleased with the fit and ease of construction. I will likely lower the waistline and depending on the fabric, omit the zipper altogether when I make the inspiration pants.

Be sure to check back for the chevron pants update.

Happy Sewing,
Bianca


Saturday, November 30, 2013

Beaded Neckline Maxi Dress in the Alabama Chanin Style

As I have said before, I love sewing retro patterns. I especially like imagining them in the Alabama Chanin style. I inherited my mother's pattern collection and she had many great patterns from the 1960's and 1970's. She made some of them and others she had not. I feel a responsibility create some of the garments she did not have an opportunity to create. 
There is a Vintage Contest over on Pattern Review that was a perfect chance to sew retro with an A.C. twist. I dove into my pattern cabinet and found this Vogue Americana/Carol Horn pattern. It is a high fitted and flared dress in mid-knee or evening length. It has a u-neckline, cut-away square armholes, pockets in side seams and princess seaming and top stitched details.


I love a good maxi dress and decided to make this one in  a double layer of blue cotton jersey. This meant I would not need the dress faced so I omitted those pieces. My pattern is a size 10. My size in this pattern and given that I am using jersey, should be a pattern size 8. I chose to omit the zipper and stitch the dress with a 1-inch seam allowance to account for the stretch in the cotton and adjust the size down.


I knew I would sew this in the A.C. style but given the extensive length of the seams I opted to machine sew the interior seams. I lengthened my stitch to the longest possible and used a knit needle. This adjustment solved any wavy fabric problems I might have encountered otherwise.  I felled the seams to the inside of the dress and I used white button and craft thread to hand-sew the top-stitching. I also used my leather thimble to help with getting through the layers of fabric in the top-stitching. I found it much easier to do the top-stitching on the seams when the dress was flat. I sewed all but one side seam together, did the top-stitching, then stitched the final seam to close the dress. 

Top-stitching seams while flat
In keeping with the A. C. style, I used bias strips of jersey to bind the neckline and armholes using a parallel stitch. I used seed and bugle beads to embellish the neckline in the parallel stitch as well.
My handy dandy beading glove was perfect for this. I alternated between a small seed bead, a bugle bead, then a seed bead.  I am struggling to find the correct needle size to fit the interior circumference of the bead and will accommodate the thickness of the button and craft thread. I found a needle thin enough to fit the beads, but I had to enlarge the eye of the needle. The needle was so thin it bent as it went through the four layers of fabric. This made the beading slow going.  If you have a combination that works, please share. 


The red thread seen in the photo above is my basting thread to secure my binding in place. I find it easier to remove the thread when it is different color
 I decided not to hem the dress as it is jersey and will curl over time. I am very happy with the end result. I am working on a shrug to wear over it as the weather changes. Here are photos of the finished dress.

Dress Front


Dress Back
Beaded Neckline
Bead details
Top-stitching Details
 I knew I needed a cover up as the Texas weather changes for our 90 seconds of Winter. I wanted  something with coverage on my back and arms, but would not distract from the front. 

I found Simplicity 3533 in my stash and thought view E was a suitable choice. It was super fast and easy to sew. I made it in a single layer and did not hem the opening.  Beyond that, I made it according to the instructions.
 
                  Photo

Here is B.I.R.A wearing it. The good thing about having a body double, is that I can have a bad hair day and let her work for me.


Happy sewing!


Tuesday, November 19, 2013

Butterfly Wings Take Flight

Playing dress-up is one of the most favorite activities in our home. On any given afternoon, one would find our family playing hospital, library, school, or grocery store. The clear favorite, though, is "Fairy Princess." Over the last 5 years, I believe we have gone through at least 8 sets of dress-up, fairy, butterfly, and dragonfly wings. Invariably, our Little Miss plays too rough with them or they are to flimsy, breaking, warping, or twisting beyond use. With every broken wing, there is an accompanying desperate plea for me to repair them.

I know toys break. Some toys are made with inferior products, and these have a short short shelf life, which is inherent in their construction and composition. Planned obsolescence of these products ensures the life of the companies that make them.
With every new fairy movie, there is a push for new accessories. In my home, there is greater a push from Little Miss to purchase the new accessories to replace those that broke.

I grew tired of replacing and repairing things that are used in every day play. I shared this frustration with Little Miss the last time she requested yet another pair of dress-up wings. In her infinite wisdom she looked at me and said, "Why don't you just make me a pair that won't break and that I can wear all the time?"

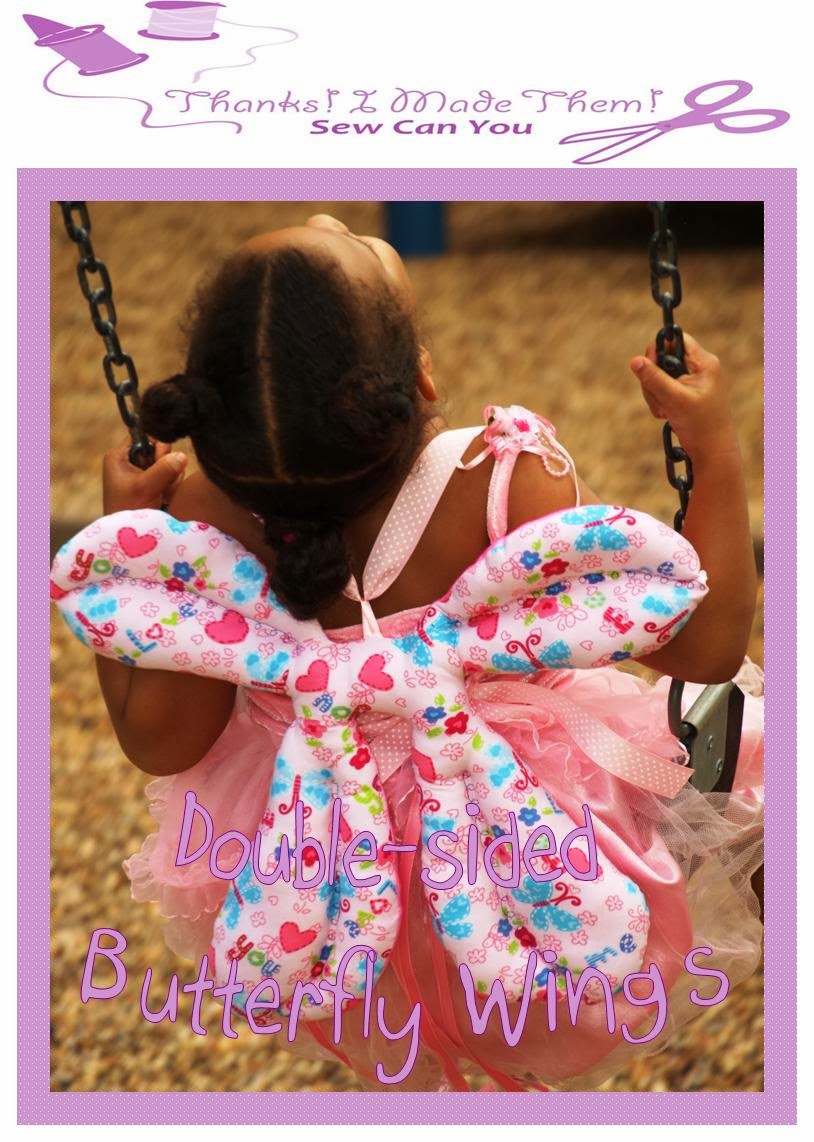
What a fantastic idea! After much planning, drafting, cutting, re-cutting and sewing up prototypes I finally found a design and size that does the trick. Introducing the Double-sided Butterfly Wings pattern.


These wings will spark imagination and creativity as your child “takes flight”. Your child will love the versatility of these double-sided wings that allow for personality expression in fabric choice. These wings come in two styles, one with stitching details on the wings and one without. You will love the durability of these wings. This pattern is perfect for the beginner seamstress and the stuffing task is perfect for little hands.


The pattern is available for sale in my Craftsy and Etsy stores! I know you will love these wings as much as we do.  They will make a fun gift for any occasion. I can't wait to see what your wings look like!

The Giveaway has ended! Thanks to all who entered.

Happy Sewing!
Bianca


Tuesday, November 5, 2013

Peplums Please!

Peplums have been trending this year and I have quite a few patterns in my stash. The Fall Collection of the McCalls Patten Company was recently released and they are showcasing them for fall. I was drawn to  Pattern 6844, a lightweight cardigan with hem variations.

M6844
McCalls 6844
As with most patterns I sew, I take a critical eye to it to see if I can make it in Alabama Chanin style. This cardigan was no exception. I decided to sew it in a double layer of hunter green jersey cotton from my stash. I used a double layer of fabric for all pieces with the exception of the facing and the peplum.  I have skinny arms and I wanted the sleeves to be fitted. I decided to sew the sleeves with a 1-inch seam allowance. I used my dress form to be certain to get the correct upper sleeve fit.

The Alabama Chanin company is moving to a machine sewn line called A. Chanin. Because are sewing some items on a machine, I could as well. I decided to sew the interior themes of this project on the sewing machine. I use a knit needle and a long stitch length and it came together pretty fast. I chose to sew all of the secondary stitches by hand using hunter green button and craft thread. I felled the seams to the interior of the coat and kept my knots hidden.
Tone on Tone stitches
The pattern instructions required interfacing on the facing pieces but I didn't think it was necessary. I used it here, but I think next time I will not. Also, the pattern claims that the front  does not meet but I did not find this to be the case. I made the size small and the found there was enough fabric to lap over itself. I think I need to think about way to keep it closed. I will wear it for a bit and see what needs to happen; maybe a belt, maybe hooks and eyes.

B.I.R.A Wearing the Cardigan
 I'm really excited with how they turned out it. I have gotten many complements and requests for custom orders. It is super comfy and great for twirling!


It don't mean a thing if it ain't got that swing!
Happy Sewing!

Thursday, October 31, 2013

Sewing for Starfish Kenya Second Session is on a roll.

Last summer, I began leading a sewing Journey Group at my church. You can read about last semester's progress here. We are at it again with another session and are sewing weekly until December. Anyone is invited to join with any skill level as long as long as they sign up before the group fills. Once again, the group filled up on the first day with people eager to sew for a cause. There is a wide range of skill levels and ages but a consistent level of enthusiasm!

We are continuing to sew shorts and dresses for the residents of the House of Hope at Starfish Kenya. This go round, we have started off spending the first couple of weeks just learning and cutting fabric. Next, we have moved onto the actual garment construction. It is really great to have varied skill levels in the group. The veteran sewits are happy to guide the novices and they are happy to be learning. The participants from the last session are thrilled to build on the skills they learned.

We are just getting into the swing of things, and we are all excited to keep working. Here are some work in progress photos. I will be updating as we move along.

Fabric cutting and cutting up!


I've got this!

So at home at the machine.

Some results and very proud women!


I am so excited to be working with such a delightful group of people! They are enthusiastic every week and generous with their time and resources.  We never seem to have enough time to work and I am always reminding them when it is time to leave. Fortunately, we still have many weeks to work and play together.

Happy Sewing,
Bianca