Monday, November 23, 2015

Hear Ye! Hear Ye! A Royal Knight Approaches!

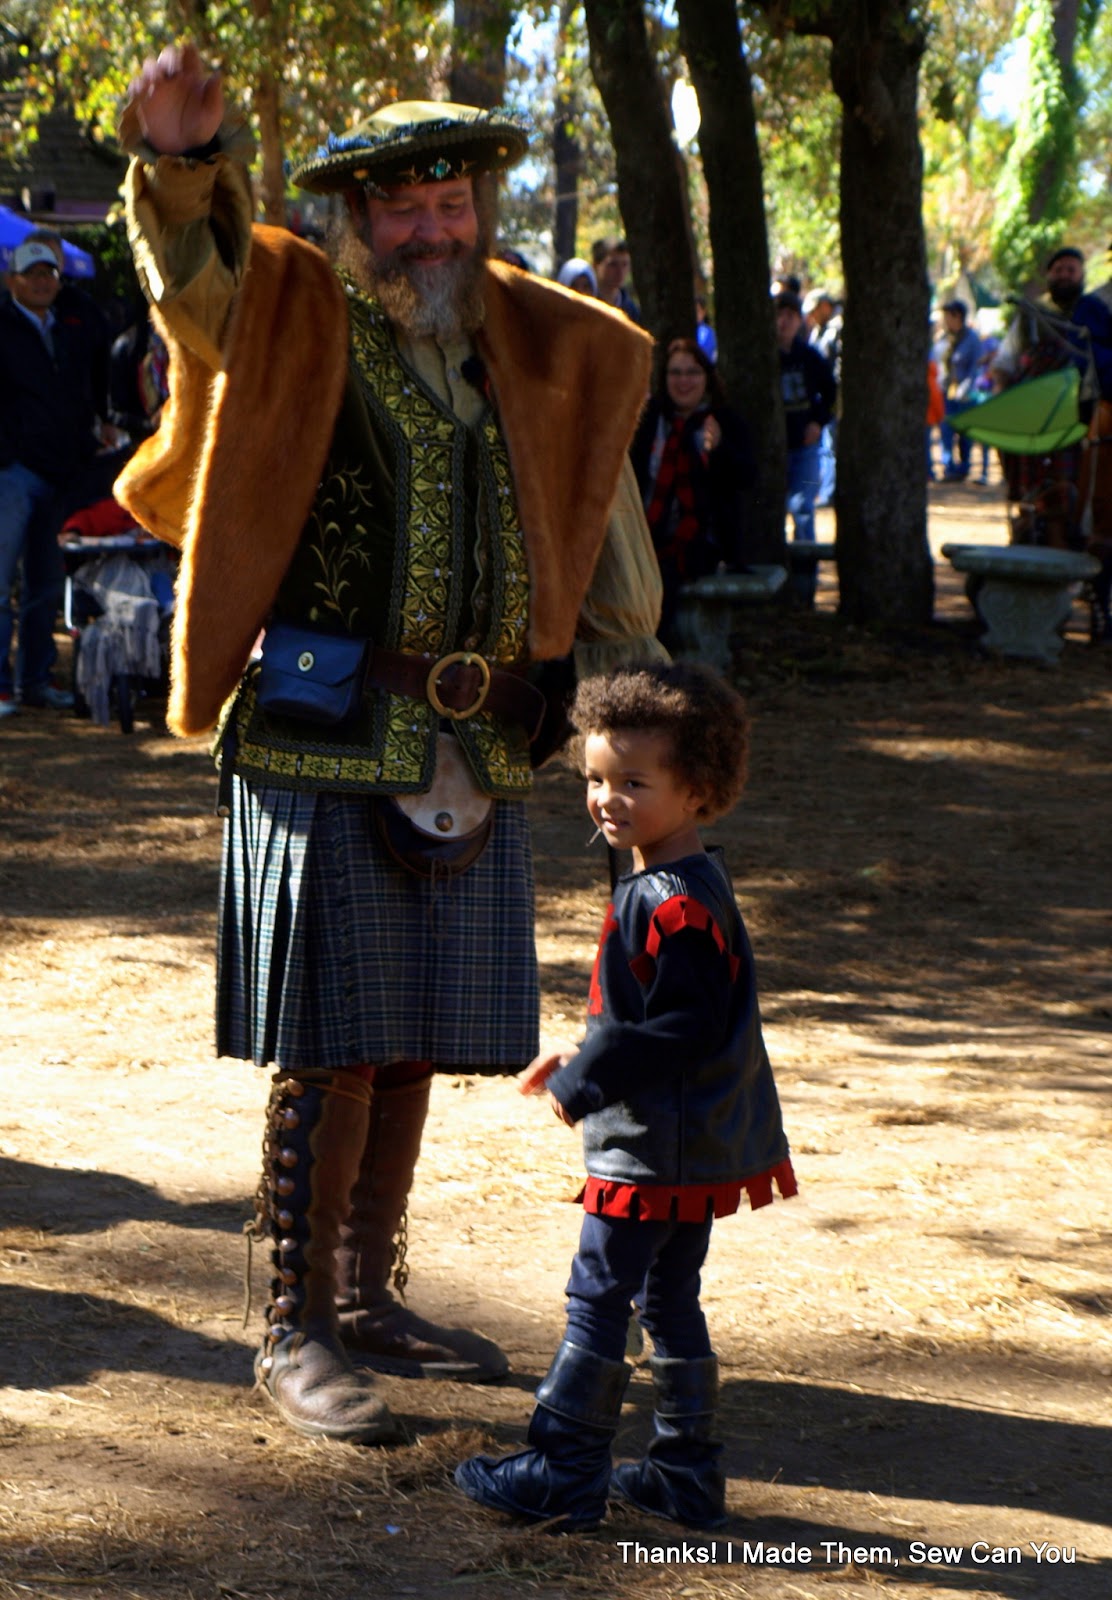
Happy Birthday to our Little Man! This darling little guy is 4 and celerated royally! For his birthday, our family took a trip to the Texas Renaissance Festival and we were accompanied by a brave knight!


Our decision to go was impromptu, but we decided to dress the part. I was pressed for time so I decided to make a costume for little man and build everyone else's from what we had on hand. Little Miss had a princess dress, so she was set. I considered this fairy costume for myself, but after checking the weather (40 degrees), I decided to refashion costumes for Hubby and me.


I knew Little Man's needed the most work, so i got started on it using Simplicity 5520.


For fabric I repurposed the leather from 2 well worn jackets that I purchased from a resale store for $.25 each! The black leather was intact, but had seen a lot  of use. I wanted the costume to look like he was a veteran swordsman who had won many battles, so it was perfect!


I cut the pattern as directed using the black as the base and the red suede as accents. The crest was secured with an adhesive designed for leather use. 


I decided to make a few changes to the pattern to suit my needs. That is why we sew right? I omitted the attached sleeves in favor of a fleece top to be worn underneath. I chose to finish the sleeve opening with bias tape. I am sewing this on my industrial machine, but you can use a home machine using a teflon foot and leather needle.


The pattern called for a hook and eye closure. It would have been impossible for me to attempt to sew through two layers of leather by hand. I chose instead to insert an elastic strip to the back top neck to allow for easy on and off wear. If you go this way, be sure to make sure it has enough stretch to get over your child's head.


Next, I worked on the helmet using a metallic silver knitI discovered in my stash! I was pretty certain he would not wear this for very long, if at all. He wants a huge Afro, so his hair is big. He also does not like his ears covered. He insisted he liked it , so I made it. 


I tapered the front a bit lower than called for in the pattern. He hates anything touching his face and this was the only solution I could come up with.  I also omitted the velcro closure in favor of elastic. Can you tell how thrilled he is with this?


In this project, I wanted to preserve as much of the original jacket as possible. For the boot covers, I decided to take advantage of the existing cuffs in the sleeves of the jacket. I turned the sleeve inside out and placed the pattern on top. Lining included, I cut the boot cover out. If you notice, the back of the cover (right side of the picture) is against the fold of the sleeve. I kept that in place and did not cut it open. This gave me one less thing to sew. The only part I sewed was the left side from the top by the clip to the point of the toe. The base was left open for the shoe. Because I kept the lining, I  basted it to leather once the front seam was stitched.


I used wide elastic to secure the cover to the shoe and again finished the edge with bias tape.


They pulled up over his leggings and covered his shoes comfortably. 


Every brave knight needs a shield. Lucky me, I found this shield in my local Goodwill. I removed the crest and applied my own. I reduced the pattern by about 25% on my copier and cut and the red suede for the applique. I secured it with the leather adhesive. 


He was ready to do battle! Within a few minutes of entering the festival, he was invited to help with a show; he was a good sport! 
        

For the Hubs, I made a self-drafted flannel tunic with grommets and leather ties that he paired with a loose fitting poet shirt and linen pants. Little Miss wore a princess dress she received as a gift.


For my outfit, I refashioned a peasant costume using a tiered skirt that I dyed navy blue from the original white. I paired it with a peasant top and a jersey shrug that I made using Mccall's 6845. For outfit cohesion, I also dyed the shrug.    
I added a bit of flair to my costume with this jeweled face tattoo.


I think the sparkle of this drew the attention of the performer of the Ded Bob show! He pulled me onstage to participate in an irreverent comedy show.


Hubs, did not get any still shots during the performance. He was busy recording video that will never be seen outside of our bloodline :). Here we are after the show. I think the Littles really enjoyed seeing me be silly, getting boinked in the head and getting laughs.  

The weekend was packed with lots of fun and new experiences for us all. Little Man is happy with his costume and I am happy with it too. If we are lucky, he will only grow up (not out) this year, so he gets more use from this.

Happy Sewing,
Bianca

Monday, November 9, 2015

It's All About Love and OOP Simplicity 5192

Why do I sew? Because I love it! I love to make fun and creative clothing using fun fabrics and long forgotten patterns. I get seriously excited about the process and super thrilled with the result. My friends know I am a sewing fiend and when they can, they feed my need.

This Spring, I got the sad news that a friend was leaving the country with her family. She could not take everything with her, so she wanted me to have her fabric. I was simultaneously miserable and elated. I vowed to put her fabrics to good use and do them justice. 


I really wanted to try my retro Simplicity 5192 pattern to make a fun tunic. You may remember I snagged this beauty in a recent stash building jaunt. I had planned on a Fall version of this tunic but, it is still sunny and warm here. I decided I am extending summer with this bold primary colored print with the repeat of "Love".


This dress came together really fast. It consists of front, back and facings for the armholes and neck.


The pattern gives the option for a traditional or invisible zipper. I opted for the latter to give a seamless back. I wanted this dress to be all about the print.
Back of dress on my custom dress form.
I was drawn to this pattern because it is a simple sheath with the flared sleeve detail. 


I love this pattern so much, I made another this weekend. I will post it when my photographer returns from preschool. Yep! These photos were taken by my 3-year old son! With such a fun dress, he wanted to get in on the action. He has quite an eye!


And he gives direction! "Now jump Mama!"


This pattern is out of print, but available in these Etsy stores. I have no information on the fabric so I cannot help you there (she says secretly glad to have all of it!). If you know anything about it, please share.

Happy and fun sewing,
Bianca

Saturday, November 7, 2015

My Fun New Purchases From Quilt Festival

So, I am still riding my excitement from The Houston International Quilt Festival. 


I met some really great people and bought some fun things. I took the suggestion of blog reader Tina and went to the Qt Studio booth of her friend Wendy. Wendy is a fabric dye artist. She uses various techniques to achieve vibrant colors in her prints.


I loved EVERYTHING in her booth! I was exercising discretion in my spending, but I did hear this overdyed piece calling my name. At first, I thought it was dyed and block printed. It is apparently a floral print fabric that is dyed over to produce this final look. I had my mind blown; what a wonderful way to transform existing fabric.


In the same vein as fabric manipulation, I was really excited to try my hand at block printing. I almost took a class, but it conflicted with my schedule. I went to the Colouricious booth and got an awesome hands-on demo on block printing from Jamie Malden. 

Jamie Malden 

She was a fount of knowledge and was so generous with her time and expertise.


I cannot wait to get stamping! I have lots of fabric paint, but did not want to get started on the wrong foot with printing. I bought this starter paint set from Pro Chem Paints. They are the kind Jamie used and I liked the feel of the paint when dry.  


Next up! I was introduced to Paradiso Designs and the lead designer Cheryl Kuezek, She is so cool! I was drawn to the lovely dresses on display. 


Boho Frock
I was tired and ready to leave the festival before stopping at her booth. When I stopped and chatted, I was immediately invigorated talking with her about her designs! I love her style and vibe and cannot wait to sew up these patterns!  I will blog about these in detail once I get to making so stay tuned. 


Okashi Courier Bag
 On the day "Little Miss" joined me, she chose a pattern for us to work on together. She likes the closed lids of the eyes and the lace.


"Little Miss" has a hard time parting with too small clothes, especially if I made it. I think this pattern may be a good one to use scraps of those garments to make. That way she can hold onto them in a new way. 

Last but not least. I got a little something fun for me! 


I grab one of these sewing themed charms every year I go and could not resist these two this year!

I really stretched myself this Festival. I took classes, sought out new people to meet,  and tried new techniques. All of with was worth it! I am so glad I went. Next year promises to be more wonderful and I cannot wait!

Happy Sewing,
Bianca

Monday, November 2, 2015

So Much More to Say About Quilt Festival! First Paper Piecing

Wowza! I had such a blast at The Houston International Quilt Festival. I met some wonderful people and bought some amazing things! I have so much to share, I will break it up over a few posts; I want to do the sharing justice. 

I love to try new creative things and after the sneak peek day, I returned on Saturday to take a class in paper piecing. I have shared that am not a quilter, but appreciate the art. My recent joining of Instagram has further sparked my interest. I follow many quilters and and quilt shops there.

I signed up for a class called "Serendipity: No Fear Paper Piecing" taught by Peggy Martin. I have completed a paper piecing project before, but the process of sewing on paper and backwards was really maddening for me. I finished my project, but was still confused about the process. I hoped the live class would help me understand the steps.

After a few hiccups with my fabric prep, I was able to dive right in.

Getting Expert Instruction

That just seems a bit insane to me!

We sewed each strip segment on four blocks at a time.

 
Work in progress on one block.


The great thing about Serendipity is that the four blocks can be positioned in several ways.

One way:


Another:


Yet another:


Here is the final orientation I chose. The light green center creates a pinwheel. I love the pop of color in the orange band.  I will not likely make an entire quilt, but I think this may make a good bag panel. 


 Here I am with Peggy. Take a look at the wonderful quilts in the background!


I had a blast! It was so much better for me to see what needed to happen in each step. It made so much sense! Can you believe I have already designed a series of blocks for my own quilt! I do not know how to make the patterns yet, but...

Happy Sewing,
Bianca

Thursday, October 29, 2015

It is Quilt Festival Time and I know an Artist!

It is once again time for the Houston International Quilt Festival. I have gone for the past several years, though I do not quilt, I go to be awed by the wonderful creations. This year I am happy to say I know an artist with two modern quilts on exhibition! I apologize for the quality of the photos, they were taken on my phone. The subjects are so wonderful, I hope you will be able to appreciate them nonetheless. 

Let's start with the quilts I came to see. Hillary of Entropy Always Wins has made this bit of wonderfulness with her Life in the ER Quilt


and this 5/325 Quilt.


The links above will take you to her posts about these profound and meaningful quilts. I cannot do her meaning justice. I was hoping to meet Hillary in person at the festival this year. Life interrupted and she was unable to attend. In absence of her, I promised to "meet her quilts" instead. Her I am with one of them and my little quilt show buddy.


While were we posing for this photo, I overhead other attendees discussing Hillary's quilt. I was so pleased to hear good words on her work I did the unthinkable, I introduced myself.  I said "I know the artist and she is great." The response was, "I know Hillary too!" Turns out, I was chatting with Stephanie of Spontaneous Threads, and Kathryn of Upitis Quilts. These are people I am familiar with through Instagram posts involving Hillary. Recognizing the serendipity of the moment, we immediately decided to take a photo to commemorate our meeting.

Here we are in front of Stephanie's (next to me) quilt. The quilt is made with a photo reflective fabric that illuminates when exposed to the light of the flash. It is pretty amazing to look at the quilt in real life then see the lit areas exposed. 


After those thrills, Little Miss and I  took advantage of the light crowds of the preview night to see more quilts. We did not get through all of them, but we had a good time. Did you know a quilt show is an awesome place to play "I Spy"? Little Miss was the only child I saw and she got really excited about the shapes, colors and textures of the quilts.


 Here she is amazed at all of the piecework that went into that and this one:


I love that she wanted to come to her conclusions about the quilt, then she would read the artists' thoughts. The quilt she is reading about is made with many circles of fabric. It wasn't until I looked at the photo at home did I see the word "dot" in the design. 


I feel so bad that I could not capture the real beauty of these pieces.  I plan to return this weekend with my better camera to do these quilts justice. I also wished I was better at crediting the artists; my apologies to the artists. 


 The quilt above is made using fabric yo-yos!


 Look at the scale of that quilted mural!


 This quilt makes me rethink my stack of old denim! 


If you get a chance to go to one of these shows consider going. Years ago, I assumed it was just for quilters and would not appeal to me as an apparel sewist. This however, is an art gallery of fabric and inspiration. This year I have even signed up to take a couple of classes. I am skeptical of my ability, but we will see...

Happy Sewing,
Bianca