Friday, June 19, 2015

The Definition of Easy McCalls 7120

So, you know I teach sewing to support my fabric habit. I am currently in a round of sewing lessons where my students have made a pair of pants and a top. Next, we will make a zipper project and a dress. Before, asking my students to make something, I figured I should try the pattern first. McCalls has a line of "Learn to Sew for Fun" patterns and I chose 7120. 


This pattern is for  semi-fitted, pullover dresses which have neckline and pocket variations, and stitched hems. B: Below elbow sleeves with button and tab. D: Shaped hemline, wrong side shows. C and D: Self-belt. Sleeves Bhemline Dside slits C and F: Narrow hem.


This pattern has an "easy" classification and I chose it because I wanted my students to have a few choices. I chose to test the pattern in the most difficult of the easy styles. I made this dress in Amy Butler Lotus Tree, Peony Pink. This fabric has been in my stash for a while and I have been waiting to find the correct project to use it. 

Pro: Many elements for new sewers to build skills: Sleeves, darts, exterior pockets, facings, buttons, buttonholes, and sleeve tabs.


Pro: Cute dress without closures for the newbie.


Con: The details may be time-consuming for the newbie. They may need to take breaks when they begin to feel overwhelmed.  


Con: Runs big, go down size. My pattern is XS-XXL range and  I cut the size medium, but graded it down to a small when sewing it, it is bigger than expected.


Con: Too long in the suggested length. I made hemmed mine in a wide 3.5 inch hem.

Maybe con: I am not sure about the depth of the neckline. I did not expect it to be this low. In this cotton, it stays in place. If using a rayon that drapes more, it will show too much for my taste.


Deep V-neckline

The print is large and I felt the pockets were camouflaged, so I added buttons to the pockets to mimic the buttons on the sleeves. 


Pocket with button detail
Sleeve tab

For the hem, I kept the length and sewed it 3.5 inches deep. I love a wide hem in a mini dress, so I didn't cut it down. 


Wide Hem


I like this one, I may sew this one again in the size small and I may add back

darts. I need easy summer dresses that have style, but are not fussy with 2 

young kids. I like this for the skills it teaches the newbie. My students will make 

it in the coming weeks, so I am anxious to get their take on it. For veteran 

sewists, this one is easy. I am curious to know if my students would define it as 

such.


Happy Sewing,

Bianca

Saturday, June 13, 2015

The Lady in Red With Mccalls 7047

Hey, do you remember that I posted plans to make this dress? Well, I have done it!

                       M7047, Misses' Dresses

It made with McCall's 7047 a "Create It" patten with mix and match options. It allows you to create lined, pullover dresses with or without peplum have close-fitting bodice, back neckline, skirt and sleeve variations, and elasticized waist. Peplum and long skirts: narrow hem. Long skirt with train, wrong side shows on hemline.    
                    Line Art
I was asked to make this dress for a friend who will be celebrating her 60th birthday this month. She wants to enter the next decade with pizazz  and va-va-voom! I was so excited to work with her. She knew what she wanted! She chose, bodice 3, with no sleeves, and skirt 9 made in sparkly "Ga-Ga Red Sequin". This Poly/Spandex blend has a 2-way stretch and a whole lot of shine.

Ga-Ga Red/Red | Solid Stone Fabrics

In a rare moment of rule following, I made a muslin shortly after she commissioned the dress. I tested the fit and tweaked it as needed and waited until now to make the real one. She wanted to tighten up her already fab bod and successfully dropped a dress size. I began working on it and it can together relatively fast. Well, let me restate that. I had uninterrupted time to work on it while the darlings are in summer camp.  

Have you worked with speciality fabrics like all over sequin? There are a few tricks to make things go smoothly.

  • Use a new rotary blade at the start of the project for clean cuts.
  • Use a new ball point needle for sewing knits. 
  • Use pattern weights not pins where possible.


  • Tailors chalk, not disappearing markers show up well and dissolve easily with a touch of heat.


  • Always press with a press cloth on the lowest setting.   
  • When sewing, keep the sequins side facing up with the smooth side, or lining fabric on the feed dogs.
  • Stitch/edge finished the seams using a seger and use a 3.5mm stitch length when sewing on the machine.
  • Expect a lot of sparkly debris in your work area.


Here is the finished dress on my custom dress form. I have pinned the dress to it so you can have an idea of the drape. I cannot wait to see my friend in it as she sizzles and pops in all the right places to make this dress sing. 


Back of the dress with wide draped cowl. 

Cowl front

Full Front

Drama in that drape!

I love the puddle train (still to be hemmed).

One shoulder drape variation


I have written a pattern review that you can read here.

I am anxious to see her in this dress! I will post pictures of her in it at the party. The dress code for the party is white attire for the guests. I am still deciding on the outfits for myself, my daughter, son and hubby. The party is in two weeks, so I need to get on it.  I am happily taking suggestions on a dress for me. If you have good ideas, please share!

Update! Here is the lovely birthday girl in her show stopper! She wore white for the first half of the night. When she stepped back into the room there was an audible gasp! She was stunning! My camera did not do it justice, but she glowed! I had goose bumps and teary eyes most of the night! I am so glad to have had the privilege to make this for her.


Happy Sewing,
Bianca


Monday, June 1, 2015

Coffee Bean Sacks Repurposed into Handbags.

Every year I like to participate in one or two craft fairs. My inventory varies based on what I feel like making what materials I have on hand. It is usually whatever suits my fancy. I recently acquired some coffee bean sacks and have a source for more. They are a combination of burlap, jute, straw, plastic fiber combinations. Some have really bold graphic designs others more subtle imagery. I decided to recycle these sacks into handbags.


Have you worked with burlap? It is tricky. You have to deal with the twisting grain, the fraying fibers, and at times the transparency of the loose weave of the material. I hesitate to give away all my secrets, however, I will tell you this, stabilize stabilize, stabilize! You must choose the stabilizer to suit your needs and purpose of your end product. I used heavier weight stabilizer for the totes,


and a lightweight for my hobo bags with softer shapes.
The adhesive on the interfacing takes a great deal of heat and pressure to bound to the sack. A press cloth is a must. It is important to press (up and down motion) rather than iron (back and forth) the material.


For the handles, I repurposed leather belts. I have a sewing machine that cuts through leather like a hot knife through butter! This combination of textures and fabrics work well together.


The bags have an interior magnetic snap and slide pockets.

After showing them to friends, they insisted I add these bags to my Etsy store for sale prior to my craft fairs. You can have a look at them and purchase there are if you like. I am also happy take custom orders if there's something you'd like that you don't see available. Use code thanks10 at checkout for 10%off.

Each bag is different. The orientation of the images varies based on what is usable and free of imperfections. The handles are chosen based on what I have sourced in my shopping outings. The fabric for the lining is chosen based on the treasures of my stash. I begin each piece with a vague idea of what I want to do, but I don't now until the end.  I am working with different patterns and tweaking design options so I'm excited to see what I come up with next :-).

Happy Sewing,
Bianca

Saturday, May 16, 2015

Resale Store Connections and a New Dress Form

I love to treasure hunt at resale stores. My favorites are the small, personal, charity or church run stores. They usually have small personable staff, with management that  turns over little.  It is a great place to find vintage fabric, patterns and sewing notions.  I am always excited when I stumble upon a deal. Much of my adventures are hit or miss with a lot of hits. To minimize my misses, I have begun to established relationships with the managers. I ask them to give me a call if they get sewing items in their store.

Yesterday, I got a call from one of my contacts. This was the first time she called and I was so excited! She told me that she had an adjustable styrofoam dress-form to sell. I do not need one as B.I.R.A, my custom dress form, is still working great for me. I knew that to keep this connection, I had to check it out. Unless she was selling trash, I was pretty much going to buy whatever it was she had (I can turn down future items, but I wanted to be sure there would be a second call).

Lucky for me, the form was in great shape and a great price.

 This is the first time I have seen one like this.


 It is made of styrofoam with dials that adjust along the side.


It is segmented and because it is foam, pinnable. 


The tripod stand is awesome! It is so substantial. It will surely hold the weight of whatever she wears and the height is adjustable great for long dresses and skirts. I have been doing prom and bridesmaid dress alterations lately. Coincidentally, my clients' clothes have been the size of B.I.R.A or my plus size form. This one will come in handy for those garments that are not.
 
There are no identifying markings on it short of this sticker on the back. Do you readers know anything this form? I would love any information you can share.

Happy Sewing and Thrifting,
Bianca

Thursday, May 14, 2015

Polka Dot Promises with Vogue 9112- Again!

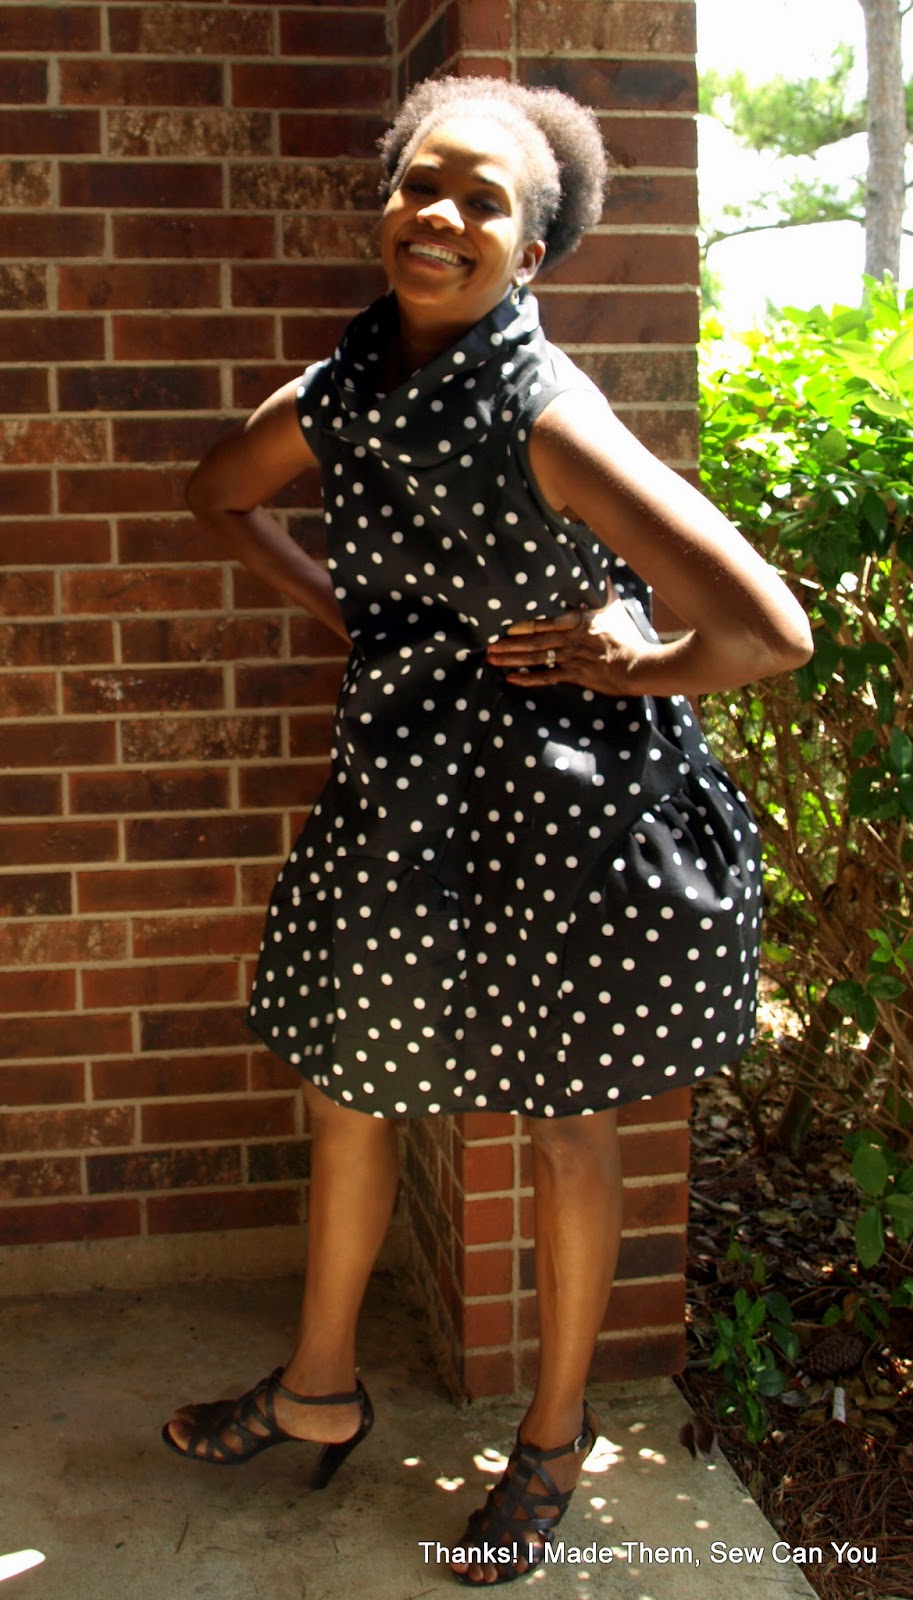
You remember how much I loved Vogue 9112 in my lemon yellow linen, right? Well as promised, I made another for myself in a black and white polka dot cotton.
                                                

This version is just as fun as the first. I like the quirky feel the polka dots adds.


Unlike, the yellow version,  I feel like the details of the seaming are lost in the small scale print I chose. I knew this was a risk when I was making it, but I do not mind. The fabric is a mid-weight cotton with a slight texture that holds its' shape well. Knowing the volume and angles would be maintained, I proceeded with this print. If you plan to make this in a print, I suggest you choose a sturdy fabric with a large scale print so all of the fun of this pattern is not lost.


In construction, I made a couple of changes from the previous version and the pattern. I still omitted the neckline facing and opted instead to edge finish with my serger. I choose to self-line the collar so the underside of the fabric was not visible. For this, I cut two collars, stitched them right sides together along the top and sides. I then flipped it, pressed it, and then transferred the markings. From there, I sewed it to the body of the dress as instructed. 


I like that by lining it this way, I can stand the collar up or flip it down. 


I decided, to omit the arm facings and use bias tape instead. I did this just to test it because I had it on hand. It was faster than the facing and had the same result.


So, what do you think? Are the dramatic elements lost in the print? Is this a dress better suited for larger prints or solids? 


I love them both and plan to make more. It is a fun everyday show stopper perfect for the Texas heat. 

Happy Sewing,
Bianca