Showing posts with label upcycled. Show all posts

Thursday, May 25, 2017

Jeans + Jeans + Skirt = Refashioned Dress

I love a good upcycle project. It is the source of much creativity (and clutter) in my life. I have a hard time getting rid of stuff because I "know I can do something with it someday". The older I get, the more I am facing my mortality and the reality that I will need to live forever to get it all done. I recently released many potential projects to someone with a longer life expectancy than I, but saved a gem or two for myself. Pattern Review is having an Upcycle Contest and it was perfect motivation to knock out one of my refashion plans.


This dress began as its' life as two pairs of jeans and a skirt. I wanted a new creation that hinted to its original form.


The key element of this dress are these beaded jeans that I found at a resale store for $1.75! They are a brand called Sassy Thai a fair trade Thailand based company that employs local artisans. Each garment is custom made to order by one or more specialist in their craft. I cannot imagine the hours that went into making these jeans.  I knew I wouldn't wear them as they were because they are not my style. I bought them and hoped for an inspired project to come to mind that would honor the work done by the original artist.


I scoured my stash and found McCalls 7187. It was a good candidate for upcycling because of the shape of the inset and the option for contrasts. I love that the inset would use most of the bead work showcasing its' beauty. 
 Image result for 7187 mccalls
I chose to make view A because I could use the segments of the pattern with the three "fabrics" I chose. The length of the inset  corresponded with the length of the beaded leg panel of the jeans. I like the version with the gathered skirt as well, but could not imagine that bulk in denim on my hips. 


Image result for 7187 mccalls

Once I decided on the pattern, the trick was to figure out the best way to cut the jeans then,


a game of Tetris with the pattern pieces to make it fit while looking cohesive.


I decided to maintain the original hems from the jeans and skirt. I liked the lace border of the jeans and did not want to disrupt that. I decided to keep the hemline of the skirt so it is consistent with that of the lace in the jeans.


When I cut the inset from the beaded jeans, the edges had some of the side leg seams visible along the edges (see cut panel photo above). Those seams did not look good alongside the even seams from the upcycled skirt. I narrowed the inset slightly to remove those seams reducing the lower inset by 1-inch on each side. I top-stitched all of my seams to reduce bulk. 

I considered a three color back, but opted to skip it given the sparkle in the front. In a stroke of fortune, the seam lines from the skirt lined up with the back darts of the back bodice.


I liked the look of the neckline as it is in the pattern. When I tried it however, I felt it was too close and sat uncomfortably on my collarbone. I cut the front collar on the fold of the leg seam. That factored into the comfort and led to me lowering the front and back neckline by 1-inch.
                                

The drop waist on this dress is not a style to which I normally gravitate. I think however, this pattern is a perfect match to maximize the beaded leg panel.


I am really pleased with this finished dress. Do you know what the best thing is? Jeans have two legs! I have another panel to use on another refashion! I don't know what it will be, but I know it will be fun! 


Voting is open now. Click here to cast your vote! I appreciate it! 

Happy Sewing,
Bianca

Monday, June 1, 2015

Coffee Bean Sacks Repurposed into Handbags.

Every year I like to participate in one or two craft fairs. My inventory varies based on what I feel like making what materials I have on hand. It is usually whatever suits my fancy. I recently acquired some coffee bean sacks and have a source for more. They are a combination of burlap, jute, straw, plastic fiber combinations. Some have really bold graphic designs others more subtle imagery. I decided to recycle these sacks into handbags.


Have you worked with burlap? It is tricky. You have to deal with the twisting grain, the fraying fibers, and at times the transparency of the loose weave of the material. I hesitate to give away all my secrets, however, I will tell you this, stabilize stabilize, stabilize! You must choose the stabilizer to suit your needs and purpose of your end product. I used heavier weight stabilizer for the totes,


and a lightweight for my hobo bags with softer shapes.
The adhesive on the interfacing takes a great deal of heat and pressure to bound to the sack. A press cloth is a must. It is important to press (up and down motion) rather than iron (back and forth) the material.


For the handles, I repurposed leather belts. I have a sewing machine that cuts through leather like a hot knife through butter! This combination of textures and fabrics work well together.


The bags have an interior magnetic snap and slide pockets.

After showing them to friends, they insisted I add these bags to my Etsy store for sale prior to my craft fairs. You can have a look at them and purchase there are if you like. I am also happy take custom orders if there's something you'd like that you don't see available. Use code thanks10 at checkout for 10%off.

Each bag is different. The orientation of the images varies based on what is usable and free of imperfections. The handles are chosen based on what I have sourced in my shopping outings. The fabric for the lining is chosen based on the treasures of my stash. I begin each piece with a vague idea of what I want to do, but I don't now until the end.  I am working with different patterns and tweaking design options so I'm excited to see what I come up with next :-).

Happy Sewing,
Bianca

Wednesday, November 12, 2014

Pattern Review Sewing Bee Round 2: Men's Dress Shirt Refashion

So, I have advanced to round two of the Pattern Review Sewing Bee. This round requires contestants to  refashion up to five dress shirts into a garment for an adult. Lucky for me, two weeks ago, I created a Pinterest board dedicated to refashions of dress shirts and was primed when the announcement was made. I went to my pin board for what had previously provided inspiration. Though they are great re-purposing projects, I thought they resembled the man shirts more closely than I liked. I wanted to use the fabric from the shirts and reference the source subtly.

I looked in my stash of shirts and found several that I could use for this project, but I wanted one more of another color. I hit the neighboring thrift store and found three shirts that made me change my plans. I saw two size 22 shirts in purple and one size 22 in blue giving me about 4 yards of fabric. Between these two shirts, I decided on a color block plan. (I am sorry for the color quality, I took those on my phone in too bright light.)
When I saw how much fabric I had, I hit my stash for a suitable pattern and found Butterick 9695.


 and Mccalls 4613 after my hubby suggested it needed more umph!
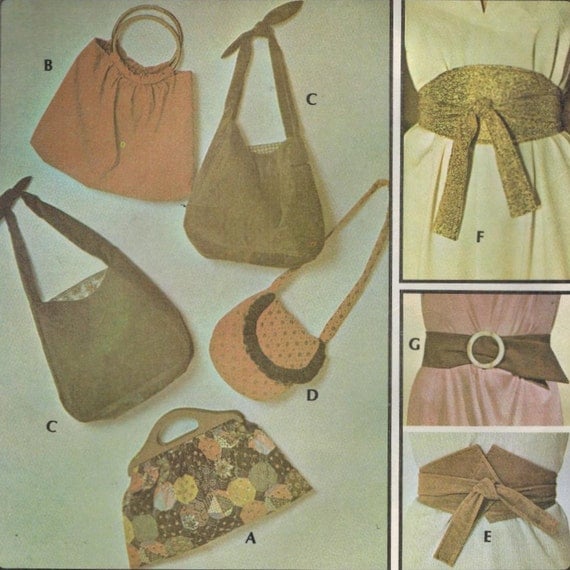
1970s McCall's 4613 Vintage Sewing Pattern Accessories Belts and Bags One Size

I set to work and here is the end result.


I kept the original hem of the shirts and added the button details to the collar and the obi belt.

I think my hubby was correct in suggesting the belt was needed.
I love the drama of the collar.
These are colors I would never have chosen without the confines of what was available at the store. I like them together.


I whipped this project out in a hurry! I had so many ideas swimming in my head that if I didn't just dive in, I would still be considering. I am glad to be done so I can relax. Here's to hoping I do well and move on to the next round.

Happy Sewing,
Bianca

Tuesday, November 4, 2014

Sewing Pattern Mannequin Wall Art

Ever get a creative inspiration that you simply need to execute? You get an idea and it gnaws at the back of your brain until you get it out. Recently, I acquired several half torso mannequins and got the idea to decorate them as wall art. I have ten more and many ideas for what to do with them. 

Here is the first one


She is made using vintage recycled materials. Her body is covered in the instructions and illustrations of out of print vintage sewing patterns. 


Her halter dress and shrug are made using the paper from the patterns. 

For the flowers, I used a combination of both types of paper giving a varied texture. For contrast, her belt is made using a double layer of vintage lace. Her highly textured skirt has a touch of whimsy by my curling the pattern paper.

 She is a great addition to my sewing space.

I am very happy with her! I am thrilled to get this tiny bit of creative energy out. I have many ideas for the other mannequins, not all sewing themed. I plan to make them and maybe sell them in a local boutique, in my Etsy store, or give them as gifts. I am not sure, but until then...

Happy Creating, 
Bianca