Sunday, June 30, 2019

Slow Stitching in the Summertime


Once the summer months roll around, I always have hand-sewing projects prepped and ready to be worked on. My kids love time at the park, in the pool and at our local libraries. I want them to get the most of these fun and carefree days and I take advantage of the opportunity to slow down and stitch.

     
After making the decision to no longer support Alabama Chanin, I began designing, making and selling laser-cut stencils for jersey hand-sewing. I and my sewing friends, wanted an alternative source for materials to practice the craft we enjoyed without compromise. 

As a brand ambassador for Nature's Fabric, I have access to  a wide range for organic cotton jersey as a canvas for my new stencils. I am happy to have had some time to complete my first hand-sewing project of the summer.

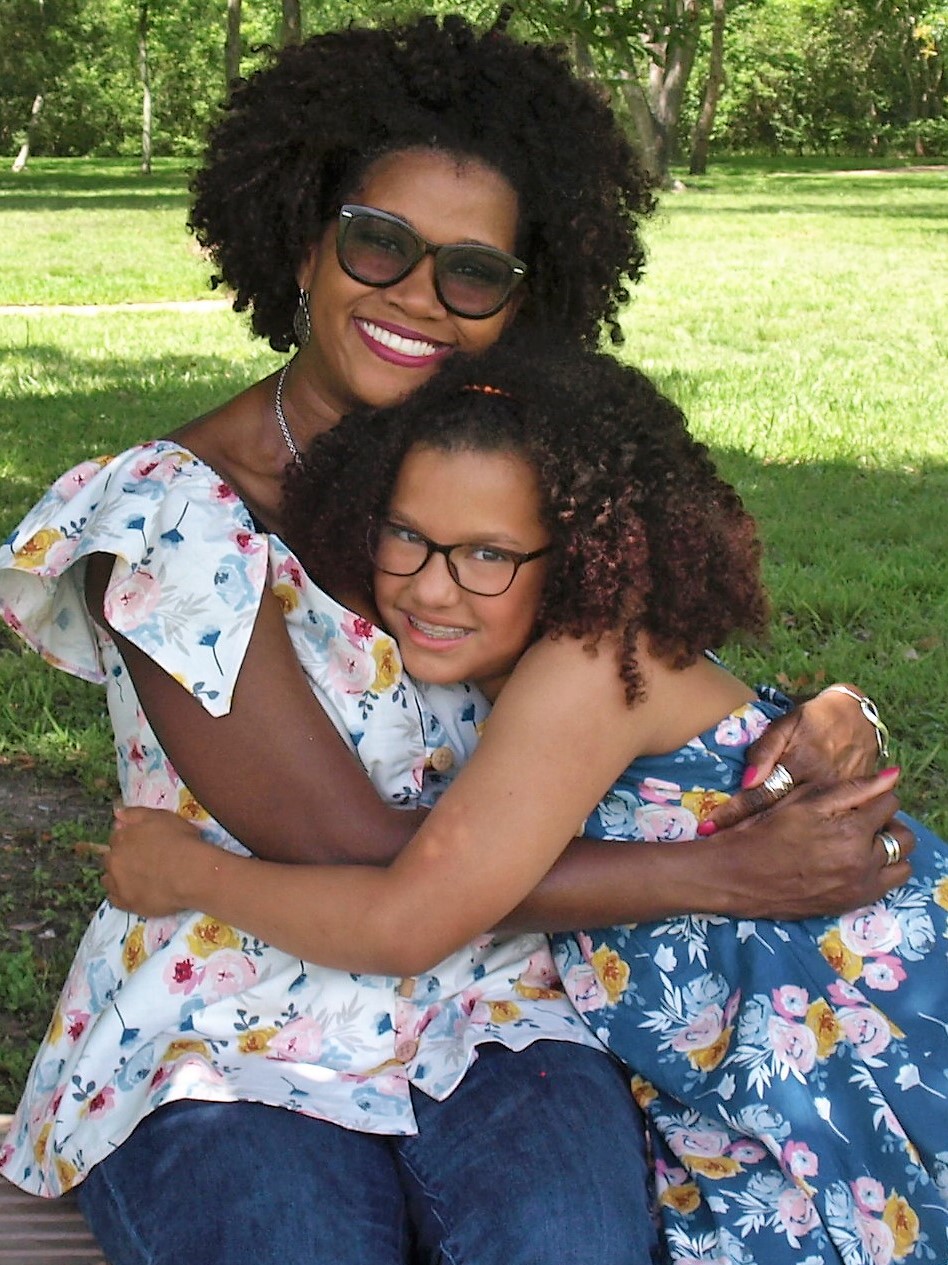
I started with the shirt from Vogue 9108. I lengthened it by 3 inches and shortened the sleeves to above the elbow. 

Image result for vogue 9108
I chose organic cotton jersey in Sun and Medium Blue. I painted my Solar stencil to the top layer using silver/pewter paint and allowed it dry. I then stitched around the shapes with white button and craft thread.    

   
After all the shapes were sewn, I cut the painted middles out leaving about 1/4 inch of the painted area for contrast against the backing fabric.  (Complete details of the process can be read here.)

 
I continued by with machine sewing the side seams and sleeves using a 4mm straight stitch length. I know this is contrary to what we know about sewing knits, but this has worked for me every time. 

 
I then pressed the seams to the back and accent them with hand-sewn topstitching. This step helps stabilize the machine sewing on the interior seams.


The neckline is secured with a strip of bias binding and a hand-sewn herringbone embroidery stitch. 


I left the shirt and sleeve hems unsewn. With wear and washing they curl  up beautifully.


I paired my top with a 4 panel skirt like Simplicity 8885. Simply omit the zipper and add a waistband casing. 

Simplicity Sewing Pattern S8885 Misses' Skirt and Pants

The interior seams are machine sewn and top-stitched the same as with the top. I used navy thread for a greater contrast against the blue. Also like with the top, I left the hem raw.


I am very pleased with my summer ensemble. I am working on adding more t-shirts to my wardrobe. With the wide range of jersey colors available and stencil ideas I have, I am looking forward to lazy summer days.

Happy Sewing,
Bianca


Friday, June 21, 2019

Wrapped In A Rainbow For a Costume Makers Ball.


Sometimes, I make a garment and immediately know what I'm going to say about it. Obviously, I will tell you about the fabric, about the pattern and my review of it. If there's a wonderful backstory, some struggle with my kids who want to claim, or of my husband's confusion of my choices. I am reluctant to do that with this dress. After making this, I was at a loss for words. As a kindness to you, I will pull myself together and give you all of those details. In truth however, if it was solely up to me, this post would simply be various pictures of me twirling in circles screaming, "I love my new dress!"


When I selected this fabric from Riley Blake's Costume Maker's Ball by J. Wecker Frisch, I chose it because I liked the idea of wearing measuring tape fabric.


There is lots of Fall color in this collection. With my neutral choice, I wanted to bring some Summer color in with my project.
Measuring Tape Black
From my previous post, you may remember I had a bit of dress envy. After the one I made for Little Miss, I wanted a tiered dress for myself. I recently found Butterick 5878 at my local Walmart. It appears to be out of print at other sources, but you may be able to get your hand on it.
I made view B, with the substitution of piping in the seams and added a tie belt. Making and installing the the rainbow piping was a time-consuming yet rewarding process. 
To make it,
  • Cut various lengths of piping (I eyeballed it and cut about 1 package per color)
  • Open out one end and fold the end down
  • Trim the cording inside by .5in.
  • Lay a new piece of piping on the open end 


  • Fold over and pin in place
  • Stitch overlap with a zipper foot
  • Repeat ad infinitum (seemingly) until you have continuous multi-colored piping  


I made the pattern per instructions with no adjustments beyond my embellishment and simple tie belt. The piping is applied to the fabric edges that are not to be gathered. To do it, baste the piping in place, right sides together, raw edges even, using a zipper foot. After gathering the corresponding fabric pieces, baste the gathers in place before stitching them to the piped fabric. Again, using the zipper foot, stitch the piping trimmed fabric to the gathered panels. 


Where the piping ends meet, like at the shoulder, I trimmed the cording inside down, to reduce bulk.


Because I didn't want the fun to end, the dress is hemmed with piping that is faced with bias tape.


At a recent sewing gathering, I pitched this black and white stripe, tiered rainbow piping, dress idea to my sewing friends. I asked if my plan was "cuckoo bananas" and wondered if I would look clownish. The response was a resounding "maybe"! I love that kind of encouragement and felt the gauntlet thrown! 


I delierated stripe placement, piping color choices, and piping location. After that work, I see nothing cuckoo here, it's just bananas!

Happy Sewing,
Bianca


Wednesday, June 5, 2019

Unabashed Dress Envy


I was introduced to the fabric of Melissa Mora's Blooms and Bobbins fabric collection at Quilt Market in Houston last Fall. 


Melissa's sample dress made to showcase the line took my breath away and gave me goosebumps! I fell in love with the dress and knew I wanted to make something fabulous with the fabric. It was one of the fabric lines that made collaborating with Riley Blake Designs appealing.  


Little Miss has been on a pants, leggings and shorts only kick for most of the year. She would decline all offers for me to make skirts and dresses for her preferring separates for their flexibility. I did not factor her in at all when I selected fabric for this blog tour. I planned to make a mixed print tiered maxi dress for myself with Blooms and Bobbins Main in Blue and Cream.


When the fabrics arrived  my little darling was completely inspired. She immediately laid out a plan for a tiered maxi dress for herself! I was stunned by her change in fashion choice and her decisiveness with wanting to use Simplicity 1121 (reviewed here) to make it. To add icing to the cake, she cut the pattern out for me to cut the fabric. With all that excitement, enthusiasm AND follow through, I knew I had to roll with her plan and rethink mine.


Once again, I have a bout of dress envy! I love this dress for her, I love this dress for me. The maxi length, and tiered volume with shoulder straps is balanced perfectly. 


The scale of the print and the blue with her skin is magical. She loves this dress and wants more in other fabrics.


When she commandeered my fabric and my plan, I had to make a switch up for what I wanted to make for myself. After participating in Me Made May, I knew that a lack of dresses was not an issue for me. I am in need of separates and chose to make a top to pair with jeans.
   

I chose Mccalls 7902 (reviewed here) for its flutter sleeves and button front with loops closures.

 
The sweet florals of the fabric with this pattern are meant for each other.


I am pleased that I could be persuaded to change me plan.


I was able to fill a void in both of our wardrobes and make pieces we both love.


Happy Sewing,
Bianca