Saturday, August 31, 2013

Alabama Chanin Large Polka Dot T-shirt

I recently enrolled in Natalie Chanin's Hand Embellishing Knit Fabric class on Craftsy. It was on sale at a rate I couldn't pass up. I initially thought that with the three books in my library, I wouldn't learn much more, but I was wrong. The class was like sitting across a workroom table from Natalie as she worked; it is pretty great.

I used to not like road trips. I was born and raised in The Bahamas on an island that is 7 miles by 21 miles long. Road trips, were not a part of my traveling culture and they used to make me very antsy and agitated. I would take trips and think, "If I were flying, I would be there by now!" Now, as a fan of hand-sewing I relish the thought of a long road trip, oh the things that can be created along endless strips of road.

I am returning from a family road trip to the Frio River in the Texas Hill Country. It was delightful, restful, peaceful and a great opportunity to work on Alabama Chanin hand-sewing. As we drove through the cotton fields I stitched away on a shirt inspired by this Large Polka Dot T-shirt in the Alabama Chanin store. The tips she gave in the Craftsy class made this project super fast. 


,
Cotton plants in Texas

Cotton fields in Texas

The Polka Dot T-shirt instructions are not described in the book, but based on the photos it was easy to figure it out. I made a stencil of large circles using pennant felt and a circle template.

I then airbrushed black paint on green jersey fabric. I appliqued the circles onto tan fabric using variegated embroidery floss that I won in a contest at the start of the year. Once all of the circles were applied with a back-stitch, I  cut away the green fabric leaving about 1/4 inch of the green along the outside of the black. A super fast tip Natalie gave in the class was to baste the bindings with regular thread before adding your stretch stitches. I would usually pin and hoop my bindings. This tip made the neckline finishing go so much faster. I hand-stitched the rest of the t-shirt following the instructions from the Studio Sewing and Design Book.

 
Polka Dot Detail

Herringbone Stitch on Neckline

 
Large Polka Dot T-shirt
Here is my review of the project:

Pattern Description:
Alabama Chanin Tee shirt from Alabama Chanin Studio Sewing and Design book and website.


Pattern Sizing
S,M,L,XL I made a size medium.

Did it look like the photo/drawing on the pattern envelope once you were done sewing with it?
I think it does with the exception of the color choices.
 

Were the instructions easy to follow?
The books give very clear instructions and inspirations for creating multiple garments. The garment construction is not difficult, but it is time-consuming. (Does time-consuming have a negative implication? It is engrossing, time-dependent, addicting, and repetitive.) The garments in the book require a great deal of work and the results appear complex because of the details, but broken down into smaller parts, easy.


What did you particularly like or dislike about the pattern?
I love everything about the patterns in the book. This polka dot embellishment was fast, easy and uncomplicated. It is a good beginner A.C. project. I also like the look of the variegated floss in the circles. It gives a bit more dimension to a simple design. 

No dislikes.

Fabric Used:
Jersey Cotton in Tan and Hunter Green and button and craft thread in natural.

Pattern Alterations or any design changes you made:

I used three strands of floss for stitching the appliques on. Natalie suggests using four strands in the back stitch. I  was in the car as I made this and found the even division of the floss more convenient than storing the two unused strands until later. I can't tell a difference now, but it may not been as strong over time.

Would you sew it again? Would you recommend it to others?
Yes and Yes.


Conclusion: If you have been thinking about making an A.C. piece, this is a good starter project.  

Happy Sewing!

Thursday, August 22, 2013

Sewing for Starfish Kenya

I began the summer with a simple question and prayer, "Lord, what breaks your heart? and "God, what would you have me do?" In answer, 1 Peter 4:10 was laid on my heart. "Each of you should use whatever gift you have received to serve others, as faithful stewards of God's grace in its various forms." That scripture helped me focus on who I could help. For the past ten weeks, I have had the tremendous pleasure of leading a Journey Group at Gateway Community Church. In this group, members united to make garments for residents of the House of Hope at Starfish Kenya. Starfish Kenya provides hope to children orphaned by HIV/AIDS. 

Leading a group of this nature was a completely new experience for me. I am passionate about sewing, and I recruited my friends to the craft; however, I was skeptical about potential participants for this new group. I was pleased to discover that the group filled up on the first day of signups...with a wait-list!  Yes!

The group was open to novice, experienced, men, women and children from the community. Having a sewing machine was helpful, but it was not necessary. All of the fabrics and notions used in this group were donated by Journey Group members. Some were happy to do some stash-busting and others were happy to make purchases for what we needed.
 
We decided that making pillowcase dresses and elastic waist pants would be useful to the residents of the House of Hope. This type of  project would also be easy for newbies to learn and eventually sew independently. We spent the first couple of 1.5 hour sessions "learning to sew". The experienced sewers dove right in to help lead the beginners. There was always fun banter as the participants got to know each other. As the weeks went along, the newbies grew more confident and it was exciting to see them proudly showing off their completed projects.

Despite being told to expect a "loss of participants" in any Journey Group over time. I must admit that I was discouraged when, one day about midway through the sessions I noticed there were a few non-returners. I saw my goal of  "x" number of garments being completed diminishing. I also wondered, "What was I doing wrong?" I took a deep breath, looked around, and I saw a room full of people who were enthusiastic, excited, and happy to be doing what they felt called to do. I was reminded of why I was there. I was not there to reach a quota, rather I was there to reach those in the room as well as those overseas.

I have been so blessed in leading this group. I am so glad I did it! There were days when I was tired or unwell, and  I felt like not showing up. I pushed through, and I was rewarded with smiling faces, enthusiastically completed homework, fabric/trim that a group member "just had to buy," or kind words from someone thanking me for starting the group. 
 
I have enjoyed getting to know the women in this group, and I am so proud of all the work we did! Here are our completed garments!


We will begin another Journey Group semester the week of September 30th. Sign ups begin September 8th.

If you are local and would like to join us, we would like to have you.
If you would like to donate child-friendly fabrics, ribbon, patterns or elastic, please let me know.

Happy Sewing,
Bianca

Monday, August 12, 2013

Making A Felt Stencil for Hand-Sewing

You can buy stencils for your hand-sewing projects or you can learn to make your own.  A blog reader recently asked about my stencil making process and I outline it here.

Supplies needed:
  • Microsoft Publisher
  • 2 Sheets of 12in. x 18in. Pennant Felt (Can be bought at hobby and craft stores for about $1) This will give you a stencil 24in x 32in in size.
  • Stencil image or text of your choosing. If you are unsure of the suitability of your image, print it first and cut the areas to be removed from just the paper. The cut area will be your painted area.
  • Spray Adhesive
  • Sharp Blade (a rounded tip blade works best, but a straight edge works as well)
  • Sewing Machine
  • Rotary Cutting Mat
Sew your felt pieces together

At your machine, align the 2 long sides of your felt together and sew using  a zig-zag stitch. Practice and adjust the stitch width until it is wide enough to secure both sides of the felt. Sew twice.
Felt sheets joined using a zigzag stitch

Stitched Felt and stencil image
Prepare your artwork

Open a new Publisher document and choose a custom page size. Adjust the width to 32in and the height to 24in. Insert your saved picture and enlarge it to fill the page dimensions. Check  the "Print Preview" to see that the image does not go completely to the edge of the page. You want about .5in- 1 in. along the entire image.

Go to your "Print Preview" under "File". You will want to print a "Tiled" picture. Adjust the overlap down to 0.000 (there will still be a little there).  Print your image, in fast draft and black and white, you do not need a high quality color image here.


Lay the sheets out and trim the overlap area away on the sheet which will be on top. In this image, you will trim the left overlap on the right sheet.


Tape sheets together and repeat until you have the entire poster joined.


You will want your completed stencil to have an uncut border with no shapes. If you have shapes that will extend over the edge do not cut those. Use a marking tool to draw around the shapes you will not cut.


 Use spray adhesive to secure the image to the top of the felt.


Use your Rotary mat as a base and cut out the shapes using a sharp blade. This is a time consuming and at times a tedious process. It is well worth the effort for a stencil you can use again and again and will not break the bank.


My cutting tools
Almost done!
Once you are done cutting, examine your shapes to check that you removed all of the felt from your cutting area. Look to the bottom of the point below. There is a bit of felt still left. Trim it away.
Double Check Cuts

Trim shape as needed.
Double check your stitching and resew, if needed. I suggest you hand sew areas that need it and not use your machine. Remember your stencil still has the residue from the spray adhesive (Laura asked a great question in the comments below, check it out)! I did not need to resew any areas on this stencil. If you use an image with smaller shapes, it may be necessary.


All done! Here is my completed $2 stencil next to my purchased $60+ stencil! (Never throwing my money away like that again!)


My completed stencil!
I am now ready to get painting! I hope you found this helpful!

Update: The stencils illustrated here are Alabama Chanin. This post was written when I supported the company. You can read here why I no longer do here. This post is popular and the information is useful for making any stencil you wish, go make something pretty. :)

Happy Sewing,
Bianca


Thursday, August 8, 2013

Making Progress on my Alabama Chanin Tank dress

Slow and steady wins the race. Right? I began stitching away at my Alabama Chanin tank dress in February. I was so excited to be creating my version of this dress:


I cut the eight panels, four top and four bottom and began sewing. I had hoped to have it completed for my anniversary last month, but didn't make the target. I am so impatient! I wanted it done and kept feeling like Veruca Salt from Willie Wonka and the Chocolate Factory, "I want it now!"

In search of a faster project, I got distracted by this, and this, and this. I could have used the time to complete the dress, I know. If you have made a heavily embellished A.C. piece I know you can relate with the desire to have a finished piece! Anyway, I did get some work in on my project and I am happy to say I am half way done! Doesn't B.I.R.A look fabulous pinned into it!

Front on B.I.R.A
Side Panel
When I started stitching the second panel many months ago, I choose to complete the back panel after the first. At the time I am certain I had a rationale for that choice. As I got near the end of the second, I knew why I made that choice then. I was seriously thinking of bailing on the fully embellished dress! I was dreaming of a front only embellishment so I could be done! My past wise self, knew my future lazy, impatient self would want to abandon it. To prevent that, she forced my hand to keep me moving! :) I am happy she did that. I really want this dress and want it to be fully embellished.
 
Detail of the outside negative reverse applique running with stitches

I will be taking a small break from this dress to whip up a couple of faster projects, but I will complete it. We will take a family vacation soon and I plan to pack a panel. 
Until then, I will be distracted!
Happy Sewing,
Bianca


Tuesday, August 6, 2013

Houndstooth Dress with Contrast Sleeves Vogue 8918

 There are some patterns you see and immediately think "I have got to have that!" For me it was this delightful dress from the Vogue Fall Collection. I love everything about this contrast pullover dress. Look at the curve of the neckline and dip of the shoulders.The styling of this dress does not hurt either; she looks fierce!  I love her TWA (teeney weeney afro), her earrings and look at those shoes!


V8918
Vogue 8918

I knew I had some Houndstooth in my stash so I snatched up the pattern on sale and ran home to get started. I put the kiddos to bed and located the double knit in my fabric hoard, I mean stash. I read the instructions and cut the dress out before hitting the hay, ready to begin the next morning.

Full disclosure, I have no plans to wear this dress for many months. It is a million and one degrees in South Texas and wearing a long sleeve double knit dress guarantees one a trip to the looney bin. I was really anxious to get sewing because the kids had a play date and I had some uninterrupted time to hopefully complete it. It was just enough time to get it done.

Here is B.I.R.A. wearing my version of the Vogue dress.


I am very happy with the end result. I am happy with it, but my darling hubby is not a fan! I modeled it and he says, "I like it, but what is up with the neck. It looks like it would be uncomfortable!" Men!


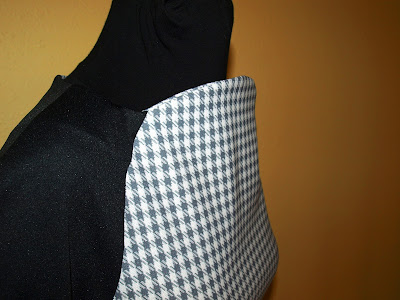
Neckline curve
 
Bodice

The neck stands up well
Posing


Here is my review of the pattern

Pattern Description: Close-fitting, pullover dress has two-piece sleeves, stitched hems, and back neck/hemline slits.

Pattern Sizing:  (6-14) I cut the 12

Did it look like the photo/drawing on the pattern envelope once you were done sewing with it? Yes.

Were the instructions easy to follow? They were easy to understand. The neckline curve and sleeve construction was a bit tricky when stitching the facing. It is pinned as one piece, but not stitched continuously. Pay attention to the pictures and you will do great.

What did you particularly like or dislike about the pattern? 
I love the curve of the neckline and the fact that the sleeves are two part sleeves. It is not a complicated pattern, but the high neck and contrast sleeves are dramatic.

Fabric Used: Grey and white double knit Houndstooth that I purchased at an estate sale. The contrast is a black knit from my stash.

Pattern alterations or any design changes you made:  I made none. I can see this being made in a fabric other than a knit and adding a zipper.

Would you sew it again? Would you recommend it to others? I made it when it is 101 degrees is Texas! I have not worn it yet and will not for a few months. I will have a better idea if I will make it again after I wear it. I would recommend others make if they like the style.

Conclusion: I saw the pattern on Thursday, cut it that night and made it on Friday! It was quick to make and has an interesting neckline.

Happy Sewing!
Bianca