Tuesday, December 12, 2017

My Velvet Crush: A Front to Back Maxi Length Wrap Dress


Have you noticed the wonderful velvet garments that are everywhere this season? I have been crushing on them and knew it was time to add a velvet garment to my wardrobe.  As the new Nature's Fabrics brand ambassador, I thought my first project for them was the perfect chance to satisfy my infatuation with this luscious fabric. 


They have many colors and prints of crushed velvet and I was on the fence about which one to choose.

      Peach Flowers on Black Polyester/Spandex Crushed VelvetNavy Polyester/Spandex Crushed VelvetPink Polyester/Spandex Crushed Velvet
      Silver Polyester/Spandex Crushed VelvetPink Flowers on Black Polyester/Spandex Crushed VelvetMist Green Polyester/Spandex Crushed Velvet

In the end, I choose the crushed velvet in Taupe, a perfect compliment to my skin and it reminded me of champagne.

If you have been here before, you know I like simple styles that let the fabric shine. I chose to use Vogue 9251 in view B with the sleeves of view A.
                   Image result for vogue 9251 pattern review
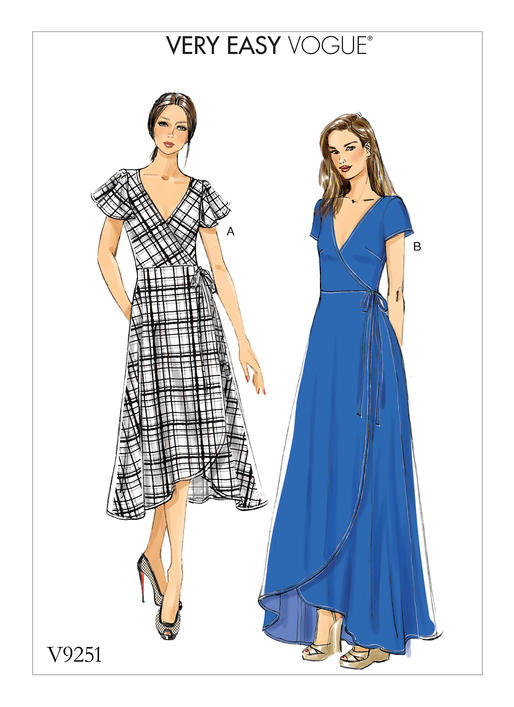
I love the drama of a maxi dress and one that that features side seam pockets is a bonus. 


I was completely taken in by the adorable flutter sleeve.


Because velvet is tricky to sew/hem. I lined the bodice eliminate any unsightly and likely, uneven, stitching lines along the neckline. I used the velvet to line it and under stitched it to prevent it from rolling to the outside. To save myself some trouble next time, I would use a non-slippery lining when paired with velvet.


The wrap on this dress offers complete coverage providing modesty when needed, or not ;p.


Speaking of modesty, hubby was happily distracted by the depth of the neckline on this one. When I was getting his opinion on it, he couldn't focus on anything but how low it goes. I jokingly remarked that I would need to turn the thing around if I wanted to have a serious conversation with him. As it turns out, the dress works that way too! 


The stretch of the velvet allows the front darts to soften when turned to the back. The back darts don't interfere with bust shaping. 


It began as a joke, but I would seriously wear this dress both ways. A perfect dress for date night or the office holiday party.


Before this dress, I had not sewn with velvet yardage before. I have repurposed and reworked existing velvet pieces, but never from scratch. Like getting to know a long pined over crush, you discover unexpected and sometimes surprising things along the way. 

Here are some tips that helped me work with velvet and maintain my love affair with this yummy fabric.  
  • Choose a pattern with a small number of pieces. This reduces the challenge of cutting and matching nap
  • Cut the fabric in single layers paying attention to the direction of the pile of the fibers for duplicate pattern pieces
  • Lay the fabric on a layer of flannel or carpet to prevent it from shifting
  • Work from the wrong side of the fabric to avoid displacing the nap 
  • Use a walking foot when sewing so the layers don't shift
  • Stitch in the direction of the pile
  • Serge the seams for a clean finish
  • Have fun because the end result will be awesome


Happy Sewing,
Bianca

Monday, November 13, 2017

Brand Ambassador Announcement!

Hello Friends!


As I mentioned a couple of posts back, I have been working on some special things that I would soon share. Now is the time to share some good, big news! A few weeks ago, a friend contacted me because she saw that Natures Fabrics was looking to collaborate with sewing bloggers. She was a longtime fan of their fabrics, and she knew that I would love them too. After acquainting myself with their beautiful fabrics, I became an instant fan, and I contacted them about their needs. They loved my projects, and we began discussing a possible collaboration.  After several conversations, we came to an agreement.

I am thrilled to announce that I have signed with Nature's Fabrics as a blog ambassador. Beginning in December and continuing in alternate months, my projects will feature their luscious fabrics. 

They have a wide range of Bamboo, Wool, Organic Cotton, and Cotton Knit fabrics, as well as patterns and notions. I can't wait to sew with them, and you will love them too! I have been looking for a source of supplies for jersey hand-sewing for when my stash is gone. Not only do they have beautiful fabrics for single layer pieces, but they also have a wide range of coordinating colors and matching fold-over elastic. 


I will have complete creative freedom in which fabrics I choose and what to make with them. That means I may need to be reined in some by you dear readers. I will be seeking your guidance along the way on my Instagram. I will post fabric choices, and I will use the one that gets the most votes to make something amazing. To make it even more fun, I may poll you on pattern choices as well.

I am so excited, and I look forward to this partnership! As a warm welcome for my readers, Nature's Fabrics is giving away a $25 gift certificate to a random entrant. Enter here  


To keep up with what's happening moving forward, be sure to follow Nature's Fabrics on InstagramFacebook, and Twitter.


Happy Sewing,
Bianca

Tuesday, November 7, 2017

Reversible Sequin Bomber Jackets Two Ways: Mommy and Me.

Oh the thrill of an impulse purchase!
                 

Hers flipped rose gold, mine flipped black
I was recently at Joann Fabrics recently and fell in love with their reversible sequin fabric. We've seen it around on pillows and it small swatches of pockets on garments. Everyone of my family loves this fabric; it is so fun to play with.  I had a 50% off coupon and the rose gold/black variety really caught my eye.


My plan upon purchasing this fabric was to make a bomber jacket. The minute I saw McCalls 7686, I loved it for its' elevated take on the sporty garment. I knew I wanted to make it this Fall and finding this fabric cinched the deal for me.                                   
An impulsive decision is, by definition, one you have not thought about beforehand. I have sewn with sequin fabric before, but not this particular variety. Had I known what was involved before buying this, I may not have followed that impulse. After making my bomber, I  realized I had sufficient fabric to make a matching bomber for Little Miss. I made my jacket the right way with all the necessary prep work. I attempted to make the second with shortcuts. In this post I will explain what I did in both and  I advise you to do it the right way if you choose to make your own. Hopefully, you will be better prepared if a similar impulse hits you.

To make it the right way:
  • Cut out your pattern pieces and fabric using a rotary cutter with a sharp blade 
  • Chalk trace the wrong side with the 5/8th inch seam allowance along the entire edge of your pieces 
  • Using thick and durable button and craft thread, trace along the chalk line making sure your stitches are visible on the right side of the fabric
                     
  • Remove all of your sequins from the seam allowance. I tried many sewing and crafting tools that were at my disposal including razors, thread snips, and Xacto blades. After slow progress and cuts to my fingers, I went to the beauty cabinet. Using a $0.33 eyebrow trimmer from the dollar store yielded the best results. It is a razor wrapped in wire so I was able to cut the individual threads without damaging the mesh beneath. This was a very slow and tedious process. Watching reruns of Sherlock helped the time go by easier.


The sequins on this fabric are strong and are sewn on individually. Sewing over them with your needle is not a good option. I repeat, sewing over them with your needle is not a good option. 
  • Once all the sequins were removed from the seam allowances, remove the basting threads and begin sewing. I used my zipper foot to be certain I was getting as close to the sequins as possible without sewing over them. I used the 3.5 stitch length.


I found it better to work with wonder clips rather than pinning as they held the slippery fabric together great.


My bomber jacket is fully lined. I really appreciate that the lining is attached at the sleeve ends and the elastic casing at the waistband. I am not a fan of the other lining attachment methods. Because of the sequin fabric, I could not machine sew it in place as directed in the pattern. I could have removed the sequins along the right side stitching line. I chose instead to attach the lining to the body of the jacket by hand-sewing it in place. 


As I was sewing this super sparkly fabric, I thought the sequin body and sleeve would be overwhelming and I considered using contrast.  Now that it is all made up, I like it a lot in all sequins. 


There is a bit of contrast on the collar and at the sleeve cuffs.


After making my bomber and seeing her excitement about mine, I decided to surprise Little Miss with a jacket for her birthday. This was another impulsive decision made a few short days in advance. :)

We bought Simplicity 8429 with a plan for a denim bomber with emoji patches. It was perfect to make a contrast version for her.
                          Image result for Simplicity 8429


I did not have two days to dedicate to removing the sequins from the seam allowances on her jacket. I have a heavy-duty Singer, multiple Brother machines, and a Sailrite for sewing heavy canvas and leather. With my limited time, I was fairly confident in my ability to sew over the sequins without having to remove them first. Wrong! I attempted many times on my various machines all with the same result; broken needles and sequins flying in my face. I gave up the ghost when the only thing that saved me from losing an eye to a projectile, were my glasses. 


Fortunately, she is little and I was able to work quickly to remove the sequins as I should have done in the beginning. With the contrast sleeves and waste cuff, there were fewer seams to shave. Admittedly, I was less precise with no chalk outlining or thread tracing. I simply eyeballed from the right side of the fabric. After making mine, I think my muscle memory had been set.

I think the contrast of the black cotton knit works great against the sequins here.

Her bomber is not lined but the sequin in the seams  are not comfortable. I encased them in fusible fleece and she's fine with that. If she were older,  not growing so much and likely to get more use out of it, I would certainly line it. We live in Texas so the shelf life on this particular one has its limits.  Additionally, I'm pretty certain when she outgrows hers, she will be reaching for mine. I sure did come up with a lot of justifications to bring this project to a close! :)

Hers flipped to black, mine flipped to rose gold
So to recap, when sewing with reversible sequins, 

  • Make a garment with limited seams
  • Chalk and thread trace seams to remove the sequins from the seam allowances. 
  • To get close to your seams use a zipper foot to sew garment together.


Sequins mixed
I love the way both of these turned out. She loves our matching outfits and I will savor that always. Some day, I may get an "Um, no Mama" eye roll with the mere suggestion. Until then, I will keep sewing for Mommy and Me. The Little Man has put in requests for Mommy and He, so I will ride this train to the end of the line.


As I mentioned, I was watching Sherlock when I was making these. A villain in a confrontation with him called Sherlock a psychopath. Before Sherlock ended the conflict with a bullet, he corrected the bad guy by saying, "I am not a psychopath, I am a high-functioning sociopath." There were moments of madness in sewing these bomber jackets and  that thought resonated with me. 

  
I designed these t-shirts to communicate to the world who I am, a "High-Functioning Sewciopath". I am one who can be antisocial in my sewing behaviors prioritizing it over other similar activities. When seeing a successful result, I have little remorse over the time and money invested, knowing I will do it again and again. I debuted the shirt at The International Quit Festival in Houston last week. It was a delight to see the smiles of people who appreciated the sentiment and defined it in their own terms.

It was so cool to see other "Sewciopaths" as I walked the festival floor. I received knowing smiles, nods of agreement and bursts of appreciative laughter. I sold many of them to people who bought them for themselves and their sew crazy and sewaholic friends. If you would like to buy one, I have listed them in my Etsy store
Use code SPATH20  to save 20% in the store through Saturday.

Happy Sewing,
Bianca


Friday, October 27, 2017

Good Things on the Horizon

Hello Lovelies!

I am so sorry for not posting in a while. Since my last post, I have been creatively busy, but sewing less. I have been selling handmade products at local craft fairs, preparing to list others in the Etsy store and now working at the International Quilt Market/Festival in Houston. In addition, I have been ironing out details for some upcoming amazing sewing collaborations. 

All of these things are good and exciting, but time is scarce. I want to be able to do the discussion about them justice, so stay tuned.

Happy Sewing,
Bianca

Wednesday, September 13, 2017

Double Duty Duster Round Two Fabric Mart Challenge!

Thanks so much for your support of my dress called "Harvey". Because of your votes, I won round one of the Fabric Mart Challenge! The second challenge is to take a basic t-shirt dress pattern and transform it into a transitional piece for fall. We are encouraged to hack the pattern to change it in some way. Here is my entry and you can vote for it on the Fabric Mart page here.


In Pearland, Texas, Fall arrives around Thanksgiving and is pretty much indistinguishable from Winter. The weather requires long sleeves, light jackets and long pants or skirts. With the high Summer temperatures, buildings are cooled to shivers requiring transitional dress on a daily basis to account for the shift. I usually have a hoodie, or kimono in my car to throw on for a trip to a store or movie.

I made a maxi length duster to serve as a topper to jazz up everyday jeans and a t-shirt. I found a wonderful Vlisco African Wax with a bold floral motif.

It looks great coming


 And going


and everything in between.


To add to the transitional element, I made it fully reversible with the other side in a luscious black linen.


When worn on the black side, the cuffs and lapels can be turned to show the contrast print. 


The wax side has side seam pockets. What's the point of sewing if you can't put pockets in everything? 


the black side has crescent-shaped pockets positioned on the outside.


For this challenge, I hacked the pattern we were given. My pattern stash is large so I rarely pattern hack. I will generally explain what I did here:

This pattern has very little ease and is designed for knits. To modify it for the duster, I looked at the finished garment measurements that coordinated with the amount of ease I wanted. 


If I was making the dress,I would have chosen the size 12/14.  For this conversion from dress to duster, I went with the size 20 and graded out the hips and increase the length to a maxi length. I did the same for the sleeves and graded them down to get to my appropriate size. I omitted the front fold and cut it open. I used a retro pattern that had a similar width and length as my guide for increasing this pattern. 


To make this duster reversible, I constructed both sides individually leaving an opening in the sleeve of one for turning to the right side. 


With right sides together, I stitched completely around the edges joining the linen fabric to the wax print fabric before turning it right side out. To finish the edges of the sleeves, pull them out as high as the armpit keeping them free of twists. Make sure the duster is right side out (ask me how I know!), then pull the sleeves out through the opening. Match up the seams then fold each sleeve end back to reveal the right sides. With raw edges even, pin in place and stitch the sleeve ends together.  


 After turning the sleeves inside I hand-stitched the opening closed. 


I lowered the neckline and added four hook and eyes to serve as closures to the front.   

I really enjoyed playing with the placement of the flower motifs on this duster. I print matched the front and centered a flower on each arm.


Come on Fall! I am ready for you!


Happy Sewing,
Bianca