I am off to Pattern Review Weekend. I am sure I will have many stories to tell upon my return.
Happy Sewing!
Wednesday, April 30, 2014
Wednesday, April 23, 2014
Three Cheers for Trapunto Hand-Sewing.
I had taken a break from hand-sewing and was waiting for an inspiration to get back into it. The Pattern Review Terrific Tank top contest was just the impetus I needed to get back to a craft I enjoy. In this post, I will detail the steps I took to complete my top so you can make one too if you want.
My darling hubby gave me Ruth Singer's book Fabric Manipulation for Christmas. There are 150 creative sewing techniques illustrated in this book and all are wonderful.

Taking guidance from it, I decided to make a reverse applique and trapunto tank top using some cotton jersey from my stash. I used lime green for the top and white beneath. I chose a retro Butterrick pattern I had on hand for my tank top foundation. I adjusted the size down to fit. When working with jersey, I find using my ready to wear size to be perfect to accommodate the stretch of the knit and give the fit I like.
 I was standing in my garage looking over my stencil choices and came up an unusual pick; a felt decoration.

Once I settled on the placement, I traced along the outside of the stencil with chalk so I could have a guide of where to replace it. I removed the felt and sprayed the back with a generous amount of fabric spray adhesive. Using my placement lines, laid my stencil in place and and smooth the back to secure it.

I then covered the exposed fabric with brown paper to catch any over-spray. I checked closely to make sure there were no gaps. I covered the stencil with river rocks to prevent the pressure of my airbrush from lifting the fabric as I painted. This is probably over kill, but I have learned from having paint slip under the stencil.
All of my prep has paid off with sharp shapes and no color bleeding.


For the trapunto shapes, I cut a small hole in the back of the shape and using a chopstick inserted polyfill until it was full. Once full, I stitched the opening closed.


Once done with the top layer, I stitched the tank front to back and at shoulder and side seams. I then felled the seams to the back and secured them with white colored button and craft thread.
 The last step is the finishing of the arms and neckline with bias strips. I cut them at 1.5 inches,

And pressed them in half for 3/4 inch wide binding.
 I pinned, then basted the binding to the top and arms. I chose to secure them using a herringbone stitch.

Here is the completed tank! You can make your own, with my DIY kit or have me make one for you as a ready made order! Visit my Etsy store.


I am very happy with the finished product. I will enter this in the Pattern Review Contest, but today I feel like a winner. (Update: I won second place with this tank! Just four votes behind the winner.) This is my first hand-sewn piece since I pulled my support of a company that almost exclusively uses this technique. I was recently reminded that they did not invent the techniques and that I should express myself, my way, in a craft I love. I feel like I have done that with this.
Moments after taking these photos, I got the cherry on top of my day. I read a wonderfully supportive post from Hilary, my virtual sewing buddy, and cheerleader at Entropyalwayswins. She took to heart my concern of the exclusion of people of color in the descriptor of "nude" as a color by this company (there are many others that do it too). She created a wonderful needle turned applique piece with a message "Nude is not a dress color. Words have power." Please show some love by seeing the wonderful work she did. I love it!
Happy Sewing,
Bianca
My darling hubby gave me Ruth Singer's book Fabric Manipulation for Christmas. There are 150 creative sewing techniques illustrated in this book and all are wonderful.
Taking guidance from it, I decided to make a reverse applique and trapunto tank top using some cotton jersey from my stash. I used lime green for the top and white beneath. I chose a retro Butterrick pattern I had on hand for my tank top foundation. I adjusted the size down to fit. When working with jersey, I find using my ready to wear size to be perfect to accommodate the stretch of the knit and give the fit I like.
Once I settled on the placement, I traced along the outside of the stencil with chalk so I could have a guide of where to replace it. I removed the felt and sprayed the back with a generous amount of fabric spray adhesive. Using my placement lines, laid my stencil in place and and smooth the back to secure it.
I then covered the exposed fabric with brown paper to catch any over-spray. I checked closely to make sure there were no gaps. I covered the stencil with river rocks to prevent the pressure of my airbrush from lifting the fabric as I painted. This is probably over kill, but I have learned from having paint slip under the stencil.
 | |||
| My trigger gun airbrush |
 |
| I have used these with much success. I recommend them if you do not have an airbrush. |
After three coats of paint dried, it was time to get sewing. I hand-basted the top layer to the bottom layer at the neck and arms. I also, basted the neck and arms of the single layer back. I stitched around all of the shapes with a small running stitch using a double layer of natural colored button and craft thread (Sorry about the picture quality, I do my stitching at night and took these pics by my bedside lamp).
The reverse applique shapes were stitched on the outside of the shapes. I then I cut the top layer leaving about 1/8 of an inch revealing the bottom fabric layer.
Once done with the top layer, I stitched the tank front to back and at shoulder and side seams. I then felled the seams to the back and secured them with white colored button and craft thread.
And pressed them in half for 3/4 inch wide binding.
 | |||
| Herringbone stitch |
Here is the completed tank! You can make your own, with my DIY kit or have me make one for you as a ready made order! Visit my Etsy store.
 |
| I really like how the trapunto stands outs. |
 |
| I like the contrast of the reverse applique against the raised trapunto shapes. |
I am very happy with the finished product. I will enter this in the Pattern Review Contest, but today I feel like a winner. (Update: I won second place with this tank! Just four votes behind the winner.) This is my first hand-sewn piece since I pulled my support of a company that almost exclusively uses this technique. I was recently reminded that they did not invent the techniques and that I should express myself, my way, in a craft I love. I feel like I have done that with this.
Moments after taking these photos, I got the cherry on top of my day. I read a wonderfully supportive post from Hilary, my virtual sewing buddy, and cheerleader at Entropyalwayswins. She took to heart my concern of the exclusion of people of color in the descriptor of "nude" as a color by this company (there are many others that do it too). She created a wonderful needle turned applique piece with a message "Nude is not a dress color. Words have power." Please show some love by seeing the wonderful work she did. I love it!
Happy Sewing,
Bianca
Friday, April 18, 2014
Champagne wishes on a beer pocketbook.
There are so many wonderful contests currently running and coming up on pattern review. These contests always inspire my creativity and push my skill development. I entered the Terrific Tanks Contests and am currently working on a shirt with reverse applique and tramputo for it.
I was not going to enter the Barganista Fashionista contest because of the work for that one. My plan to not enter was in place until I saw Naomi Campbell in a one of a kind leopard print chiffon dress by Gucci at the Glaad awards.
I was not going to enter the Barganista Fashionista contest because of the work for that one. My plan to not enter was in place until I saw Naomi Campbell in a one of a kind leopard print chiffon dress by Gucci at the Glaad awards.
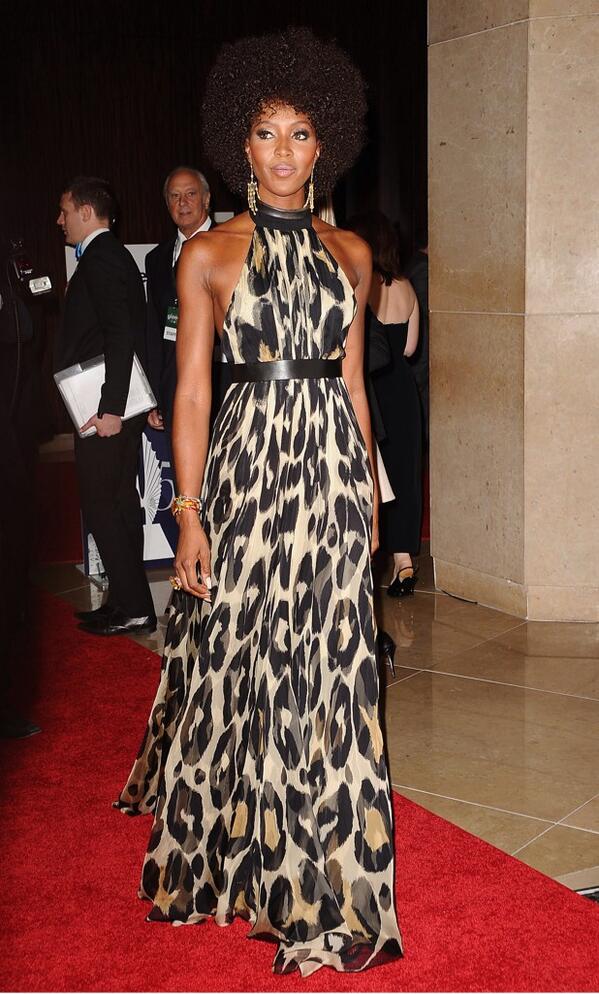
She is a vision in these colors, with the Afro, the jewelry and the attitude. I love the cut of this dress at the shoulders and the look of open back. The leather choker and belt seem to put a leash on a wild animal and I love it! I immediately wanted one and decided to use the contest as a motivator (excuse) to make one for myself. The contest guidelines does not require a replication of the inspiration garment, but a reference to it. Phew! that takes some of the pressure off!
I knew I did not have this exact pattern in my stash so I shopped my stash to find a similar one or combination of patterns to build this dress. For the backless bodice I chose this vintage Edith Head for Vogue pattern that is a size 12.


I shopped my fabric stash and found a snake print rayon that I bought on sale a few years ago. For the leather collar and belt, I repurposed a belt from a jacket I purchased on $.25 day at a local resale store.
This dress was an exercise in franken-patterning the top to take into account the backless design and choker neckline. I shortened the bodice by three inches and widened the center front by two inches to allow for more gathering. I completely lined the bodice with self fabric and installed bra cups to provide added support. To simulate the train of the inspiration dress, I cut the skirt back a foot longer. I free-handed the train into a curve that pools on the floor.
I used my dress form to determine the length of the choker and hand sewed a hook and eye closures to the ends.
 |
| Backless halter side view |
 |
| Back with removable belt. |
 |
| Leather choker sewn with my heavy duty machine and leather needle. |


 |
| The inspiration and the execution |
If one were to make this, I suggest increasing the size of the skirt by three or four sizes to allow for more fullness. I would also add four inches to the bodice center front for more gathering there too. The bra cups were an afterthought once most of the dress was constructed. I decided to hand-stitch the cups into the dress lining using my custom dress form as a guide for placement. (I did not include pictures of that because it is ugly and no one really wants to know how the sausage is made). I suggest planning to add cups and install them between the outer fabric and lining before attaching the bodice to the skirt.
Before officially entering the contest, I need to find some pricing information about the inspiration dress. I will need to submit and savings calculation to show the percentage saved over the inspiration. This dress cost me about $20.25 to make: $15 for fabric, $.25 for the belt, $1.97 for New Look pattern and the Vogue pattern was given to me. For the contest, I will need to factor in the actual pattern cost and cost of leather. Even with those costs, it will not be anywhere near the cost of a Gucci original.
Happy Sewing,
Bianca
(This dress is a part of the Summer Dress Sew-along.)
Wednesday, April 16, 2014
Estate Sale Treasures! Emilio Pucci Slip
I have so much going on right now it is nuts! I was contacted by a friend who was selling a massive lot of vintage clothing. She owns a liquidation company and thought it would be a good business venture for me. I am now in possession of 2 SUV loads of clothing from the 1940's -present. I am sorting through it and will be for a long time.
So far I have found many treasures like this rack of vintage lingerie and negligees.

The best find so far is this Emilio Pucci slip.


 I hope to find more goodies like this!
Happy Sewing (and thrifting)
So far I have found many treasures like this rack of vintage lingerie and negligees.
The best find so far is this Emilio Pucci slip.
Happy Sewing (and thrifting)
Thursday, April 10, 2014
African Inspired Full Maxi Skirt.
I love Pinterest for always providing me with inspiration for my sewing
studio, kitchen and home. Some of my boards have hundreds of pins of
things I like and plan to create. Every time I log on, my dream pins
mock me and call me a failure for my lack of execution. I grew tired of
the lies my "KNOCK it off" board told me this week and decided to knock
off a skirt I pinned. I love these African inspired full maxi skirts. 

I love the fullness and length and vibrant colors! These are just a few of the images I pinned with the hopes of making and I finally decided to get to work. I shopped my fabric stash and found this fabric that I purchased at an estate sale in January. I was fortunate to get 5 yards of fabric for just $1!

There is no selvedge information so I do not know anything about it. It does however, remind me of the African prints in my inspiration pictures. I shopped my pattern stash to find the right style and came across this one.

Have you ever heard of this pattern company? I hadn't and did a bit of research. Apparently, this pattern would have been ordered by mail through the British magazine Woman and Home. This particular pattern was advertised in the January 1976 issue (the year and month I was born). The original owner of the pattern even included the magazine clipping in the pattern envelope.


The pattern had just three pieces, front, back, and waistband. The pockets are attached and not sewn in separately like in some patterns. I added a simple waistband sash that is 5 feet long. Here is my skirt!


Happy Sewing!
Tuesday, April 8, 2014
Summer Dress Sew-along.
I love dresses! I am working on a couple of them right now, so this sew-along is timely. Grace Dressmaking is hosting a Summer Dress Sew-along and I am in! Click the image below to get all of the details on how to sign up!

I have the pattern on the left. :)
Happy Sewing

I have the pattern on the left. :)
Happy Sewing
Wednesday, April 2, 2014
I had a notion to add hand-stitched embroidery to my Toms.
A dear friend recently gave me a pair of Tom's shoes. She thought they would be super comfy for our recent trip to Walt Disney World. They are very comfortable but also very pink. Pink for me is a fun and happy color. As I write this I am wearing a fuchsia Kool Aid Man shirt with a pair of jeans.
On a normal day, however, I am NOT wearing pink. Because these shoes are comfortable and where given to me, I needed to figure out a way to make them more my style. I decided the fabric was a perfect canvas (he he he) to add embroidery. It sounded like an easy proposition so I grabbed my embroidery transfers and begin to chose. I have thousands of iron-on embroidery designs and an affinity for sewing notions.

I decided on a sewing machine, bobbin, a thimble and buttons. I usually do my embroidery on flat surfaces or in a hoop. Stitching on a shoe is a completely new experience for me (I am listing to The Supreme Macaroni Company by Adriana Trigani, and I am no Valentine). I was wise enough to know that I needed a short needle that could be maneuvered within the shoe. I also decided that stitching a reverse back stitch was probably the best stitch option. This stitch allowed me to complete the previous stitch and start the new stitch on the surface of the fabric. Other stitches, like the split stitches require more clearance than the interior of the shoe allows.
 |
| Photo credit DCM |
I used six strands of embroidery floss for my stitches. I wanted to be certain they were sturdy and visible from a distance. The only trouble I had was with tying the stitches off when a shape was completed. To resolve that issue, I simply, blindly, looped the thread under a few inside stitches before tying off. To be certain they were secure, I kept my thread tails long and knotted off. I have a couple of dangles inside the shoe, but I cannot feel them when worn. I am usually very confident in my embroidery stitches, but a few of these are shaky considering I was stitching in the round. All in all, I am very happy with the result. Check out my CusTOMS! (PATENT PENDING ALL RIGHTS RESERVED :)
 |
| Tom's embroidered with sewing notions. |
 |
| Spool of thread. |
 |
| Sewing Machine with fabric and bobbin |
 |
| Thimble |
 |
| Spool of thread and button. |
Now, these shoes feel like me. Every time I wear them I will think of the kindness of my friend.
Happy Sewing!
Subscribe to:
Posts (Atom)