Saturday, September 19, 2020

Beatrix Dress in Tresco by Liberty of London


I don't know if I should call it kismet, destiny, coincidence or just plain good sense. When I wore my Liberty maxi dress to Quiltcon 2020, and entered the Morris Textiles booth, it was clear a creative relationship was inevitable. Leisa and I connected over the wonderful Liberty of London, William Morris and fabrics by other British designers she sells. Her store is based in Austin which meant I could get my British textile fix this side of the pond. Top of my list were the Liberty of London sewing patterns. 

I was really interested in the Beatrix dress 


Before now, the cost and shipping from UK sources made me hesitant to take the plunge. In addition, I was reluctant because there were few pattern reviews or photos of those pieces on "real" people. Leisa and I decided that others in the sewing community probably had those same reservations, so we decided to partner to make these patterns in Liberty Fabrics.

How fabulous is this Beatrix dress in Liberty Tresco Lawn from Morris Textiles?

This dress was an easy pattern to make if you are familiar with any of the big four patterns companies. The pattern tissue, measurements and instructions read like a McCall's sewing pattern. 

I love this pattern as shown on the package cover, but I decided to add some style modifications to fit my lifestyle. That's the beauty of sewing though, isn't it? With a tweak here or there and you can make a garment completely your own. Theoretically, I love the dramatic look of the deep V of the bodice of the Beatrix. Practically, however, there is no way I  want to be that exposed, nor do I want to find and wear an adhesive bra to achieve the pattern look.


When cutting the bodice I winged the adjustment to give it a little more modesty. I added two inches to the width of the front facing. When constructing the neckline, I folded the excess in under the bias tape as instructed by the pattern.

                             
Morris Textiles Brand Pattern Weights available in my Etsy store.

When I came to the V, I brought the folded edges of the facing together and stitched that area closed.


A front slit is fabulous on this dress, but it is a little too flash risky for me. It's not Halloween and with a strong wind I don't want to give the world a treat! I decided to switch the center slit to the right side seam. I don't mind showing a little bit of leg especially when I have the full coverage in a maxi dress. With a strong gust of wind, I can still maintain my dignity.


When I started this dress, I intended to make the included cuff for the sleeve. Once I cut it and pinned it to my dress form, I loved the billowy effect of the unbound sleeve. I played with it and decided to switch to a casing with 1/4" elastic. I loved the idea of adjusting the density of the sleeve and wearing it at varying heights.

Soft and fully extended


Elbow height and folded under


I think the easy breezy nature of this print plays well with the new sleeve modification.

I made the dress in size 12 which corresponds with my measurements for the big four patterns. I am 5'8" in flat feet and I did not add any additional length to the skirt. The back of the dress is cinched in with a fabric tie to give added shaping to the bodice.


This fabulous dress has side seam pockets. I will say this is the only feature of this dress I am not 100% in love with. The top of the pocket is anchored in the bodice seam making the opening a little higher than I usually like, but it is not a deal-breaker. I may choose to lower them in future makes of this pattern.


The print is gorgeous and this lawn is airy and flirty. I love this dress. It feels like a cool glass of lemonade on a hot summer day. 


I enjoyed this and the pattern weight collaboration we did using her Liberty fabric quilt block designs. We are having fun and I am looking forward to what we will do in the months to come.

Happy Sewing,
Bianca

Tuesday, September 1, 2020

Finding my Sewjo with a Colorful Caftan


How is your sewjo lately? The worldwide pandemic, systemic racism in America, virtual school and working from home have all played a part in diverting my sewing energy. I have kept up with my work-related sewing, but my making for fun has slowed. The response within the sewing and craft industry surrounding the Black Lives Matter movement after the murder of George Floyd by police, has dulled my usual enthusiastic making. In recent months, I have no interest in supporting businesses with my time and money if they are neutral on the issue of racial equality. 

I started looking at sewing patterns and fabrics in my stash with fresh eyes. I withdrew from, and declined some opportunities based on the business' and in some cases, the designers' public stance on race. When the Riley Blake blog tour for "Create" by Kristy Lea was announced, I somehow missed it. When I discovered it later, I was immediately drawn to the bold color and geometric shapes of her first collection.


I immediately performed some social media reconnaissance to see what this Australia based artist was about. I liked what I saw of her work and her response to the racial upheaval she was witnessing in America. She used her voice to shine a light on similar racial issues in her country and raised money to affect change  there. She was clear in her message to her followers that Black Lives Matter. I was motivated to support her line and contacted Riley Blake Designs to be added to the tour.

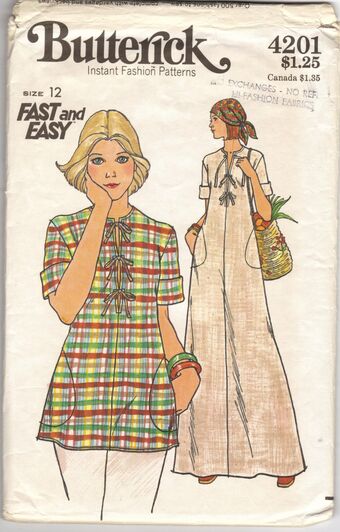
I requested Black Create Geo Gems and when it arrived, I wanted to cover my body in it! I am not buying patterns now, so I hit my stash to find my tried and true woven caftan pattern (Butterick 4201).

Butterick 4201 | Vintage Sewing Patterns | Fandom
I love the simple lines and single sizes of retro patterns. It makes cutting and constructing them a breeze. I like a rotary cutter, cutting  mat and my pattern weights to zip through this step. 

Rainbow Geo Pattern Weights

I made a few, slight adjustments to the pattern that required an assortment of notions and tools I had on hand. I have linked them here for your information if you want to purchase from your preferred retailer. If you choose to purchase from the affiliate links, I will receive a nominal fee as an Amazon Associate and Kraft-tex ambassador.

Instead of the three ties at the front, I switched those for a laced-up front and pressed lapels. I used my expanding seam guide to mark the placement of the holes.


I then punched through the fabric to create an opening for the grommets.


I installed them per the instructions of my heavy duty grommet setter.


I made a 1/2in. wide fabric tube that I turned with my vintage Fast Turn loop turner.


I criss-crossed threaded it through the grommets and tied the ends in a knot.


I love this dress! The colors pop and it is easy to wear.

 
The simple details of this dress gives some fun interest.

                 
The sleeve has a turned up cuff that I accented with a single grommet.


When flipped down, gives a fun geometric twist.


What would a great dress be without side-seam pockets? 


My previous versions of this dress (Ankara, cream linen, blue linen and for my friend Hillary) had a few inches of wearable ease. I liked the airy feel of it, but I wanted the option to cinch some of that in at the back. To do this, I simply added spaghetti ties, made the same way as the lacing tie, to the side seams.


The Kraft-tex color for the month of August was Greenery. I used it to make a fun grommet studded clutch to coordinate with this dress.

After making my dress, I looked at the remnants on my cutting table and couldn't swipe them into my scrap pile. On their own, none of them were big enough to make something significant, but, pieced together, there were possibilities. I used various lengths of colored piping to join the random scraps of fabric. The result was enough to make the front panel of an insert for my Now You See Me Tote Bag. 
In the vinyl tote

On its own

The piped panel was made by sandwiching piping between the raw edges of the right side of two fabrics and sewing it in place. I repeated with more piping until the panel was the desired size and finished the insert per pattern instructions.


This dress and bag in this fabric, with these patterns, makes me smile. Considering all that is happening in the world around us, I count that as a win.


Happy Sewing,
Bianca