Saturday, December 29, 2018

Up All Night Pajamas! Embroidering on Velour!

 
Whenever I get a package from Nature's Fabrics, I have to open it in secret. My kids are fanatics for soft plush fabrics. Very often, they cuddle the fabrics, take them away and use them as blankets until I'm ready to sew them up. They are so adorable it takes all of my willpower to reclaim my fabrics.

With my most recent order, I purchased with them in mind. I received this Wedgewood Cotton Velour for my son:

                                                       Image result for Wedgewood Cotton Velour

and this Gray Sparkle Cotton Velour for my daughter:

          Gray Sparkle Cotton Velour

I had planned on making all-in-one pajamas for both of them using these fabrics. Little Miss loved her selection so much, she's asked for a day time outfit  over PJ's. Little Man was completely thrilled with the idea of wrapping his entire body in his fabric at night.

I thought Simplicity 1731 was a perfect choice for this. Both kids were thrilled with it for themselves and excited with the thought that I may make a set for the rest of the family (and maybe get a dog!).
My little guy has a passion for reading and doing so at bedtime. He has recently admitted to stretching his allotted reading time beyond light outs. It reminded me of an embroidery design by Designs by JuJu. I knew I wanted to add the "I Read Past My Bedtime" message to his pajamas.

This project was also an opportunity for me to try machine embroidery on plush fabric. The trick is to not crush the nap of the fibers while allowing the design to pop. I achieve this, I had to make a velour sandwich by layering tearaway embroidery stabilizer on the bottom, fabric in the middle, and water soluble stabilizer on top. 


The water-soluble stabilizer allows the stitches to rest on top of the velour without crushing the nap of the fabric.


The design stitched up beautifully in the colors the Little Man chose. He was up for the flowers, as long as I made them black! 


The pattern stitched up easily and quickly. After cutting the jump stitches, I un-hooped the fabric and removed the stabilizer by hand and water. 


I modified the pattern only slightly by omitting the neckline drawstring for the hood. He and his curls can't be contained!


He loves the side pocket and strange upper sleeve pocket placement. He is really pleased to have the sleeve and hem casings. Anyone else like retracting into your clothes like a turtle? It is a treat on cozy nights!


I made the size small. It fits great and he has room to grow. 


He absolutely loves these and has been wearing them nonstop since I made them. 


It has been the perfect outfit for staying up late and finding more adventures in a good book.


Happy Sewing and Happy New Year!
Bianca


Monday, November 26, 2018

D.I.Y. Digital Printed Fabric From Flour-Resist Technique


I just love when one creative adventure is the inspiration for another. I recently painted some fabric using the flour-resist technique I have previously detailed here  and in the August/September issue of Sew News Magazine. A bi-product of this process is a painted and cracked flour surface that is washed away to reveal a more subtle painted surface beneath. I love the look of this stage of the process and always feel it is such a waste to dispose of the beauty made.


This time, I took photos of the various sections of the fabric hoping to devise a plan to use them at some point.


Nature's Fabric now allows customers to print digital images on various knit fabrics. This new option was timely and I was excited to play with one of my photos that I was anxious to wear. My abstract image met the 300 DPI quality requirement, but did not have a seamless repeat (think floral designs and recurring patterns). If you know me, you know I am open to experimentation. Despite the lack of seamless repeat, I was curious to see what my submitted image would produce. I was willing to break the rules and see what I got with my image. 

Here is the image I emailed after placing my order. It is the same image 
flipped and joined on the long side in a photo program.


The proof of the image looked like this and gave approval to print.


The image was perfectly transferred to 2-yards of double brushed polyester. The 300 gsm weight fabric is soft like a plush fleece with a smooth top surface and textured underside. My kids love the feel of this fabric so much, it almost broke their hearts to know it was all mine.  


I love that the yellow edges created a bold stripe against what looks like a galaxy design.


When I ordered the fabric, I initally planned to use it to make a dress. After seeing it, and feeling it, I knew I wanted to get more wear out of it than I would with a statement dress. I opted instead  to make a cardigan that I can use frequently. I love the cocoon shape of Simplicity 8740, view D. The fabric requirements meant I could maximize most of my fabric with very little waste. 


I was also drawn to this pattern because of the front and sleeve bands. I oriented them horizontally for visual interest against the vertical stripes of the body. This is a fast, easy and comfortable garment to make an wear.


I made the size medium and with my denser fabric, love the way the weight plays with the drape and stripe on the print.


I am very impressed with the quality of this image and the way it is reproduced onto the fabric. It has exceeded my expectations. 


I love the result of my "take this image and make it work" approach to this project. It does not have definite shapes, text, or required vertical or horizontal orientation. If it did, I would have needed to be more technical with my image choice and creation. This is a video on how to do seamless repeats for fabric printing. It will help you plan your design for printing. Once designed, your image will have to be at least 300 dpi for clear printing. If it all seems overwhelming, the staff of Nature's Fabric is very friendly and helpful if you have questions as you go.


Have you created and digitally printed fabric before? What software did you use to create it? Which service did you use? What has your experience been like?Would you do it again? I will be making more for sure. The only question is which photo to use next!

Happy sewing,
Bianca 


Tuesday, October 30, 2018

How Many Fabric YoYos Did I Need To Make A Full Length Duster?


Is that a good or fair question? On this side of the answer, I am not so sure. Had I asked that question at the beginning of this project, the answer would have been so daunting, we may never have known! About year ago, on a trip to Austin, my family discovered Austin Creative Reuse, a resale store for makers and creatives. My family of 4 all loved the small store and everyone stocked up on supplies for technology-free entertainment. 


We scored radical savings on our finds, but as the register was being rung, I felt I spent more than I planned. That fact did not turn my eye away from a bag of vintage fabric yo-yos on a shelf nearby. I am a sentimental fool and my heart broke for the person whose incomplete hand-sewn project was donated away. In my head, I concocted a scenario of their sudden tragic unexpected death and grief stricken relatives getting rid of them because of painful memories. (Yes, I know it is possible that the person is alive and well and donated them as a UFO's they were de-stashing, but justify, justify). Anyway, my soft heart could not leave them behind and I added them to my purchases.


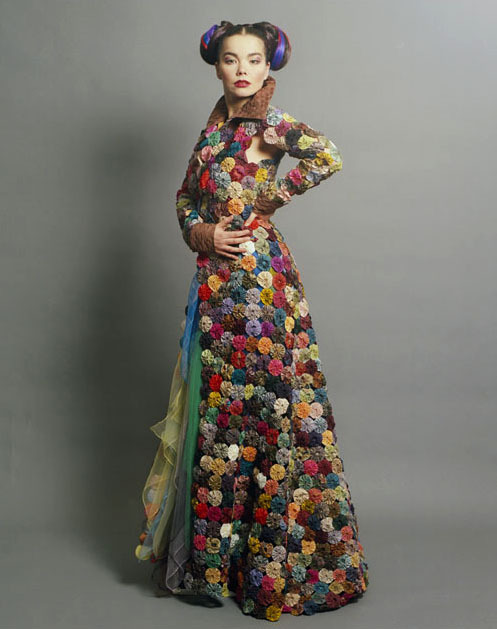
Upon inspection at home, I found that the bag contained strips of hand-sewn fabric yo-yos on the way to becoming a blanket and individual yo-yos not yet connected. My initial plan was to complete the blanket, but I found it wasn't functionally practical for the warmth I need for couch cuddling.  I decided I wanted to wear it and found this image of Bjork for inspiration.


Her couture jacket is beautiful and I knew I could make my own version if I didn't overthink it and get overwhelmed by the prospect. The idea was in my head for months, but I did nothing with it because it seemed frivolous and unnecessary. Truly, where would I wear something like that? I have been trying to focus on practical sewing of things that will get daily use. So I set it aside.  

Closet Case Files and True Bias are hosting the #sewfrosting community challenge on Instagram. The goal is to make a bold, brave, inventive garment that is less about the substance of "cake" sewing, and more about the fun and frothy "frosting". The challenge was the prefect time to gather those fabric circles and get making nothing I need, but something I want.  


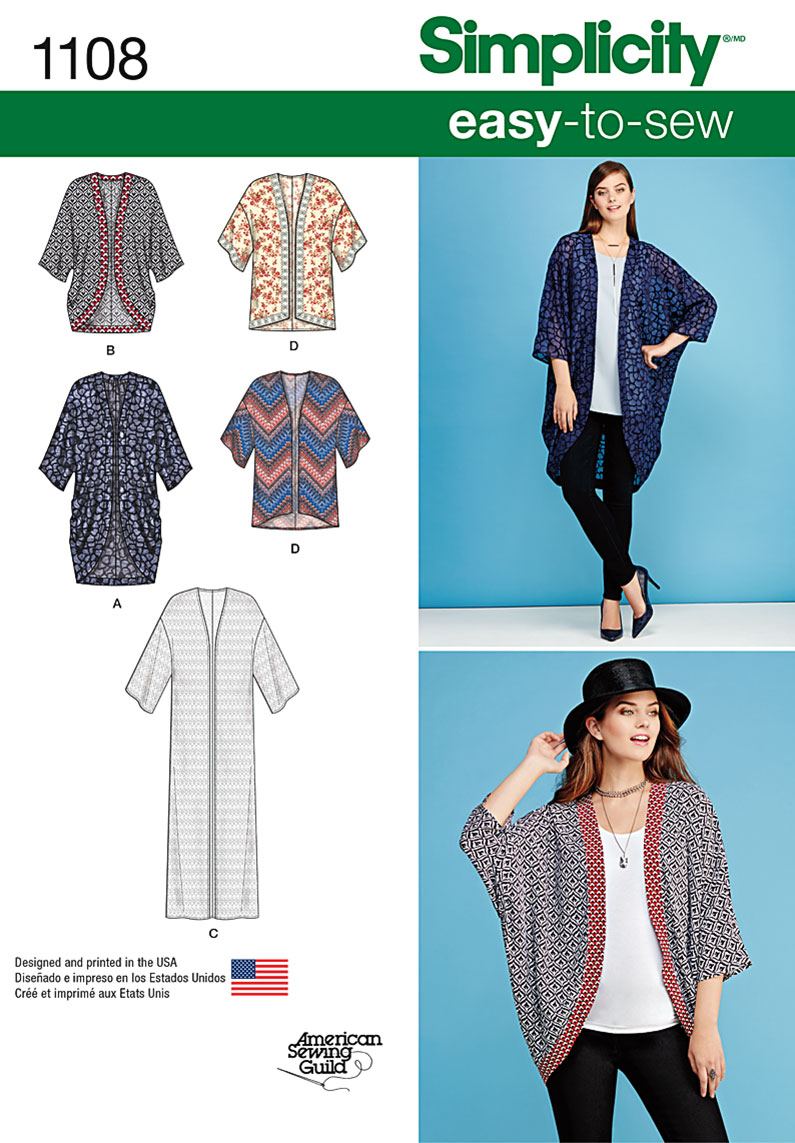
I used Simplicity 1108 to make the full length version of view C. 

Image result for simplicity 1108

I made it up as I went and was not sure I would write about the process. Frankly, I wasn't sure anyone but me would be interested in wearing, much less making one. Now that it is done and I love it, I can advise you on how to proceed if you want to make your own.


  1. Choose fabrics or scraps to make fabric yo-yos using a Quick yo-yo tool the size of your scraps will depend on the finished yo-yo size you are going for        
  2. Connect your yo-yos to each other at the sides with hand stitches and strong button and craft thread. This will make your "fabric."                                                                                                                                                                                                                                                                                                                                                                                    
  3. Cut a pattern size down from what you would normally. When you make your yo-yo fabric, you will keep the yo-yo's intact at the seams rather than cut them down to fit the pattern. This overhang will give you the extra ease lost in sizing down.  For center back, treat it as a single piece cut on a fold rather than 2 pieces with a center seam.                                                   
  4. As you make your fabric, check your size progress against the pattern pieces                                                                                                                        
  5. Once the fabric has been made to the corresponding pattern pieces, complete construction in the order described in the pattern. Omit the binding/facing and hemming instructions as the yo-yos will serve as the edges. I attempted to complete the construction with hand-sewn seams. I got as far as sewing the top and under shoulder seams by hand. It was time-consuming and as I contemplated my 5'8" frame, I opted to machine sew them.                                                                                                                                                                                                                                                              

I prefer the look of the hand sewn yo-yos for the general construction of the fabric. For the  side seams, I am not mad at these machine sewn ones. 


Because of the weight of the duster, I added a shorter front "collar" of yo-yos to the neckline for more support. The center front is closed with hook and eye closures on 5 sets of yo-yos.                                                                               


I am really excited about this project. I love the artsy vibe and hand-crafted dedication that went into each little circle. I can imagine fabric scraps from completed garments, being collected in a basket more than 40 years ago; remnants of treasured garments made with love.  I know this duster wasn't the original makers' plan, but I hope they would appreciate what I have done.


This will be a Fall staple for me as the temperatures begin to drop. 


I will be at Quilt Market and Festival this week and next. I doubt I will be hard to spot in my coat of many colors, my wind blown Afro and my "Hell yeah! I made this!" strut.
  

Back to the original question, how many fabric yo-yos did I use to make a full length kimono? For this piece, FOUR HUNDRED AND SEVENTY SIX! 476! FOUR HUNDRED AND SEVENTY SIX! 476!


If you are going to make one, I wish nimble fingers and happy sewing!
Bianca

Thursday, October 25, 2018

Spruced Up Waxed Canvas Jacket


Have you sewn with waxed canvas before? I love the look if it on bags and jackets and bought some wax with the plan of treating fabric to make my own. The wax and fabric have remained untouched in my sewing room since December waiting for the motivation to begin the work.


Fabric Funhouse, my source for cork fabric, now sells high quality waxed canvas in a range of colors.  


I was approached by the company to make a jacket for their booth at the upcoming The International Quilt Festival in Houston. Because they are awesome, I agreed. I could not decide which color I liked best, so I asked them to surprise me with whatever they wanted. They chose well and I was sent the fabric in a rich garnet color. It is a color I love and wear often in my lipstick.

As you all know, I love fabric painting and bold prints; I rarely wear solid colors. I read on the website that the "wax does not transfer or migrate onto other fabrics, leathers and your designer linings." This gave me the idea that the wax permeates the fabric, rather than sit on top of it. I figured it would respond favorably to stencil painting. It was a risky proposition because typical printed waxed fabrics have the wax added after the print is laid. After a couple of successful test swatches, I was convinced I wanted to do it.

I usually like to airbrush paint my fabric. In anticipation of readers wanting to try this technique, I opted for a more accessible paint method. I used 4 cans of Tulip Color Shot Fabric Paint in Pewter Shimmer. It is available on amazon and in craft stores. If you follow me on Instagram, you know the saga and my hoarding of this now discontinued color.


I painted the design of my new Cobbles stencil on the cut fabric pieces of a modified Simplicity 8298. To maximize efficiency, I stitched three of my felt stencils together along the long edges to make a larger stencil. I applied a light layer spray adhesive to the back of the stencil before setting it on the fabric. This helps give sharp edges to the motifs and prevents paint for getting under the stencil during spraying. The paint was applied in multiple light layers to give even coverage. After completing an area, I re-positioned the stencil, covered the already painted area and continued painting until done.

When working with waxed canvas, special considerations are needed. A full list of care and considerations can be found here, some bullet points are below:
  1. Expect creases, cracks and texture on the fabric surface
  2. Use clips, not pins to hold your fabric
  3. Use a press cloth and clapper if you must press it
  4. Press on medium heat
  5. Use a size 100/16 or 100/18 needle
  6. Use at least a 3mm stitch length and heavy duty thread
  7. Clean your machine to remove any build-up after and replace your needle                                          
As I mentioned, I modified Simplicity 8298 for this jacket. It is written for  pre-quilted fabrics, but I liked the simple shape and minimal seam lines so I tweaked it to work for this. I opted to make a lined version of view C with the length of view A. I added side seam pockets instead of the visible ones given.

                      Image result for simplicity 8298

I basically made an exterior from the canvas and another from a basic black broadcloth. I get confused every time I do it, so I refer to the bagged lining method demonstrated on this blog


It makes for a clean finish on the inside and out.

 
I am really pleased with this jacket! I tested it on a rainy day and its water repellent qualities worked like a charm! The paint is durable and was worth the gamble. I feel like stencil painting opens up so many design possibilities with this fabric.


I cut the size medium based on my measurements. Because I did not use prequilted fabric and the stiffness of the canvas, I think it looks a smidge too big in these photos. That being said, it feels comfortable to wear and I am certain with fall layering it will be fine.  


If you will be at Quilt Fest, you can see this jacket close up at the Fabric Funhouse booth. I will be out and about when not helping at The Paradiso Designs booth (947). If you see me, please say hello. 

Happy Sewing,
Bianca