Monday, March 25, 2013

Little Hooded Cape

On a jaunt to High Fashion fabrics in Houston, I found Simplicity 8356 from Shirley Botsford Designs, in the discontinued $1 bin! It got My Little Miss all excited about the possibilities for dress up and me thinking about a winter cape. It is not a typical coat, but with  the volume of the cape, I believe it will keep her warm.


e
  
My sister and her darling daughters were visiting so I thought I would make capes for them too. I delved into my stash to find fabrics. I gave them options and they made the design choices for inside of the cape.

My Little Miss loves to twirl, dress up, Dora and the color pink! She loves her new winter cape!


I have also made two more capes for a parent at Little Misses' Mom day Out. She choose some great fabric combinations. I have added a covered button over the hook and eye closure for added interest. Here are those pictures:


Here is my review of Simplicity 8356

Pattern Description:
Child’s Costumes: A-Dress, Overlay, B C D- Vest, B D-Blouse, B- Shirt and Apron, C- Blouse D- Skirt and Cape

Pattern Sizing:                        
3, 4,5,6,7,8
I made 2 size 4 and one size 8.

Did it look like the photo/drawing on the pattern envelope once you were done sewing with it?
Yes, the shape, but I modified the rest.

Were the instructions easy to follow?
Yes.

What did you particularly like or dislike about the pattern?
I liked everything about it. In Texas, it does not get too cold for too long. I love that I can toss this on my Little Miss and go. No fussing with zips, snaps and such when getting in and out of the car and her car seat.

Fabric Used:
A wrinkle free, water-resistant, home dec. fabric from my stash for exterior. A Dora printed cotton for the hood interior.

Pattern alterations or any design changes you made:
I lined the hood with a print. I omitted the ties and opted for a button and hair tie for the closure.

Would you sew it again? Would you recommend it to others?
I actually made three at the time; one for my Little Miss and two for my nieces.  I would recommend it. Little Miss gets complements every time she wears it. It is not for shy girls! I have requests to make it for others.

Conclusion:
Great for our mild winters and after, great for pretend play.

Friday, March 22, 2013

Thrift Store Score!

I was running a errand in Alvin and passed the local Disabled American Veterans (DAV) thrift store. I don't usually go to that part of town, so when I am near, I pop in. Today, I found this little beauty in the appliances section.

Score!


This Baby Lock Serger works like a dream and came with the original manual and a Creative Serging book! I have a great Serger, but, one can always use a back up!  This one is  pretty old, but it does have differential feed. I have seen it for sale for at least $100, so $14 was a good deal! This one will be available for my students to use during our lessons. I guess, I need to begin a fourth cover!

Happy Sewing!

Wednesday, March 20, 2013

My new sewing machine covers are complete!

My darling machines have been naked for so long. I have been throwing scrap fabric or old pillowcases over them when I don't use them. I know it is bad, but it was under the misguided belief that it would not be covered long. I finally faced facts and decided to make covers for my two machines and Serger. I was eager to use these embroidery patterns from my stash. 


embroidery patterns
I also had this pattern from 1999 in my stash and thought it would work great for my purposes.


Here is my review of Simplicity 8826:
Pattern Description:
 

Sewing room accessories I made a sewing machine cover using the Serger pattern
Pattern Sizing:                        
 

One size

Did it look like the photo/drawing on the pattern envelope once you were done sewing with it?
 

Yes, the shape, but I modified the rest. I embroidered the front of each with patterns from Sewing Revolutions embroidery designs. I made three covers, one says “Material girl”, another says “Sewing mends the Soul” and the last (a wip) says “Happiness is homemade”.  I added black piping to the seams.

Were the instructions easy to follow?
 

Yes

What did you particularly like or dislike about the pattern?
 

I disliked that the pattern called for creating your own quilted lining. I had some ugly pre-quilted stuff in my stash, so I used it instead. I liked that there were only three pieces.

Fabric Used:
 

Cotton /poly blend for suits; black piping and Nell’s  hand dyed embroidery floss.

Pattern alterations or any design changes you made:

I added piping, embroidery, and I reduced the size. The front and back panels were the proper size for my machines, but the middle piece was twice as wide as I needed. I cut it in half and found it perfect for my Brother machine, and Singer Heavy duty, but, I will keep it the original size for my Serger.

Would you sew it again? Would you recommend it to others?
 

I will be in trouble if I need to cover a fourth machine! I would recommend it.

Conclusion:
Good base pattern that allows for customization.


Here are photos of the completed covers:
Sewing mends the Soul

Sewing mends the Soul detail

Material Girl Sewing machine cover
Material Girl detail
The last cover is still a work in progress:
Happiness is homemade
 Happy Sewing!

Saturday, March 9, 2013

From Sewing to Sowing


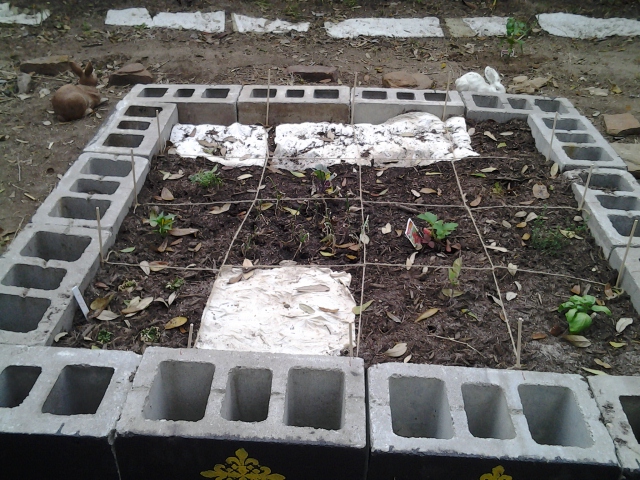
It is time for us to begin planting our backyard garden. In the past three years we have planted directly into the ground and had some success with  herbs, tomatoes, and squash. The soil we have is clay filled soil with poor drainage. After doing some research, I decided this year to establish cinder block raised beds. Hubby took the cultivator out and tilled the foundation soil in the area we will lay the beds.


I searched Craigslist and found someone selling cinder blocks and sent Hubby on his mission. He purchased a bunch and we hauled them to the back. Actually, I enlisted the help of neighborhood kids to help for a small fee. It was well worth the money to have them cart them with us.


In preparation for planting, I found this dandy little greenhouse on sale at Big Lots and started some seeds and cuttings when we were still in the frost time-frame.


I have seen on Pinterest, that celery can be grown from kitchen scraps. Apparently, they grow new roots and keep giving you celery. So, I figure if celery will regrow, why not other veggies. We have had much success with green onions in the past. We took a trip to Chinatown and I grabbed anything with roots and decided to give it a go.

Bok Choy, Romaine Lettuce, and spinach from the store


Romaine Lettuce after 4 days!

Boston Lettuce from the grocery store.

Basil Seedlings

Bok Choy is struggling after two weeks

Supermarket Spinach after two weeks
Using the ideas of square foot gardening, and planning from a free trial on www.growveg.com I have planned 4 plots of herbs and veggies and got to planting.  Each square foot of planting space holds one type of plant or herb. The number of plants in each is determined by appropriate seed spacing. I tried to adhere to companion planting guidelines when choosing what to plant as well as choosing what we will eat. My layout can be seen here.

I used twine and twigs as dividers in the plots.

The white napkins are my diy seed mats that space my carrots.

At the top of the frame are my English cottage flower mats. I hope they grow into a dream.


I plan to fill the block holes with marigolds, chives, green onions and whatever else will grow and deter bugs.
Let's see how it grows!


This a pineapple plant from a fruit we bought back in October. It is growing really well, but no sign of new fruit yet. I really hope it develops one. They look great growing.


Last year, I fell in love with the gardenia bush blooming on my neighbors side yard. It was huge and full of fragrant flowers. I have killed at least three plants since moving here and was a bit envious of how well theirs was doing. With permission, I took cuttings and hoped to propagate a plant that way. I killed those cuttings and did more research. I found this technique on ground layering and successfully got two plants! They
 are now in pots and will be transplanted when stronger.


I am pretty optimistic about this garden. Let's see what happens!

Happy Sowing!


Monday, March 4, 2013

Super Swaps on Flickr

I signed up to participate in a small bag or pouch swap in a Flickr group. I was assigned a partner for whom I am to make a bag or pouch. In exchange, another person in the group would make one for me. This is my first swap, so I was nervous about what to make. So, without an idea of what to make, I focused on choosing the fabric.

I pulled these fabrics from my stash based on the color pallet from swap partner. I thought I would make a bag with the wood or plastic handles, but decided against it. In the end, I choose to make a bag using the two bottom prints from the Amy Butler Love collection. I found this pattern (Simplicity 0579) in my stash and decided to modify view D.
Rather than construct it with patchwork in the center, I opted to use one fabric for the entire exterior and another for the lining. To add a bit of contrast and texture, I added a raw edge gathered flower pin with a covered button center.
Simplicity 0579 view D
Detail of the gatherer flower pin.
I think I will add a few surprise goodies for my partner to enjoy with her new pouch. I hope she likes it!

Here is my Review of the pattern:

Pattern Description:
Multiple Patchwork Purse, make-up bag, key chain

Pattern Sizing:

One size I made view D

Did it look like the photo/drawing on the pattern envelope once you were done sewing with it?
Yes, the shape, but I modified the rest. I did not do patchwork. Instead I used a complete cut of fabric and added a gathered flower pin with a covered button.
Were the instructions easy to follow?
Yes

What did you particularly like or dislike about the pattern?

I disliked that the lining had to be slip-stitched to the body. It was an unnecessary pain, I think there should be a prettier way to do this; maybe an opening in the bottom lining. It is not a deal breaker though.
Fabric Used:
Cotton fabric from the Amy Butler Love line.

Pattern alterations or any design changes you made:

I did not do patchwork. Instead I used a complete cut of fabric and added a gathered flower pin with a covered button.

Would you sew it again? Would you recommend it to others?

I will. I would.

Conclusion:
Cute Pouch, Easy to sew, I would make again.

Happy Sewing!