Showing posts with label embroidery. Show all posts

Monday, November 28, 2016

Make the (Shower Curtain) Fabric Your Own

I have many reasons for entering sewing contests. Sometimes it's the prize, sometimes it's to teach my kids lessons in working hard, winning and losing. Other times it's to develop a new skill or for the challenge of adding creative elements. I enjoyed the "Make the fabric your own"  round of the 2015 PR Sewing Bee. For the creative challenge, I decided to participate in the stand along contest currently running on Pattern Review


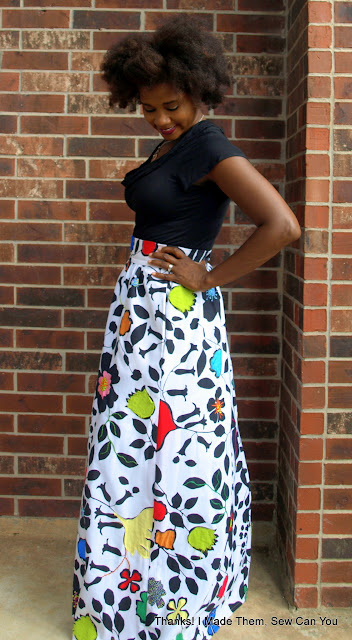
The goal of the contest is to modify fabric in a way that changes the end result.  For this skirt, I started with a Room Essentials garage sale shower curtain. I did not intend to channel my inner Scarlet Ohara for this project, but when I saw this fabric, had no choice. I love the mix of large and small scale motifs and thought it was the perfect base for embellishments.


I used an out of print McCalls 6389 skirt pattern as the base. I like the higher waist and cannot resist a maxi skirt with side-seam pockets.    


To change the fabric up, I added embellishments to the upper surface and behind the fabric. The skirt is covered in frayed applique, hand embroidery, and reverse applique. I love the improvisational process of this skirt. Each embellishment was taken on its own when I decided what to do. 


Collage of Embellishments
Over the course of weeks between custom orders, I would pick it up and stitch on a whim. 

                                               
Despite my lack of planning, I was careful to keep with primary colors and solids so the end result remained cohesive. 


With all of the hand work involved, there were lots of thread tails and fabric edges on the underside of the skirt. I added a full lining to protect the work and my skin from the loose ends.

     
I had so much fun with this! It is the first of its kind for me and I am really pleased with the result. There are areas I love and others I may change in time. I have it in my mind to keep working on it when I need a stitch project. This will become a walking stitch sampler by the time I am done. 

                                               
There are relatively few entries in this contest. I am surprised considering you could do whatever you want with the fabric. It overlapped with another contest, so I think others gravitated toward making for that one. Regardless of the reasons, I am anxious to see the other entries in this one. If you are so inclined, I would appreciate your vote for my skirt if you think it is worthy of it. Voting will open on Dec. 3.


Life is too short for boring clothing so go and make something breathtaking!

Happy Sewing,
Bianca

Thursday, April 21, 2016

Afro Diva Pincushions

So, I have been printing more fabric of my lovely handmade afro-haired sunglasses wearing diva. 


I have gotten carried away and decided to make a few pincushions. The base is the printed fabric with applique hair and embroidery accents in the hair and lips. This is a large pincushion that measures approximately 6inx6inx1in. It is filled with crushed walnut shells for weight and stability.

I have such fun playing in her "hair" with the pins!


I made a couple for friends and decided to have an Instagram swap with the extras. The support for the pincushions was positive and I was encouraged to make more to sell. I thought it was a good idea and have added them to my Etsy store. You can see them all in my store below.


Happy Sewing, Bianca

Wednesday, April 2, 2014

I had a notion to add hand-stitched embroidery to my Toms.


A dear friend recently gave me a pair of Tom's shoes. She thought they would be super comfy for our recent trip to Walt Disney World. They are very comfortable but also very pink. Pink for me is a fun and happy color. As I write this I am wearing a fuchsia Kool Aid Man shirt with a pair of jeans. 

On a normal day, however, I am NOT wearing pink. Because these shoes are comfortable and where given to me, I needed to figure out a way to make them more my style. I decided the fabric was a perfect canvas (he he he) to add embroidery. It sounded like an easy proposition so I grabbed my embroidery transfers and begin to chose. I have thousands of iron-on embroidery designs and an affinity for sewing notions.


I decided on a sewing machine, bobbin, a thimble and buttons. I usually do my embroidery on flat surfaces  or in a hoop. Stitching on a shoe is a completely new experience for me (I am listing to The Supreme Macaroni Company by Adriana Trigani,  and I am no Valentine). I was wise enough to know that I needed a short needle that could be maneuvered within the shoe. I also decided that stitching a reverse back stitch was probably the best stitch option. This stitch allowed me to complete the previous stitch and start the new stitch on the surface of the fabric. Other stitches, like the split stitches require more clearance than the interior of the shoe allows.


Photo credit DCM
I used six strands of embroidery floss for my stitches. I wanted to be certain they were sturdy and visible from a distance. The only trouble I had was with tying the stitches off when a shape was completed. To resolve that issue, I simply, blindly, looped the thread under a few inside stitches before tying off. To be certain they were secure, I kept my thread tails long and knotted off. I have a couple of dangles inside the shoe, but I cannot feel them when worn. I am usually very confident in my embroidery stitches, but a few of these are shaky considering I was stitching in the round. All in all, I am very happy with the result. Check out my CusTOMS! (PATENT PENDING ALL RIGHTS RESERVED :)

Tom's embroidered with sewing notions.

Spool of thread.

Sewing Machine with fabric and bobbin

Thimble
Spool of thread and button.
Now, these shoes feel like me. Every time I wear them I will think of the kindness of my friend. 

Happy Sewing!


Wednesday, March 20, 2013

My new sewing machine covers are complete!

My darling machines have been naked for so long. I have been throwing scrap fabric or old pillowcases over them when I don't use them. I know it is bad, but it was under the misguided belief that it would not be covered long. I finally faced facts and decided to make covers for my two machines and Serger. I was eager to use these embroidery patterns from my stash. 


embroidery patterns
I also had this pattern from 1999 in my stash and thought it would work great for my purposes.


Here is my review of Simplicity 8826:
Pattern Description:
 

Sewing room accessories I made a sewing machine cover using the Serger pattern
Pattern Sizing:                        
 

One size

Did it look like the photo/drawing on the pattern envelope once you were done sewing with it?
 

Yes, the shape, but I modified the rest. I embroidered the front of each with patterns from Sewing Revolutions embroidery designs. I made three covers, one says “Material girl”, another says “Sewing mends the Soul” and the last (a wip) says “Happiness is homemade”.  I added black piping to the seams.

Were the instructions easy to follow?
 

Yes

What did you particularly like or dislike about the pattern?
 

I disliked that the pattern called for creating your own quilted lining. I had some ugly pre-quilted stuff in my stash, so I used it instead. I liked that there were only three pieces.

Fabric Used:
 

Cotton /poly blend for suits; black piping and Nell’s  hand dyed embroidery floss.

Pattern alterations or any design changes you made:

I added piping, embroidery, and I reduced the size. The front and back panels were the proper size for my machines, but the middle piece was twice as wide as I needed. I cut it in half and found it perfect for my Brother machine, and Singer Heavy duty, but, I will keep it the original size for my Serger.

Would you sew it again? Would you recommend it to others?
 

I will be in trouble if I need to cover a fourth machine! I would recommend it.

Conclusion:
Good base pattern that allows for customization.


Here are photos of the completed covers:
Sewing mends the Soul

Sewing mends the Soul detail

Material Girl Sewing machine cover
Material Girl detail
The last cover is still a work in progress:
Happiness is homemade
 Happy Sewing!

Friday, February 15, 2013

My Embroidered Clock Won!

After all my hard work, it has paid off! I won the popular vote for my entry in the New Embroidery with Vintage Patterns contest on Flickr for my clock.


I have won a collection of Susan Bates embroidery hoops from Coats and Clark


susan bates hoops by newvp-contest-photos


A ezine from &Stictches

A collection of colorfast, hand-dyed embroidery floss from Nells.

embroidery floss from nell by newvp-contest-photos

And a embroidery pattern from Sarah Jane Studios


6 iron on patterns by newvp-contest-photos

I am very pleased that my new years resolution has produced a good result!

Happy Sewing!

Tuesday, February 5, 2013

New Year, New You Embroidery Entry

I have finished my entry for the New Embroidery with Vintage Patterns Flickr group contest! My entry is for the category:  "New Year, New You" We are to choose any vintage embroidery pattern that we feel captures the meaning and spirit of one of our new year's resolutions or something we hope to accomplish this year.

My resolution is to dive into sewing and use my time sewing to produce quality and not just quantity pieces. With that in mind, I choose a pattern that fit that theme to a tee. The pattern is from the Keepsake Transfers Collection from 1980.

I began stitching a little over a week ago in between other projects. I think it came together very well and very fast. I even had to rip a few stitches out when they didn't work like I hoped. As  I shared in this original post, I had another clock option in mind to frame the finished piece. I tried it, but the french knots in her afro were too full to allow the clock to spin. Luckily, I had a clock kit in my stash and instead did this using a dollar store frame and the kit.

I may change the numbers to buttons, but for now, it is finished! What do you think?


New Year, New You Embroidered Clock


Details of the many stitch  types used. Seed, back, stem, split, satin stitches and the french knots.


Detail of the girl in the notions basket Of course she has a delightful curly afro. Represent SISTA! Yup, she knows what time it is! (hahaha)
I am very pleased with her. She will have a very prominent place in my sewing room. If I find the time to organize it... 

Happy Sewing

Monday, January 28, 2013

Jamie Shift Dress in Alabama Chanin Style


I have completed my entry dress for the BurdaStyle Sewing Vintage Modern Contest. It took only one and a half weeks of nap-time and bedtime sewing. Given what was involved from start to finish, I am surprised that I completed it so quickly!
  • First, the pattern was traced and cut (my least favorite part).  From the original pattern, I omitted the facings and instead used a double layer of jersey fabric; blue for the top and cream underneath. I also omitted the back zipper and instead used a six inch slit and hook and eye closure.
  • The top fabric was painted with the Angie's Fall stencil with fabric paint and allowed to dry overnight.
  • Next, I began hand stitching around the shape using running and reverse back stitches leaving the thread tails and knots visible on the right side of the fabric.
  • I then, hand beaded sequins and seed beads inside the shapes. This process is completely new to me and I think I did a fair job of it. I learned some "what not to dos", but all in all I am happy with it.

  • The dress was then hand sewn together, then the side and shoulder seams felled to the wrong side and sewn.
  • Finally, I bound the neck and arm holes securing them with a herringbone stitch.
 It is fun and flirty and I think it is too cute!


The contest deadline has been extended to February 15th, so there is still time for you to get your entry in!

Happy Sewing

Thursday, January 24, 2013

Utterly, Completely, Totally Obsessed beyond all reason with Alabam Chanin sewing.

A year ago my mother-in-law gave me the book Alabama Studio Sewing and Design. I added it to my amazon wishlist because it was a sewing book and I liked what I saw in the preview. I really had no idea how much I would love the process of slow-stitching  and completely constructing garments by hand from start to finish. Natalie Chanin's design concept uses 100% organic cotton and all hand-stitched and richly embroidered with applique, reverse applique, intricate bead work, ribbon embroidery and various knot techniques. Her designs are available for purchase as customizable garments on her website Alabama Chanin. The garments are made to order and to your specifications. The garments are expensive and at first glance may seem outlandish. If you consider what goes into each piece, you will see why they are worth so much.

If paying $300 for a skirt or $3400 for a dress is too much for you, how about you make your own! She does the fabulously unthinkable thing of giving her fans all the tools to build their Alabama Chanin wardrobe at a fraction of the cost  in her three books. She provides the patterns, the stencil artwork for download, the sewing techniques and inspiration for you to begin the slow and satisfying process.
Alabama Chanin sewing books


I have since purchased the other books and dived in. I have traced patterns, cut stencils, painted fabric, and sewn and sewn and sewn. Here is a sampling of what I have made using her techniques.

With all the details required for her garments, I thought I would start my projects small and began making the uber cute bolero from her third book. I used the spiral applique technique and the herringbone stitch. It was so satisfying to make this and I worn it a great deal last summer.


Spiral Bolero front


Spiral Bolero Back


 After constructing the bolero, a few skirts, and a couple of failed projects, I decided to tackle a dress or two. I thrifted some lovely tan jersey fabric from the local Value Village and used some plum jersey from my stash. I used the paisley stencil and tank dress pattern from Alabama Studio Sewing and Design. I made this dress in a single layer and am happy with it because of the Texas heat, but I think I prefer the heft of a double layer garment.
I
Alabama Chanin Paisley Tank Dress


Detail of the skirt

Detail of the herringbone stitch on the neck and arm bindings.
This dress took a month to make and I relished the slow progress as I went along, but boy was I glad I didn't decide on an all over design. I wanted it to be done so I could wear it! I am very happy with the end result and am so ready to move onto the next project.