Showing posts with label stencil making. Show all posts

Thursday, August 13, 2015

Hand- Sewn Reverse Applique and Applique Tops with Free Image Download.

I wish I was a regular yoga exerciser. I like the idea of being the type of person that is zen. meditative and relaxed. I own a yoga mat and I've attended a few classes. Every time I do I realize it hurts it's not as easy as it looks and I would rather sweat hard for 30 minutes then be silent for an hour.

I recently had reinvigoration of the idea of doing yoga. There I was, downward facing dog, staring at my yoga mat. Sweat beading on my brow, wondering if I would get to the point when this would be fun. Suddenly, it hit me! The mat I have been staring at would make an excellent stencil! With a blast of creative inspiration, my burning limbs and taut muscles suddenly did not hurt so much. 

Using the stencil making steps I previously wrote in this post; I got to work. I photographed my mat and manipulated the image in Publisher to get the 18in x24in image to use as my stencil image (Thanks Dr. Fun).  


I decided to use my stencil for shirts hand-sewn in reverse applique and applique techniques on cotton jersey. I will show the reverse applique shirt to begin with. I decided to use my trusted vintage Simplicity 9300 pattern that I used to make a halter top.


I have an airbrush and love the results painting with it produces. It is however, 100+ degrees in my Texas garage. I was not willing to spend any time in there to paint fabric. I also know you may not have one, so I wanted to show an alternative. 


I applied a light layer of spray adhesive to the back of my stencil and positioned it on top of my fabric. This helps me get crisp edges around the shapes and helps the stencil stay in place when using an airbrush.  Using a 3-1, paint to water ratio, I thinned it out a bit. Using the paint as is, makes the fabric less flexible than I like. (Okay, I really didn't use that ratio. I just poured about an inch and a half into another bottle and added some water and shook it!). sprayed multiple light layers to get the saturation I needed taking care to let each layer dry before the next. 

Next, I cut the front of the shirt and made a tiny hole in each large shape. This makes the cutting out easier later. I then basted it to the red backing layer at the arms and neck.

Stenciled top layer basted to the back
  
Shape with hole to aid in cutting later.

I prefer to join my layers while it is in an embroidery hoop. Using button and craft thread, I sew a running stitch around each shape. I tie a double knot to secure it after each shape. Using the hole I previously cut as an entry, I removed the middles leaving about 1/4 of the silver paint.


Here is the completed shirt.

I sewed the internal seams on my machine and hand-sewed the external seams laying them down toward the back. I really like the curved hem on this.


I bound the neckline with a bias strip and secured it with a herringbone stitch. I am still working on getting it to slant less.


I really do enjoy the puff sleeve on this.


I am very happy with this result. The bold red is very striking when paired with the silver paint and black fabric. This stencil size is large and relatively fast to sew. 
This look can be created using a tried and true t-shirt pattern. Use a dinner plate to cut the curve of the hem and end your stitching about 8-inches up.

I enjoyed this stencil so much, I made another in the applique technique using vintage Butterick 3681 to make view A. Mccalls 7093  is a currently available close pattern match.
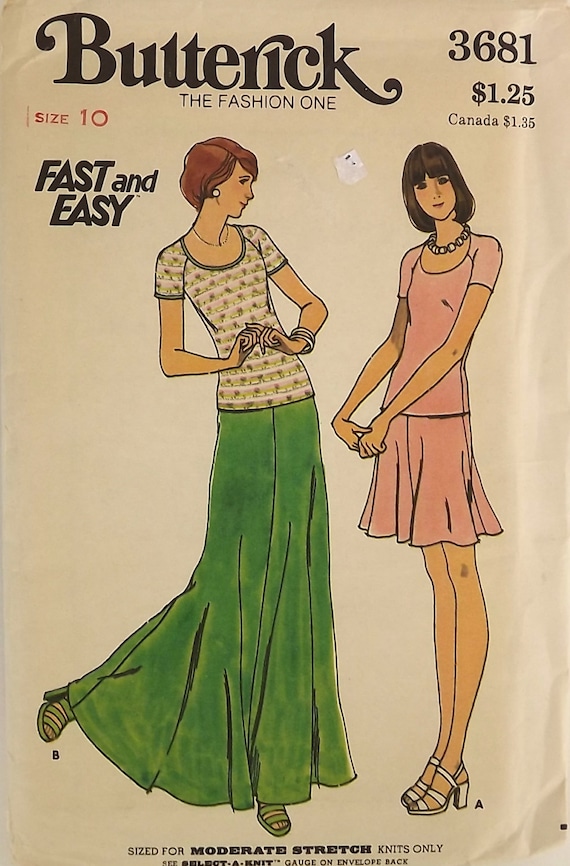

     Vintage 70's Sewing Pattern, Top and Skirt, Size 10

The beginning of the process is the same without cutting a hole in the shape before sewing the layers together. For the applique, I cut around the shapes outside the gold paint by about a 1/4 inch. All the outside fabric is removed.


The internal seams of the top and skirt were machine sewn. The visible seams are laid down and hand-sewn. The neck binding was secured using the herringbone stitch.


I like the depth of the neckline, raglan sleeve with a shoulder dart. The sleeve and bottom hems are left raw; they will curl when washed. Speaking of washing, I machine wash on delicate inside out. The quality of the stitching and paint have not been compromised  in my many hand-sewn garments. 


The texture in this effect is so fun, isn't it? 

If you want to make these tops, or some other garment you can! You can download the pdf image of this stencil for free in My Craftsy Store the link is in the right column. It is a 6-page landscape layout that you can download, piece together and make.  If you use it, please share your projects with me!

Happy Sewing,
Bianca


Saturday, November 22, 2014

Reverse Appliqué Jersey Dress: The Great Pattern Review Sewing Bee- Round # 3


So I, along with 24 other contestants, have advanced to the next round of the The Great Pattern Review Sewing Bee- Round #3. For this project, we have been given the Winter Street Dress, to make a dress using two knit fabrics. Both fabrics should be knits (printed or solid colors). There is no limit on how much or how little of the 2nd fabric you use, as long as its visible and enhances the garment.
Winter Street Dress Courtesy of Pattern Review
On my initial reading of this project and the rules, I have to say I was enthused. I am NOT a fan of PDF patterns with all of the cutting and pasting together. (I think I may have mentioned that a million times before). Additionally, though others look great in it, I am not a fan of this style of dress. I don't think the is waistline flattering on me. I do love the sleeve variations especially the slight flounce. Given a choice however, I would not have not have chosen this pattern.
  
Given my reticence about this round, I chose to rely on my old favorite sewing technique of hand-sewing jersey knit fabric. I thought the requirement to use two knit fabrics made this an awesome candidate for reverse applique. I briefly considered making my stencil, as I have done before. Given the time constraints, I decided against it. I recently purchased another fabulous home decor stencil from the same company that I used to make my Moroccan Halter and Tank top.  I had yet to use it and thought this would be a great opportunity.
Stencil image
                     
The rules allow you to modify the pattern in any way you like. I was really excited about that. I wanted to accentuate the lattice work in the stencil. The front and back of the dress are cut as two pieces with box pleats. I decided to make the front and back pieces one continuous silhouette and eliminate the pleats. I have never done this type of modification to a pattern. I have a large  pattern stash. If I want a pattern in a specific style I simply look in my stash and find one that works. 

I thought the path of least resistance would be to change the pattern rather than working with the cut fabric. After downloading and cutting the pattern (grrr), I prepared it for my modification. I simply chose to pleat the skirt portion of the pattern and tape it to the upper bodies of the front and back pieces. This way I got the pattern to the size I wanted while eliminating the pleats.

I cut the medium to begin with, but graded down to the small.  My dress is constructed in a double layer of 100% jersey knit in cream and light green. The front cream layer of the fabric is airbrushed painted in an opaque gold paint. I stenciled the front in 4 sections with 30 minutes drying time between each painting. You can read about my airbrush in this long ago post.

Airbrushed along the edges because the centers will be removed.

Fabric stenciled in for sections and covered to prevent over spray.
Two hours later, it is all dry
This dress is embellished with the reverse applique technique. To achieve this effect, I basted the stenciled front to the green under layer at the arms and neckline. Using white button and craft thread, I hand-stitched along the outside of the stenciled shapes through the two layers of fabric.
Once the entire front was stitched, I cut the center of the shapes leaving about a 1/4 inch or so of the gold painted area.
Front of dress stitched with the centers removed.

I even like the back of the stitched panel.
Next, I sewed the front to back at the shoulders and side seams on my machine with regular thread. I checked the fit, and adjusted it at the side seams for a closer fit at the bust and waist. I serged the seams for a clean finish, pressed them to the back and felled them down with hand-stitches. A leather thimble was crucial to aid in sewing through six layers of fabric with the thick thread. 

The neckline of the dress is trimmed with 1.5 inch jersey bias binding folded in half. The binding was pinned, basted, and then secured with a hand-stitched herringbone stitch. This stitch was made using button and craft thread. The hem of the dress and sleeves are left raw and will curl in time.

Here is the completed dress:


Sleeve Detail

Solid back

Herringbone stitch on the neckline.
We are asked to explain why our garment should advance to the next round. Here is what I said:
This dress looks great on the many people who have made and reviewed it. I however, did not purchase this pattern because the front and back pleats and two piece front is not my style. I feel my modification is true to the original design while making it more appealing to those who passed on it for the same reasons I did. The fact that the modification is an easy fix further bolsters the appeal to those who may now be interested.

I made a largely hand-sewn garment in a fairly short time. I have made hand-sewn garments over the course of many months with impressive results. I am pleased that I was able to complete this dress with pattern modifications in a matter of days. I know many people have wanted to venture into hand-sewing projects, but are intimidated by the time commitment and perceived difficulty. I feel this project may inspire someone to see it is manageable and may encourage them to try something new. An impressive project focuses on the creator, while an inspiring project focuses back to the observer. I hope this dress achieves both of those things qualifying me for the next round. 

I am happy with this dress. I love the feel of the double layers of jersey. I am pleased with the way color scheme worked together. The sleeves are adorable and the length is perfect straight from the pattern. I love the texture of the reverse applique in this large scale motif. I will make this again. What do you think of an ombre dyed bottom layer?

We do not get feedback from the judges as to why we advance or are eliminated. I do not know where I stand. The results for this round will be announced in one week. I will let you know how I do on the Thanksimadethem Facebook Page.


Happy sewing,
Bianca

Monday, August 12, 2013

Making A Felt Stencil for Hand-Sewing

You can buy stencils for your hand-sewing projects or you can learn to make your own.  A blog reader recently asked about my stencil making process and I outline it here.

Supplies needed:
  • Microsoft Publisher
  • 2 Sheets of 12in. x 18in. Pennant Felt (Can be bought at hobby and craft stores for about $1) This will give you a stencil 24in x 32in in size.
  • Stencil image or text of your choosing. If you are unsure of the suitability of your image, print it first and cut the areas to be removed from just the paper. The cut area will be your painted area.
  • Spray Adhesive
  • Sharp Blade (a rounded tip blade works best, but a straight edge works as well)
  • Sewing Machine
  • Rotary Cutting Mat
Sew your felt pieces together

At your machine, align the 2 long sides of your felt together and sew using  a zig-zag stitch. Practice and adjust the stitch width until it is wide enough to secure both sides of the felt. Sew twice.
Felt sheets joined using a zigzag stitch

Stitched Felt and stencil image
Prepare your artwork

Open a new Publisher document and choose a custom page size. Adjust the width to 32in and the height to 24in. Insert your saved picture and enlarge it to fill the page dimensions. Check  the "Print Preview" to see that the image does not go completely to the edge of the page. You want about .5in- 1 in. along the entire image.

Go to your "Print Preview" under "File". You will want to print a "Tiled" picture. Adjust the overlap down to 0.000 (there will still be a little there).  Print your image, in fast draft and black and white, you do not need a high quality color image here.


Lay the sheets out and trim the overlap area away on the sheet which will be on top. In this image, you will trim the left overlap on the right sheet.


Tape sheets together and repeat until you have the entire poster joined.


You will want your completed stencil to have an uncut border with no shapes. If you have shapes that will extend over the edge do not cut those. Use a marking tool to draw around the shapes you will not cut.


 Use spray adhesive to secure the image to the top of the felt.


Use your Rotary mat as a base and cut out the shapes using a sharp blade. This is a time consuming and at times a tedious process. It is well worth the effort for a stencil you can use again and again and will not break the bank.


My cutting tools
Almost done!
Once you are done cutting, examine your shapes to check that you removed all of the felt from your cutting area. Look to the bottom of the point below. There is a bit of felt still left. Trim it away.
Double Check Cuts

Trim shape as needed.
Double check your stitching and resew, if needed. I suggest you hand sew areas that need it and not use your machine. Remember your stencil still has the residue from the spray adhesive (Laura asked a great question in the comments below, check it out)! I did not need to resew any areas on this stencil. If you use an image with smaller shapes, it may be necessary.


All done! Here is my completed $2 stencil next to my purchased $60+ stencil! (Never throwing my money away like that again!)


My completed stencil!
I am now ready to get painting! I hope you found this helpful!

Update: The stencils illustrated here are Alabama Chanin. This post was written when I supported the company. You can read here why I no longer do here. This post is popular and the information is useful for making any stencil you wish, go make something pretty. :)

Happy Sewing,
Bianca