Showing posts with label B.I.R.A.. Show all posts

Monday, November 9, 2015

It's All About Love and OOP Simplicity 5192

Why do I sew? Because I love it! I love to make fun and creative clothing using fun fabrics and long forgotten patterns. I get seriously excited about the process and super thrilled with the result. My friends know I am a sewing fiend and when they can, they feed my need.

This Spring, I got the sad news that a friend was leaving the country with her family. She could not take everything with her, so she wanted me to have her fabric. I was simultaneously miserable and elated. I vowed to put her fabrics to good use and do them justice. 


I really wanted to try my retro Simplicity 5192 pattern to make a fun tunic. You may remember I snagged this beauty in a recent stash building jaunt. I had planned on a Fall version of this tunic but, it is still sunny and warm here. I decided I am extending summer with this bold primary colored print with the repeat of "Love".


This dress came together really fast. It consists of front, back and facings for the armholes and neck.


The pattern gives the option for a traditional or invisible zipper. I opted for the latter to give a seamless back. I wanted this dress to be all about the print.
Back of dress on my custom dress form.
I was drawn to this pattern because it is a simple sheath with the flared sleeve detail. 


I love this pattern so much, I made another this weekend. I will post it when my photographer returns from preschool. Yep! These photos were taken by my 3-year old son! With such a fun dress, he wanted to get in on the action. He has quite an eye!


And he gives direction! "Now jump Mama!"


This pattern is out of print, but available in these Etsy stores. I have no information on the fabric so I cannot help you there (she says secretly glad to have all of it!). If you know anything about it, please share.

Happy and fun sewing,
Bianca

Saturday, June 13, 2015

The Lady in Red With Mccalls 7047

Hey, do you remember that I posted plans to make this dress? Well, I have done it!

                       M7047, Misses' Dresses

It made with McCall's 7047 a "Create It" patten with mix and match options. It allows you to create lined, pullover dresses with or without peplum have close-fitting bodice, back neckline, skirt and sleeve variations, and elasticized waist. Peplum and long skirts: narrow hem. Long skirt with train, wrong side shows on hemline.    
                    Line Art
I was asked to make this dress for a friend who will be celebrating her 60th birthday this month. She wants to enter the next decade with pizazz  and va-va-voom! I was so excited to work with her. She knew what she wanted! She chose, bodice 3, with no sleeves, and skirt 9 made in sparkly "Ga-Ga Red Sequin". This Poly/Spandex blend has a 2-way stretch and a whole lot of shine.

Ga-Ga Red/Red | Solid Stone Fabrics

In a rare moment of rule following, I made a muslin shortly after she commissioned the dress. I tested the fit and tweaked it as needed and waited until now to make the real one. She wanted to tighten up her already fab bod and successfully dropped a dress size. I began working on it and it can together relatively fast. Well, let me restate that. I had uninterrupted time to work on it while the darlings are in summer camp.  

Have you worked with speciality fabrics like all over sequin? There are a few tricks to make things go smoothly.

  • Use a new rotary blade at the start of the project for clean cuts.
  • Use a new ball point needle for sewing knits. 
  • Use pattern weights not pins where possible.


  • Tailors chalk, not disappearing markers show up well and dissolve easily with a touch of heat.


  • Always press with a press cloth on the lowest setting.   
  • When sewing, keep the sequins side facing up with the smooth side, or lining fabric on the feed dogs.
  • Stitch/edge finished the seams using a seger and use a 3.5mm stitch length when sewing on the machine.
  • Expect a lot of sparkly debris in your work area.


Here is the finished dress on my custom dress form. I have pinned the dress to it so you can have an idea of the drape. I cannot wait to see my friend in it as she sizzles and pops in all the right places to make this dress sing. 


Back of the dress with wide draped cowl. 

Cowl front

Full Front

Drama in that drape!

I love the puddle train (still to be hemmed).

One shoulder drape variation


I have written a pattern review that you can read here.

I am anxious to see her in this dress! I will post pictures of her in it at the party. The dress code for the party is white attire for the guests. I am still deciding on the outfits for myself, my daughter, son and hubby. The party is in two weeks, so I need to get on it.  I am happily taking suggestions on a dress for me. If you have good ideas, please share!

Update! Here is the lovely birthday girl in her show stopper! She wore white for the first half of the night. When she stepped back into the room there was an audible gasp! She was stunning! My camera did not do it justice, but she glowed! I had goose bumps and teary eyes most of the night! I am so glad to have had the privilege to make this for her.


Happy Sewing,
Bianca


Saturday, May 16, 2015

Resale Store Connections and a New Dress Form

I love to treasure hunt at resale stores. My favorites are the small, personal, charity or church run stores. They usually have small personable staff, with management that  turns over little.  It is a great place to find vintage fabric, patterns and sewing notions.  I am always excited when I stumble upon a deal. Much of my adventures are hit or miss with a lot of hits. To minimize my misses, I have begun to established relationships with the managers. I ask them to give me a call if they get sewing items in their store.

Yesterday, I got a call from one of my contacts. This was the first time she called and I was so excited! She told me that she had an adjustable styrofoam dress-form to sell. I do not need one as B.I.R.A, my custom dress form, is still working great for me. I knew that to keep this connection, I had to check it out. Unless she was selling trash, I was pretty much going to buy whatever it was she had (I can turn down future items, but I wanted to be sure there would be a second call).

Lucky for me, the form was in great shape and a great price.

 This is the first time I have seen one like this.


 It is made of styrofoam with dials that adjust along the side.


It is segmented and because it is foam, pinnable. 


The tripod stand is awesome! It is so substantial. It will surely hold the weight of whatever she wears and the height is adjustable great for long dresses and skirts. I have been doing prom and bridesmaid dress alterations lately. Coincidentally, my clients' clothes have been the size of B.I.R.A or my plus size form. This one will come in handy for those garments that are not.
 
There are no identifying markings on it short of this sticker on the back. Do you readers know anything this form? I would love any information you can share.

Happy Sewing and Thrifting,
Bianca

Thursday, May 14, 2015

Polka Dot Promises with Vogue 9112- Again!

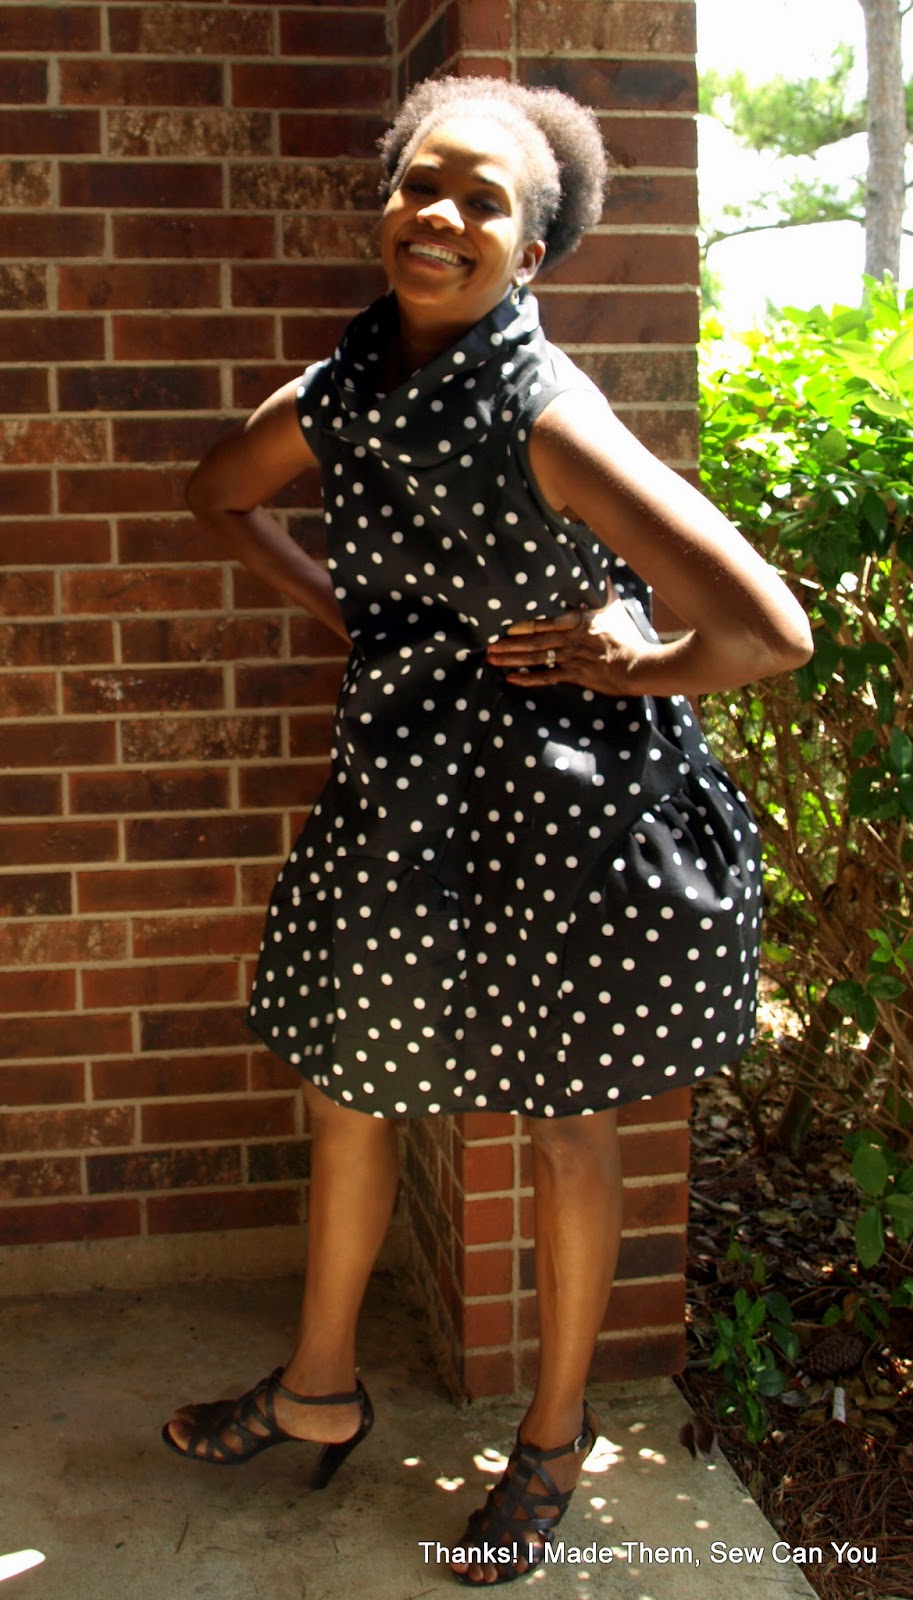
You remember how much I loved Vogue 9112 in my lemon yellow linen, right? Well as promised, I made another for myself in a black and white polka dot cotton.
                                                

This version is just as fun as the first. I like the quirky feel the polka dots adds.


Unlike, the yellow version,  I feel like the details of the seaming are lost in the small scale print I chose. I knew this was a risk when I was making it, but I do not mind. The fabric is a mid-weight cotton with a slight texture that holds its' shape well. Knowing the volume and angles would be maintained, I proceeded with this print. If you plan to make this in a print, I suggest you choose a sturdy fabric with a large scale print so all of the fun of this pattern is not lost.


In construction, I made a couple of changes from the previous version and the pattern. I still omitted the neckline facing and opted instead to edge finish with my serger. I choose to self-line the collar so the underside of the fabric was not visible. For this, I cut two collars, stitched them right sides together along the top and sides. I then flipped it, pressed it, and then transferred the markings. From there, I sewed it to the body of the dress as instructed. 


I like that by lining it this way, I can stand the collar up or flip it down. 


I decided, to omit the arm facings and use bias tape instead. I did this just to test it because I had it on hand. It was faster than the facing and had the same result.


So, what do you think? Are the dramatic elements lost in the print? Is this a dress better suited for larger prints or solids? 


I love them both and plan to make more. It is a fun everyday show stopper perfect for the Texas heat. 

Happy Sewing,
Bianca

Sunday, April 19, 2015

Hand Sewn Details on DVF Vogue 1663.

I like an underdog. I like to root for the long shot, the geek, the less than popular one. We all know the quintessential DVF wrap dress and are familiar with the popular Vogue 1549 pattern. I made the dress for myself last year. This time around, I have sewn up an underdog DVF dress pattern from my stash. 


Vogue 1663
I love a good maxi dress and even better if it has pockets. This dress is a semi-fitted and slightly flared, pullover dress. It can be worn three inches below mid-knee or evening/maxi length.  It has a pointed collar, cutaway armholes, front button and self-loop closing and pockets in side seams. It has a self-tie belt holding in fullness at waistline. The pattern calls for topstitching, but I chose to extend it with all over hand sewing. 
This is not a multi-sized pattern but lucky for me, my copy is a size 10 requiring no modifications. For fabric, I  used an interlock knit that is buttery soft. I found it at a Value Village resale store. It had been hacked up by the previous owner, but I saw the potential in what was left. 

The instructions are great on this simple dress and it came together very fast.

I love a flowy maxi dress. This dress is shapeless and drapey without the belt and fun in that "Mrs. Roper's" from "Three's Company" way. 


With the belt synched, it has less of a boho feel. 


Back
Pockets in a knit can be tricky considering the weight of the contents. These pockets are great. The pocket extension on the pattern factors that in well. I can put my cell phone and keys in them without bulk or distortion. 

My favorite thing about the pattern are the seam lines, the collar, and front opening. They were a perfect canvas for hand-sewn topstitching. I had not done hand-sewing in a long time and I missed it (thanks Helen for reminding me)

Hand- sewn top-stitching details on dress worn by  My Custom Dress form.

Front details

Hand-sewing along side seams. 
I machine sewed the majority of the internal seams and used button and craft thread to add hand-sewn details to the seams. I stitched the approximately 20 feet of seams all down by hand. It was not as bad as it sounds and worth it. I cut the skirt at the hemline and left it with a raw edge. 

If you get your hand on this out of print pattern, I say grab it and give this unsung pattern a go. 

Happy Sewing,
Bianca

Sunday, February 1, 2015

African Print Coat with Leather Sleeves

I have mentioned before my love of African Wax fabric and designers who use them. I have pinned a million and one garments that inspire me. Pattern Review was hosting a  Bargainista Fashionista Contest  this month. I entered it at the start of the month with the plan to make something truly spectacular based on designs of the items I pinned. My lofty plans deflated a bit as I got super busy, but I was still determined to complete an entry.

Based on fabric and patterns in my stash, I used a Stella Jean coat as my inspiration for my project.


Back on BIRA
Pocket
Lining
I used Simplicity 2311 as my base because it is a misses coat in two lengths with sleeve, collar, and belt variations. The basic silhouette is the same and the pattern has a large collar.
                                           Simplicity Misses' & Miss Petite Coats 2311

For fabric, I used an African wax fabric from Ghana. I was given it as a gift by a friend I taught to sew. I have had the fabric for years, but never used it. The design looked naughty to me (look again, do you will see it?). My hubby says it is in my head and that he does not see what I see, so I decided to finally use the fabric. For the lining, I used a polyester fabric from my stash.  After laying out my fabric, it was 1/8 a yard short for the sleeves. I recalled seeing a Burberry coat with contrast leather sleeves and decided to go that way. I chose to sew the sleeves with repurposed leather.


I did not like the instructions in this pattern. The jumped around so much, I felt I needed to put all of my energy into understanding it. I like background noise when I sew. Sometimes it is an audiobook, or  television show or a movie. I had to stop watching The Shawshank Redemption, a movie I know by heart, to not miss an instruction. It was very frustrating. I have never had issues with Simplicity PR patterns and assumed these would work like others in the past. These were the worst; I hate them like broccoli. The pattern was not completely bad. The lining instructions were better than others I have seen. 


I would sew this type of coat again, but not with this pattern. I am sure there are easier to read patterns out there. 


The Stella Jean coat cost $1190 

My coat 
$45 estimate for the African fabric from Ghana
$10 for lining
$1 for the pattern
$.25 for leather from repurposed jacket
An estimated cost of $56.25


Amount saved $1133.75 saving 95.27%

Conclusion: I am so in love with Stella Jean Designs. Her use of large scale vibrant African fabrics is drool worthy and completely out of my budget. I am happy to find a use for my gifted fabric. This pattern was a pain, but all in all, I am pleased with my result. I have a large collar, large scale African print coat that does not break the bank. The leather sleeves are interesting and a departure from the inspiration, but I am glad I went that way.


Happy Sewing,
Bianca

Monday, November 17, 2014

Mildred, My Adjustable Dress Form Is Complete!

I have said it before, but it is worth repeating, I love it when a plan comes together. You may remember Mildred, my Acme adjustable dress form. She was generously given to me by a friend. She had been well loved and had some damage to her chipboard, jersey cover and her interior supports. In that previous post you can see a breakdown of what she needed and the first part of that repair.


Most of the repairs I made where made by trial and error and guesswork. I made a paste of shredded paper and Mod Podge to fill the holes in the chip board. 

On the portions that were broken completely, I supported the sides in the proper position, filled with the paste if needed and let it dry. Once it was dry, I Mod Podged  pattern paper over the filled seams and holes.

Once I was satisfied that the structure was sound, I looked in my stash to find a suitable cover for Mildred. It is in times like these that I know how hoarders are born. I found some lace scraps in my stash that until now could not conceivably be used for anything.  I cut it to size and discovered it was just enough to cover this form! It was confirmation that I should never throw scraps away, ever!

The lace is a large scale motif and the fabric beneath would show. I needed to cover the under layer with an attractive color. I decided on metallic silver spray paint. I went this route to kill two birds with one stone. Despite my cleaning the nuts, bolts and supports with steel wool, it was still a bit dull.  In addition to covering the fabric, the paint promised to cover existing rust and prevent more from developing in the future.

First coat of silver spray paint.
After the pieces were painted and dry, I applied spray adhesive to the back of the pre-cut lace and painted fabric side of the form and covered it. I allowed about a 1-inch seam allowance on all edges and wrapped it around the sides. I secured the overlapped edges with Mod Podge. I knew it would dry hard and adhere to the chipboard underneath. I was uncertain how the decoupage medium would affect the lace on the front. I wanted it to be secure, but not hard to the touch. My plan was to try it with only the spray adhesive and if needed, add layers of Mod Podge for fabric in time.

She started out as Mildred, but now that she is dressed in this sexy lace number, I have renamed her, meet Millie. She is repaired and standing straighter in her new loveliness.

She only took about 2 days of active work. I left her to dry and cure for a few days in between the work days. I made two minor time-sapping mistakes along the way. The first is not marking each piece and their position when I took it apart. I photographed them and thought it looked obvious which was right front, and left back and so on. The lace cover and coupled with the distraction of two children playing, it is not so obvious. In the end, it worked out. 

The second thing I should have done, was spray the nuts and bolts with a lubricant after the rust removal. They were clean but, a bit stiff to turn when I was putting it back together. The putting it back part requires holding many moving segments in place while tightening them. 
Close up of the upper body.

Lower body
This was a fun and satisfying project. I am trilled that I was able to restore her and bring her back to a usable and beautiful state. There is always a fear of ruining such a treasure, but I am glad I took the risk. Best of all, the friend who gave Millie to me is pleased with the result.


Happy Sewing,
Bianca