Showing posts with label custom dress form. Show all posts

Saturday, June 13, 2015

The Lady in Red With Mccalls 7047

Hey, do you remember that I posted plans to make this dress? Well, I have done it!

                       M7047, Misses' Dresses

It made with McCall's 7047 a "Create It" patten with mix and match options. It allows you to create lined, pullover dresses with or without peplum have close-fitting bodice, back neckline, skirt and sleeve variations, and elasticized waist. Peplum and long skirts: narrow hem. Long skirt with train, wrong side shows on hemline.    
                    Line Art
I was asked to make this dress for a friend who will be celebrating her 60th birthday this month. She wants to enter the next decade with pizazz  and va-va-voom! I was so excited to work with her. She knew what she wanted! She chose, bodice 3, with no sleeves, and skirt 9 made in sparkly "Ga-Ga Red Sequin". This Poly/Spandex blend has a 2-way stretch and a whole lot of shine.

Ga-Ga Red/Red | Solid Stone Fabrics

In a rare moment of rule following, I made a muslin shortly after she commissioned the dress. I tested the fit and tweaked it as needed and waited until now to make the real one. She wanted to tighten up her already fab bod and successfully dropped a dress size. I began working on it and it can together relatively fast. Well, let me restate that. I had uninterrupted time to work on it while the darlings are in summer camp.  

Have you worked with speciality fabrics like all over sequin? There are a few tricks to make things go smoothly.

  • Use a new rotary blade at the start of the project for clean cuts.
  • Use a new ball point needle for sewing knits. 
  • Use pattern weights not pins where possible.


  • Tailors chalk, not disappearing markers show up well and dissolve easily with a touch of heat.


  • Always press with a press cloth on the lowest setting.   
  • When sewing, keep the sequins side facing up with the smooth side, or lining fabric on the feed dogs.
  • Stitch/edge finished the seams using a seger and use a 3.5mm stitch length when sewing on the machine.
  • Expect a lot of sparkly debris in your work area.


Here is the finished dress on my custom dress form. I have pinned the dress to it so you can have an idea of the drape. I cannot wait to see my friend in it as she sizzles and pops in all the right places to make this dress sing. 


Back of the dress with wide draped cowl. 

Cowl front

Full Front

Drama in that drape!

I love the puddle train (still to be hemmed).

One shoulder drape variation


I have written a pattern review that you can read here.

I am anxious to see her in this dress! I will post pictures of her in it at the party. The dress code for the party is white attire for the guests. I am still deciding on the outfits for myself, my daughter, son and hubby. The party is in two weeks, so I need to get on it.  I am happily taking suggestions on a dress for me. If you have good ideas, please share!

Update! Here is the lovely birthday girl in her show stopper! She wore white for the first half of the night. When she stepped back into the room there was an audible gasp! She was stunning! My camera did not do it justice, but she glowed! I had goose bumps and teary eyes most of the night! I am so glad to have had the privilege to make this for her.


Happy Sewing,
Bianca


Saturday, May 16, 2015

Resale Store Connections and a New Dress Form

I love to treasure hunt at resale stores. My favorites are the small, personal, charity or church run stores. They usually have small personable staff, with management that  turns over little.  It is a great place to find vintage fabric, patterns and sewing notions.  I am always excited when I stumble upon a deal. Much of my adventures are hit or miss with a lot of hits. To minimize my misses, I have begun to established relationships with the managers. I ask them to give me a call if they get sewing items in their store.

Yesterday, I got a call from one of my contacts. This was the first time she called and I was so excited! She told me that she had an adjustable styrofoam dress-form to sell. I do not need one as B.I.R.A, my custom dress form, is still working great for me. I knew that to keep this connection, I had to check it out. Unless she was selling trash, I was pretty much going to buy whatever it was she had (I can turn down future items, but I wanted to be sure there would be a second call).

Lucky for me, the form was in great shape and a great price.

 This is the first time I have seen one like this.


 It is made of styrofoam with dials that adjust along the side.


It is segmented and because it is foam, pinnable. 


The tripod stand is awesome! It is so substantial. It will surely hold the weight of whatever she wears and the height is adjustable great for long dresses and skirts. I have been doing prom and bridesmaid dress alterations lately. Coincidentally, my clients' clothes have been the size of B.I.R.A or my plus size form. This one will come in handy for those garments that are not.
 
There are no identifying markings on it short of this sticker on the back. Do you readers know anything this form? I would love any information you can share.

Happy Sewing and Thrifting,
Bianca

Saturday, January 3, 2015

Out With The Old in With The New Denim Jeans Refashion.

I am a keeper. I keep things that should be thrown out because the minute I do, I discover I need it. I was recently clearing out my closet and came across a few pair of jeans for the donate pile.


Before giving them away, I remembered that I wanted to make a pieced jacket using Vogue 8483.

This jacket has a lovely angled neckline, interesting seam lines, and offset buttons. I like those elements and was drawn to this pattern because of those features. I rarely make muslins, I know, I know. I am a bit lazy in that regard, but I also use my custom dress form to check fit during construction. For this unusual style garment, I thought a muslin was a good idea.

First, I cut the middle seam open.

Then, after ironing :) I cut the pattern pieces out using Tetris like placement.


Here is the completed jacket and review of the pattern.
Worn with my African  Inspired Maxi Skirt.


Pattern Description: Unlined, above hip or above knee length jacket has front extending to collar, princess seams, raglan sleeves in two lengths and asymmetrical closing with buttons and purchased cord for loops, stitched hems and topstitch trim. I made the short sleeve version.

Pattern Sizing: B5(8-10-12-14-16), GG(18-20-22-24) I made size 10, no adjustments. 

Did it look like the photo/drawing on the pattern envelope once you were done sewing with it? Yes, the shape is the same, but my "fabric" added additional seam lines.

Were the instructions easy to follow? Yes, very easy.

What did you particularly like or dislike about the pattern? I like the different lines on the sleeve and the collar. I like the asymmetry of the front and button placement. I like that you can wear it buttoned up 


for one look and 

open for another.
I thought the collar would be more dramatic than it is. I have a thing for dramatic collars if you remember my Dress shirt refashion.

Fabric Used: Denim jeans repurposed for this jacket.

Pattern Alterations or any design changes you made: I used a contrast menswear fabric for the facing. I did not want to make loops, so I repurposed an elastic hair tie cut in three lengths. It is a densely covered elastic that is strong enough to be secured over my large button.


Would you sew it again? Would you recommend it to others? I made this as a muslin with the plan to remake it.  I did not think I would make it again. I prefer a tapered waist that gives more shape. It may be the weight of the denim, but I think it is boxy at the hip and I do not love that. Additionally, the curve of the sleeve is a bit raised and I do not like that. I think my denim is responsible for my drape issues. 


I thought I was done with it, but then I posted it on Pattern Review and got a renewed perspective on it. The lovely folks on PR were so kind on that review. I worn it to church today and a fan of it bought it right off my back! I guess I will have to make another. Hubby just gave me a pair of black jeans he is done with, so I am set for fabric :)

Conclusion: I thought this was a nice pattern and good test for repurposing jeans. I am pleased with this version. It is a nice twist on a jean jacket and I am sure to get much use from the other one I have to make for myself.

Tuesday, December 24, 2013

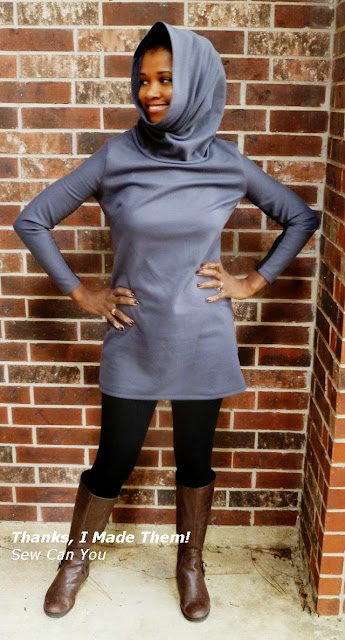
Over-sized collar tunic with contrast sleeves


It is cold here in Texas and time for more warm clothes! The window for warm clothes is very small so I have to be selective about I sew and it has to come together quickly. I had this out of print Vogue 8129 pattern in my pattern cabinet and have been waiting to make the over-sized collar tunic.

Vogue 8129
The pattern includes a misses dress, tunic, and pants. It has a loose fitting, slightly A-line dress, two inches below knee, ankle length or tunic. It has an over-sized bias turnover collar or standing collar and short or full length sleeves. To make the outfit complete there are straight-legged pants, without side seams that have an elasticized waist.

I cut this out about two weeks ago and ran out of fabric for the sleeve. At the time, I  was able to cut two smaller sleeves from the fabric hoping it would be enough. I have skinny arms, so I thought, eh, it would work out; I was so wrong. When I got ready to sew it, I completely forgot that I did not have enough fabric for the sleeve and sewed it up with no adjustments. The sleeve did not fit and I had a Tim Gunn "make it work" moment. 

I sewed the sleeve in flat on my serger and didn't want to cut through all of that stitching to fix the problem. I decided to insert a gusset in the sleeve under the arm in a contrasting color. I cut it in a black four-way knit I had in my stash. I chose a super stretchy knit because it allowed me to be less precise with the amount of fabric I needed for the gusset. The gusset was  a three inch wide rectangle that is as long as the sleeve and came to a point under the arm. It worked out great and I am so pleased with the result.
Adding a gusset
The pattern called for a 22-inch zipper for the back closure. I was torn between using an invisible or exposed zipper and asked for input on my Facebook page. The overwhelming opinion was for an invisible zipper. Many people thought the exposed zipper detracted from the look.

Exposed zipper option on B.I.R.A
I am really grateful for the input I got. Ultimately, I decided to omit the zipper altogether as the fabric has a lot of stretch and the neckline is large. I was leaning toward the exposed zipper before the poll and am so glad I asked because I think with the gusset, it would have been too much.
Vogue 8129
The pattern instructs you to tack the collar to the inside neckline seam. I decided to leave it free so I can adjust the drape to suit my mood.
Over-sized Collar
 
Back
 
Gusset sleeve and no zipper
I haven’t seen many current turtleneck patterns in the pattern books. If you want a similar tunic, Vogue 8670 comes close if you cut the neckline wider, increase the size of the collar and add length.

V8670 
This is such a fun tunic. I want to wear it everyday! I have a green version cut and I like the idea of making one in a solid with a print collar. We will see, it is 30 degrees today, but it may be 80 tomorrow!

Happy Sewing!
Bianca

Wednesday, December 11, 2013

Alabama Chanin Bloomers T-Shirt

Back in August I made an Alabama Chanin Bloomers stencil with the intention of making a t-shirt and a four panel skirt.  My design plan led me to airbrush navy blue cotton jersey using white paint and use black cotton jersey as the backing fabric.


Painting skirt panels.

Skirt and shirt panels.

T-shirt all painted.


Summer stitching by the pool.
 I decided to stitch using the reverse applique technique with the knots exposed  and thread tails visible. 


All stitched and painted areas cut away.


I hand-stitched the front and back panels together per the instructions in the book (from memory at this point).  I felled the seems to the inside and bound the neckline using a beaded parallel stitch. I added three seed beads to each stitch and stitched it using a single strand of button and craft thread.

Beaded Parallel Stitch 

Completed Top on B.I.R.A
I am happy to have completed this top and I am steadily working on the four panel skirt to go with it. I will update when it is all done. I am not sure how long that will be as I am stitching away on a dress, and a beaded paisley top.

Happy Sewing, 
Bianca

Wednesday, July 3, 2013

Meet B.I.R.A. My Custom Two-way Dress form


I used to own a sewing dress form. It was one of those mass produced numbers you can adjust to fit your size and height. I fiddled with the knobs on the bust, but the waist would shift. I would widen the hips, but the rear would shift out of whack. It was a good guideline for garment fitting but, it did not adjust to fit MY body. I sold it to someone on Craigslist. She could use it more than I, and I was happy to get rid of it. 

I continued to sew without a form and did okay until I recently lost about 25 pounds. I was able to cut and sew a pattern from the big four US companies and know it would fit based on history. Since losing weight, I have found it difficult to determine the correct size to cut and sew. My mind sometimes gets stuck on the larger size despite the objective data of my measurements. It occurred to me that a dress form would come in handy for tissue fittings and adjustments as I went along. That said, I couldn't see purchasing another like the one I had.

I did some research on other brands and types of forms that provide a more realistic replica of ones' body, but the cost was prohibitive. I did some Pinterest looking and found paper tape, duck tape and plaster cast D.I.Y options. After reading a multitude of methods, I did not find any one that suited my needs. Some were armless or legless, options that did not allow for sleeve or pant fittings. Others were not pin-able, or durable to last long term. Some instructions omitted key steps or were lacking visuals that I thought necessary for my success. 

I made a list of key features I wanted in my form and decided to design a form to suit my needs.
  • It would have arms for sleeve fittings
  • It needed to be more than standard torso only, or "one-way" dress forms
  • It would have hips and legs for lower body garment fittings for pants, shorts, swimwear, etc.
  • It would have a stand for dresses, but be easily removable to fit lower body garments.
  • It would be an exact replica of my body
  • It would be pin-able for draping and alterations
  • It would be fairly easy to make and could be done in a weekend or two
I got to work and made B.I.R.A (my Body Image Realignment Aid). This custom dress form is fantastic! She meets all the requirements I specified and more. I love her!


 Here is B.I.R.A in my Passport Dress


Here I am in the same dress!


Here she is wearing a pair of jeans and my Anna's Garden Fitted Tunic.


 Here I am in the same garment!


 Pants can be fitted from the hanging position


Or Shorts can be fitted on the stand. B.I.R.A is wearing my Cynthia Rowley overlap shorts.


I have documented the creation of B.I.R.A in a 15-page  pictorial digital PDF download. It is available for sale in My Etsy store.
It is also available on Craftsy.

For the next week I will be hosting a giveaway of this PDF instruction booklet. 
Enter to win a copy below! Please spread the news!


a Rafflecopter giveaway