Showing posts with label fitted tank dress. Show all posts

Sunday, December 15, 2013

Pressing Forward on my Alabama Chanin Anna's Garden Dress!

I am so excited to be making significant progress on my Alabama Chanin Anna's Garden negative reverse applique dress. Inspired by this dress:

                   Image


I started hand-stitching this four panel dress in February when I got my new airbrush and Anna's Garden stencil.


I enthusiastically began stitching the panels every chance I got. I took it with me to appointments, on drives, to the gym, wherever  I went; I could not stop working on it. That was the way it was for a good part of the year. I was making great progress until one day someone said something to me that made me change my perspective on this one. It was a benign observation that eluded me until they mentioned it. It was not a bad comment in itself, but it just took the wind out of my sails. 

It was not a conscious decision to stop working on this, but it fell by the wayside while I worked on many other things. It was bought back into my focus by Dr. Fun who is making a full length dress in the Anna's Garden stencil for Mardi Gras. Her dress is going to be beautiful and I cannot wait to see it completed. She lit the fire under me again to get stitching. 

Back in August I had half of the dress stitched and wrote about it here.

B.I.R.A Wearing half of the dress

Now, after renewed inspiration, I am making tremendous progress. Here is where I am today:
 
Front Completely Hand-stitched


Back still a work in progress

Stitch Details. I decided to keep some of the white paint in my version.
Getting There


Underside stitching
Though I love this, I am on the fence about keeping this dress for myself or selling it to help fund my Alabama Studio Week (if interested, email me). If I keep it, I hope to have it completed by my birthday in January. I am also hoping to have a place to wear it by then. :) 

Happy Sewing,
Bianca

Wednesday, May 29, 2013

Alabama Chanin Short Fitted Tank Dress with Random Ruffles


I am slowly and steadily stitching away at my Anna's Garden fitted tank dress that I airbrushed months ago. It has four panels that need to be extensively stitched. I work on it every now and then, but then I get impatient; I want it done now! More specifically, I want more Alabama Chanin pieces in my wardrobe. To that end, I step away from it to and work on a faster project
This time it is the Short Fitted Tank Dress from the book Alabama Chanin Studio Sewing and Design. I decided to make it using random ruffles for embellishment on the front. I chose to add a neck ruffle and a strip of contrast to the neckline. I found that pinning the random ruffles onto the dress front easier, than ruffling it as I went along. I got a few more pin pricks that way, but it went a lot faster.


I felt the neckline was too low for my liking so I added the gathered  ruffle to give more coverage. It did the trick in the front, but I think it made the back too heavy and it doesn't lay as flat as I like. I folded the ruffle in half before stitching it in place. Next time I will use a single layer for the ruffle. Not a wearing deal-breaker, but good to know for next time.

Here are is the finished garment as well a review of the pattern.


Be careful in marking the center front and side seams on this one! I am pretty certain I didn’t do this and sewed them wrong. Look! I think the side seams should be center and the center seams on the side! Grrr! I am glad at least that I made this mistake on this dress rather than another, with more embellishments. Lesson learned. I plan to resolve this issue by paying attention next time and wearing this one with a bolero I plan to make. Regardless, I like the dress and will wear it happily!

The problem seems obvious now!


Pattern Description:
Four panel tank dress from Alabama Chanin Studio Sewing and Design

 
Pattern Sizing:
 

S,M,L,XL I made a medium and sewed it with a 1/2 inch allowance.
 
Did it look like the photo/drawing on the pattern envelope once you were done sewing with it?
 

This dress is a combination of multiple elements from the book brought together in one piece. It looks like I intended.

Were the instructions easy to follow?
 

The books give very clear instructions and inspirations for creating multiple garments.
 
What did you particularly like or dislike about the pattern?     

I love everything about the patterns in this book. I do not like the depth of the neckline on the dress however. This dress is muslin to test increasing the modesty level with the added ruffle.
Fabric Used:
 

Jersey Cotton in Tan and Brown

Pattern Alterations or any design changes you made:
 
I made the fitted tank dress in the short length. I added four strips of brown random ruffles on either side of the center seam. I added a brown gathered ruffle to the front and back neckline. On top of the ruffle I added a 1.5 inch strip of tan jersey that I secured with a herringbone stitch. I bound the armholes with strips of jersey using a parallel stitch.

Would you sew it again? Would you recommend it to others?  

Yes and Yes!

Conclusion: Great books and start to an awesome addiction. 

Happy Sewing!

Monday, April 29, 2013

Alabama Chanin Fitted Tank Dress

One of the first items from the book the book Alabama Chanin Studio Sewing and Design that I fell in love with is this paisley dress. I have been hesitant to make it because of all of the hand sewing involved. Rather than make the fully detailed dress I decided to make an un-embellished muslin.


The pattern came from the third book. For this dress, I cut the size medium and sewed a 5/8th seam allowance into the dress when I constructed it. So the sizing is midway between the small and medium sizes. I found that to be the perfect sizing for me; not too tight, not too loose.

I used tan colored jersey fabric and "natural" color button and craft thread. I sewed it completely by hand using running stitches. I felled the seams to the inside and kept the knots unseen. I bound the neckline and arms using the cross stitch.


stitch details


Cross stitch detail


I love the shape of the dress and the hem that is long in back and slightly shorter in front. I do not like that the neck line is so low. I cut it higher, but had to readjust it after binding it. The higher neckline flopped over. I redid it by re-cutting to the original depth. 

Full length Fitted Tank dress

Long hem/ train in back


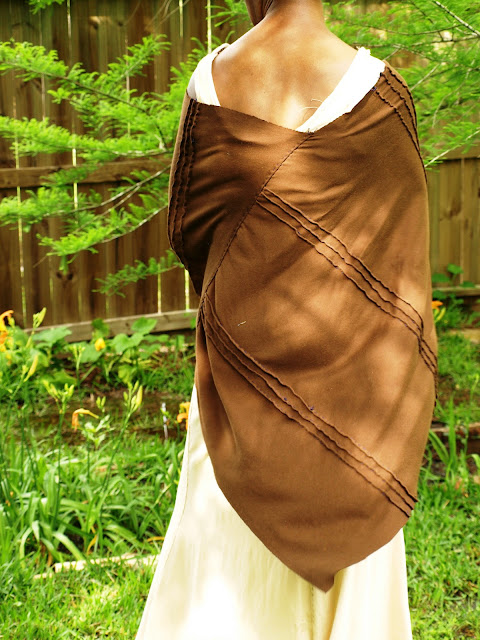
I recommend this dress for a thinner person. This dress is not very forgiving on the figure. I added a poncho I made last year. It works well to hide issues a cheeseburger could produce.
Worn with poncho


Pin-tuck poncho back

I will make this dress again. I think I will make it in a dark color in the paisley design. I do not know when I will start it, but my anniversary is coming up. That may be an incentive to get stitching.

I am very pleased that I was able to tick this off of my list.

Happy Sewing

Monday, February 11, 2013

New Airbrush, New possibilities

After making many A.C. garments I am happy to report that I finally have an airbrush to improve my fabric painting! In the past, I have used aerosol spray fabric paint and pump paints to color my fabric. Some times I have had favorable results, other times not so much.
Paints I have used in the past.

Results with sprayed fabric paint a bit spotty, but functional.
The results with these methods has been okay, but I was really looking for a new, better way to paint. This quality of painting limited my ability to create design that exposed the entire stencil shape as in negative reverse applique. So, I added a Master Airbrush to my Amazon wishlist and received one for a Christmas gift from my Mother-in- law.

This little number came as a kit with all I needed to get painting including the Createx airbrush paint. I am a firm believer that if you can read, you can learn anything. If the instructions are provided, one can learn many new skills. The problem was the instructions with airbrushes are woefully lacking. I guess the manufacturers assume, if you are buying an airbrush, you know what you are doing right out of the box!

The first issue I had was with attaching the regulator to the compressor. It did not say this, but if after you screw it on, it does not tighten vertically, you are to use a wrench to loosen the bolt so that it comes out further. Once you do this, try again until you can adjust it vertically. (I do not know how this is done. I returned the first airbrush to amazon because that was not explained and I thought it was a defect.I had the same problem with this one so I called tech support and they explained what needed to happen. I took this one to my neighborhood Habour Freight tools and they fixed it for me). I thought this solved my problem, and I could begin spraying, but I was wrong.

I had another "problem". Every time I turned it on, within a few seconds the motor would shut off. I Googled it, checked message boards, and watched YouTube videos, but nothing made sense to me. Finally, after avoiding it for days I called tech support AGAIN to see what was up. Turns out, it was doing just what it was supposed to do! The motor runs when you turn it on and then it shuts off when the appropriate PSI range is reached! That is when you begin to spray! You can keep spraying while it builds more pressure as you go. I thought it was broken, but it was just doing what it was supposed to. I am so glad I called!

I got to spraying my new Alabama Chanin Anna's Garden Stencil!


Look at the difference in the paint quality! I am so pleased with the results! This was my first time ever using an airbrush and I am so excited!
Look at the quality of the paint on these panels!
I have been dreaming of a fitted tank dress from the most recent A.C book. I have a delicious sea foam green jersey that I will use as a top layer. I painted with white and am unsure of the backing layer. I am not sure if I want bold contrast or muted similarity. I am also on the fence about whether I want it to be reverse appliqued or regular applique. It would be a shame to cut all that paint away for reverse applique! I have a few projects in the works so I have a bit of time to decide on that. More to come!

Happy sewing!