Saturday, July 19, 2014

Lucky Me! Little One Yard Wonders!

Lucky, lucky, lucky me! This week I won a random giveaway on Pattern Review. The prize was the book Little One yard Wonders!
                                http://www.junemccraryjacobs.com/wp-content/uploads/2014/06/101-Little-One-Yard-Wonders-Cover.bmp 

I own the other books in the series, One Yard Wonders and Fabric-by-Fabric One Yard Wonders and was excited to see what this book had to offer. Today, the book arrived in the mail.There are 101 projects for babies and kids and many caught my eye. Here are a few that caught my eye and are on "to make list".

Go Away Big Monster Towel
My "Little Man" loves hooded towels. He is outgrowing the ones I made when he was born. This will be a great treat for him!
Yia Yia Snuggle Hoodie
 He is also a huge fan of fleece. He has many blankets he carries EVERYWHERE. When the weather cools off in December, I will make him a few of these.
Simple Pants (Love the pockets)
 I think the whole household can benefit from these fun pockets on pants.

Summer Days Hat
 How cute is the ponytail slot?

Tot Tote and Wallet
 Pockets, pockets everywhere!

Doll bed with Storage
 So much cheaper to make than the designer doll beds at a particular doll store. 

House in the Hallway
I seriously Googled this type of playhouse this week. I could not find the correct words to get what I was looking for. I am so excited to make this in a bakery style and car repair shop.

Car Cozy Playmat
"Little man" takes his cars wherever he goes. He would love to take this on the go.

Retro-Inspired Bathing Cover-Up


I love the pocket detail and pom-poms here! I will be adding this to a grown-up dress for sure. 

There are so many wonderful projects to complete in this book. I am anxious to get started on some of these. I am working on a long list of sewing projects so these have to wait a bit, but I am thrilled to have something to waiting in the wings.

Happy Sewing,
Bianca


Tuesday, July 15, 2014

My First Foray Into Swimsuit Sewing.

Have you ever sewn a swimsuit? I had not, and had no plans to make them.They are fairly reasonably priced to buy and always seemed like more trouble than it is worth to make. In a recent fabric acquisition, I discovered 3-yards of swimsuit fabric in a retro motif than it just my style. Not wanting this fabric to go unsed, I decided to make a suit.


Despite my hesitation to make a suit, I have several patterns in my stash. For my first attempt, I chose McCall's3566.
                         M3566
I chose to make view D top with G bottom and the H cover-up.  A few necessary tools of this project  included: my serger, a must for working with this fabric and suggested by the pattern; a loop turner to flip the drawstring on the coverup and top and stretch needles to sew the fabric smoothly.


The instructions were easy to follow and the suit came together without a hitch. There were a few frustrations with keeping all of the elastic guides and drawstring pattern pieces straight, but beyond that, it went well. Here is my custom dress form
wearing the ensemble. (Sorry about the crotch pole, I tightened it too much when I fit some pants the last time I used it. I did not want to wait on hubby to get home to unscrew it for me.)


Back


Based on my measurements I cut the size 12 (bust 34) for the entire suit and the A/B cup. I may have overestimated my assets, but I think this runs big. I could have gotten away with a 10. I really like the cover-up. I appreciate that it can be worn hitched up on one side or worn as a skirt.

Working with specialty fabrics takes more time than working with regular fabrics. Given the time spent on this, usual cost of fabric, and the cost of a similar RTW swimsuit, I will buy in the future. Don't get me wrong, there is nothing wrong with the pattern. Given the choice between spending my time or money in the future, I will rather spend an hour at TJ Maxx than make another one.

I am happy to have crossed a swimsuit off my sewing bucket list. Now off to see what to tackle next...

Happy Sewing,
Bianca 


Sunday, July 13, 2014

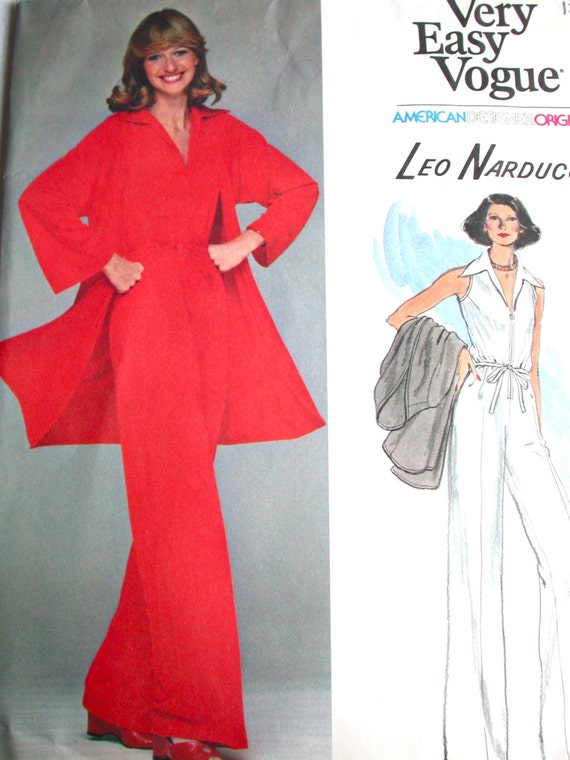
Back in my Time Machine with Leo Narducci Vogue 1389

In my recent quest to find jumpsuit to make, I discovered that I had five vintage patterns in my collection. Some of these were inherited, others bought in a bundle with ones I loved. The Pattern Stash Contest on PR, had me looking in my stash again to make something I was once excited about. I enjoy wearing my Simplicity Jumpsuit  and decided to make another. This time I decided to use my Vogue 1389 Leo Narducci Jumpsuit pattern.

                       Vogue American Designer Pattern No 1389 UNCUT Vintage 1970s Size 12 Bust 34" Very Easy Leo Narducci Sleeveless Jumpsuit Playsuit and Jacket

This sleeveless jumpsuit has shawl collar with front slit, front zipper closing and cutaway armholes with self bias bands. The self belt holds in fullness at waistline. Included is a slightly flared cardigan jacket has front and neckline band, cutaway armholes and full-length sleeves. 

When I first saw this pattern, I liked that the jumpsuit pieces were continuous, without a separation at the waist. Looking at it, I was not crazy about the width of the collar. I chose to sew it as intended before modifying it. I really wanted to make this in a white cotton spandex, but I did not have enough of it in my stash.

If you are a follower of this blog or have liked the Facebook page, you know I have a vast fabric stash. After my recent acquisition of 120 cuts of fabric in various lengths, types and colors, I could not justify purchasing fabric for this garment. I opted to use a navy blue seersucker from my stash. I choose it because I wanted a fabric that would be cool in the Texas heat and need little ironing.


The instructions, as always, were easy to follow. The only exception was the facing illustration. The picture and language were a bit tricky for me. I do not think it would be a problem for most. I am a visual learner and the illustration was simply not clear to me. I just thought about what needed to happen and figured it out fairly quickly.


The instructions required installing a regular zipper I chose to use an invisible zipper. I am torn about the depth of the neckline. I think it is about 1-inch to low for my taste showing cleavage. It does not gape, so with a blue bra, I should be fine. I wanted a deep hem so I added  three inches to the leg length before cutting it out.

This was a fast project to make and I am happy with the result. It is the kind of garment that requires an Afro puff and ginormous sunglasses.


If you want to sew in your time machine, this pattern is available through several Etsy vendors.

Happy Sewing,
Bianca

Tuesday, July 8, 2014

Stash busting with a bit of whimsy!


I love long weekends. They are great for extended family time with my hubby and kids. It is also a great time to put a dent in delayed sewing projects. Here are the fun little projects I worked on.


First up is a jumper I made this out of print Butterick pattern from my stash.
 
I thought this pattern was a fun way to use the button fabric I bought at Ikea earlier this year. It was the last on the bolt and when I bought it, I had no idea how to use it. The fabric was just too cute to pass it up. I made up this dress and wrote a review you can read about here.


It is so fun to wear. It is comfy, fun and makes people smile when they see me in it.


Next up, I made an easy breezy outfit from two more patterns from my stash.

View 3
 

 I love the 1980's feel of this top with the side tie.

For the neckline and sleeves I opted not hem them. I instead chose to edge finish it with a scallop stitch. 


Here is how I did it:

I pinned about 1 inch of wash away stabilizer to the edge.

I then stitched a scallop stitch. I tested the widths and lengths of the stitch options and chose to keep the standard settings.


Once it was all stitched, I trimmed close to the scallops and rinsed the stabilizer away. I did not wash it in the machine, just ran it under the sink and hung it dry. It is a bit scratchy now, but I hope it will softer in the actual wash. It was not so uncomfortable that I could not wear it.


The shorts were made using this fun pattern.


It is three simple pieces with a zipper in back. The construction was simple and just what I was looking for in a summer short pattern. I wrote a brief review that you can read here.


I also got some work in on another jumpsuit that I will share later this week. All in all, it was a fun and productive weekend. I hope you can say the same.

Happy Sewing,
Bianca

Tuesday, July 1, 2014

The Drape Drape Collection


I love surprises. I have very specific tastes and usually have some creative plan in the works. For this reason however, people in my life do not normally surprise me, they simply ask me what I want when they want to give me something. Last week, my friend Hillary sent me a wonderful surprise package in the mail! It was the Drape Drape Collection of books by Hisako Sato.


It was a wonderful surprise and great opportunity to try garments from books I have long admired, but never tried. The patterns in these books appear intimidating and were previously only published in Japanese. Now they are in English and gifted to me, I took the opportunity to dive in.


Full disclosure, I usually have visual orientation and directional issues. For this reason, reading the diagrams in the book was more difficult for me than they would be for most. The illustrations and cutting layouts for some garments make me feel like I did when looking at Magic Eye posters from the 1990’s. I stared at them for a long time until my eyes cross, then for a reason I cannot explain, it suddenly comes into focus and then, I know what needs to happen. 
 
Given that this was my first project from the books, I decided to use Drape Drape 2 to make No. 2 One-piece side drape top.


I like that this is a simple top that looks more stylish and complicated than it is. I liked how easy it was to construct. It has one side seam and two shoulder seams. It is one of the easiest pieces to make in the Drape Drape 2 book. Based on the measurements, I chose to cut the S/M of a lightweight polyester knit I purchased at an estate sale.

I dislike tracing and piecing patterns together. I HATE this part of sewing patterns and have passed on wonderful patterns if this is a requirement. I knew if I wanted to enjoy this great gift I  had to get over it. The patterns are layered upon each other and required careful concentration to identify the correct cutting lines. They are color coded, so that helped a great deal.


I used freezer paper to make the pattern and had no trouble once the lines were identified. I suggest you piece your paper together to accommodate the shapes you are tracing first. You may be tempted to trace the smaller width of your paper then tape them together after. I found it better to work with the larger unmarked sheet than try to match the lines once traced.
The instructions on this top were very easy to follow, but I chose to forgo them for this simple top and stitch it up the way that made the most sense to me.


I stitched the shoulder and side seams together before adding the binding. The pattern suggests doing it differently, but I found it simpler to stitch right sides together and flip binding to inside and then top-stitching.

Serged bias binding before turning it inside.
I cut three and made two of these tops in different weights to experiment with the draping (obsess much?). Here is the Seafoam version with the most drape. I am right-handed and prefer to wear the drape on the left, but it can be worn either way.


I really like this top. It has the comfort and ease of a t-shirt, but with a bit of sass. I  do not think I could get away with wearing this to Kroger for milk. I am sure I would not have to push my cart though ;p . I decided to make a casual one in a heavier cotton jersey. I love it for its everyday wear-ability, though the drape is firmer. 


I LOVE these books! I have flagged so many garments to make in the near future. I am so grateful for this gift. It has pushed me to deal with my least fun part of sewing with great results. This gift has inspired me to pay it forward and send a surprise sewing gift to someone. I am looking forward to brightening someone's day and advancing their  skills as these gifts have done for me. I encourage you to do the same.

Happy Sewing,
Bianca