Showing posts with label refashion. Show all posts

Thursday, May 25, 2017

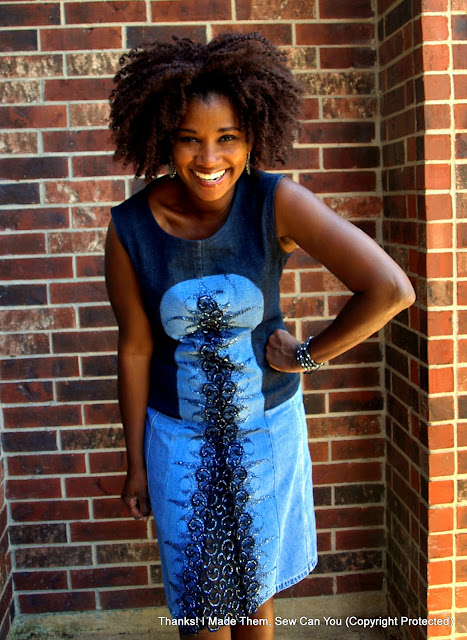
Jeans + Jeans + Skirt = Refashioned Dress

I love a good upcycle project. It is the source of much creativity (and clutter) in my life. I have a hard time getting rid of stuff because I "know I can do something with it someday". The older I get, the more I am facing my mortality and the reality that I will need to live forever to get it all done. I recently released many potential projects to someone with a longer life expectancy than I, but saved a gem or two for myself. Pattern Review is having an Upcycle Contest and it was perfect motivation to knock out one of my refashion plans.


This dress began as its' life as two pairs of jeans and a skirt. I wanted a new creation that hinted to its original form.


The key element of this dress are these beaded jeans that I found at a resale store for $1.75! They are a brand called Sassy Thai a fair trade Thailand based company that employs local artisans. Each garment is custom made to order by one or more specialist in their craft. I cannot imagine the hours that went into making these jeans.  I knew I wouldn't wear them as they were because they are not my style. I bought them and hoped for an inspired project to come to mind that would honor the work done by the original artist.


I scoured my stash and found McCalls 7187. It was a good candidate for upcycling because of the shape of the inset and the option for contrasts. I love that the inset would use most of the bead work showcasing its' beauty. 
 Image result for 7187 mccalls
I chose to make view A because I could use the segments of the pattern with the three "fabrics" I chose. The length of the inset  corresponded with the length of the beaded leg panel of the jeans. I like the version with the gathered skirt as well, but could not imagine that bulk in denim on my hips. 


Image result for 7187 mccalls

Once I decided on the pattern, the trick was to figure out the best way to cut the jeans then,


a game of Tetris with the pattern pieces to make it fit while looking cohesive.


I decided to maintain the original hems from the jeans and skirt. I liked the lace border of the jeans and did not want to disrupt that. I decided to keep the hemline of the skirt so it is consistent with that of the lace in the jeans.


When I cut the inset from the beaded jeans, the edges had some of the side leg seams visible along the edges (see cut panel photo above). Those seams did not look good alongside the even seams from the upcycled skirt. I narrowed the inset slightly to remove those seams reducing the lower inset by 1-inch on each side. I top-stitched all of my seams to reduce bulk. 

I considered a three color back, but opted to skip it given the sparkle in the front. In a stroke of fortune, the seam lines from the skirt lined up with the back darts of the back bodice.


I liked the look of the neckline as it is in the pattern. When I tried it however, I felt it was too close and sat uncomfortably on my collarbone. I cut the front collar on the fold of the leg seam. That factored into the comfort and led to me lowering the front and back neckline by 1-inch.
                                

The drop waist on this dress is not a style to which I normally gravitate. I think however, this pattern is a perfect match to maximize the beaded leg panel.


I am really pleased with this finished dress. Do you know what the best thing is? Jeans have two legs! I have another panel to use on another refashion! I don't know what it will be, but I know it will be fun! 


Voting is open now. Click here to cast your vote! I appreciate it! 

Happy Sewing,
Bianca

Monday, August 22, 2016

Jeanius Refashioned Coat Using Simplicity 1254

It is 90 degrees in Texas and I have made my Winter coat! I am so ahead of the game this year! Yay me! Okay, that is not completely accurate. I have finished my Winter coat from last year! 


I began this refashioned, pieced denim coat last Winter using Simplicity 1254 by Leanne Marshall. After spending many hours piecing the coat exterior, I lost my sewjo. All the improvising and auditioning placement of pieces, took it out of me. That coupled with the rapid change in weather, relegated the shell of this coat to my W.I.P. pile.  


I picked this project up again when Lisa over at Pattern and Branch alerted me to the #Refashioners2016 #Jeanius challenge. The Refashioners is a challenge created by Portia Lawrie of Makery that showcases ways to refashion a selected garment. This years challenge is denim from jeans.


To make my coat I pieced 9 pair of men's and women's jeans. After "making" my fabric base, I cut the pieces and sewed per instructions.


The cowl is large and can be used as a hood if you prefer. My choice of denim makes it too heavy for that to be practical. 
  

The only change I made to the instructions was to add two snaps to the underside of the front facing. This part is made using the waistband from one of the jeans. It it does not lay flat because of its' thickness. The snaps keep it together. 


The inside of the coat is lined with Dutch Wax fabric. As is normal with me and linings, I had some troubles with sewing it. Nothing about the pattern just me and the way my brain works. It required a little more concentration, but I go the job done.

Lining Front

Lining back
It is funny, when I pulled this from the W.I.P pile, I couldn't remember why I lost my sewjo. I expected to see glaring problems to resolve. There were none. It serves as a reminder to walk away from stressful situations and projects if you can. Time away gives new perspectives and can reignite excitement after the love is gone.

How about you think about making a project? The challenge goes until September 30th so you have time. 

Happy Sewing,
Bianca

Monday, November 23, 2015

Hear Ye! Hear Ye! A Royal Knight Approaches!

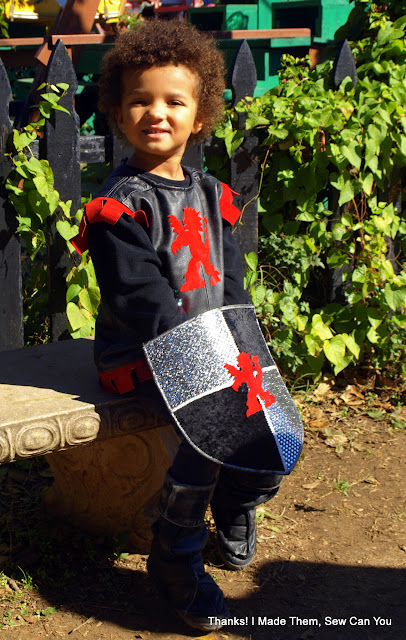
Happy Birthday to our Little Man! This darling little guy is 4 and celerated royally! For his birthday, our family took a trip to the Texas Renaissance Festival and we were accompanied by a brave knight!


Our decision to go was impromptu, but we decided to dress the part. I was pressed for time so I decided to make a costume for little man and build everyone else's from what we had on hand. Little Miss had a princess dress, so she was set. I considered this fairy costume for myself, but after checking the weather (40 degrees), I decided to refashion costumes for Hubby and me.


I knew Little Man's needed the most work, so i got started on it using Simplicity 5520.


For fabric I repurposed the leather from 2 well worn jackets that I purchased from a resale store for $.25 each! The black leather was intact, but had seen a lot  of use. I wanted the costume to look like he was a veteran swordsman who had won many battles, so it was perfect!


I cut the pattern as directed using the black as the base and the red suede as accents. The crest was secured with an adhesive designed for leather use. 


I decided to make a few changes to the pattern to suit my needs. That is why we sew right? I omitted the attached sleeves in favor of a fleece top to be worn underneath. I chose to finish the sleeve opening with bias tape. I am sewing this on my industrial machine, but you can use a home machine using a teflon foot and leather needle.


The pattern called for a hook and eye closure. It would have been impossible for me to attempt to sew through two layers of leather by hand. I chose instead to insert an elastic strip to the back top neck to allow for easy on and off wear. If you go this way, be sure to make sure it has enough stretch to get over your child's head.


Next, I worked on the helmet using a metallic silver knitI discovered in my stash! I was pretty certain he would not wear this for very long, if at all. He wants a huge Afro, so his hair is big. He also does not like his ears covered. He insisted he liked it , so I made it. 


I tapered the front a bit lower than called for in the pattern. He hates anything touching his face and this was the only solution I could come up with.  I also omitted the velcro closure in favor of elastic. Can you tell how thrilled he is with this?


In this project, I wanted to preserve as much of the original jacket as possible. For the boot covers, I decided to take advantage of the existing cuffs in the sleeves of the jacket. I turned the sleeve inside out and placed the pattern on top. Lining included, I cut the boot cover out. If you notice, the back of the cover (right side of the picture) is against the fold of the sleeve. I kept that in place and did not cut it open. This gave me one less thing to sew. The only part I sewed was the left side from the top by the clip to the point of the toe. The base was left open for the shoe. Because I kept the lining, I  basted it to leather once the front seam was stitched.


I used wide elastic to secure the cover to the shoe and again finished the edge with bias tape.


They pulled up over his leggings and covered his shoes comfortably. 


Every brave knight needs a shield. Lucky me, I found this shield in my local Goodwill. I removed the crest and applied my own. I reduced the pattern by about 25% on my copier and cut and the red suede for the applique. I secured it with the leather adhesive. 


He was ready to do battle! Within a few minutes of entering the festival, he was invited to help with a show; he was a good sport! 


For the Hubs, I made a self-drafted flannel tunic with grommets and leather ties that he paired with a loose fitting poet shirt and linen pants. Little Miss wore a princess dress she received as a gift.


For my outfit, I refashioned a peasant costume using a tiered skirt that I dyed navy blue from the original white. I paired it with a peasant top and a jersey shrug that I made using Mccall's 6845. For outfit cohesion, I also dyed the shrug.    
I added a bit of flair to my costume with this jeweled face tattoo.


I think the sparkle of this drew the attention of the performer of the Ded Bob show! He pulled me onstage to participate in an irreverent comedy show.


Hubs, did not get any still shots during the performance. He was busy recording video that will never be seen outside of our bloodline :). Here we are after the show. I think the Littles really enjoyed seeing me be silly, getting boinked in the head and getting laughs.  

The weekend was packed with lots of fun and new experiences for us all. Little Man is happy with his costume and I am happy with it too. If we are lucky, he will only grow up (not out) this year, so he gets more use from this.

Happy Sewing,
Bianca

Wednesday, November 12, 2014

Pattern Review Sewing Bee Round 2: Men's Dress Shirt Refashion

So, I have advanced to round two of the Pattern Review Sewing Bee. This round requires contestants to  refashion up to five dress shirts into a garment for an adult. Lucky for me, two weeks ago, I created a Pinterest board dedicated to refashions of dress shirts and was primed when the announcement was made. I went to my pin board for what had previously provided inspiration. Though they are great re-purposing projects, I thought they resembled the man shirts more closely than I liked. I wanted to use the fabric from the shirts and reference the source subtly.

I looked in my stash of shirts and found several that I could use for this project, but I wanted one more of another color. I hit the neighboring thrift store and found three shirts that made me change my plans. I saw two size 22 shirts in purple and one size 22 in blue giving me about 4 yards of fabric. Between these two shirts, I decided on a color block plan. (I am sorry for the color quality, I took those on my phone in too bright light.)
When I saw how much fabric I had, I hit my stash for a suitable pattern and found Butterick 9695.


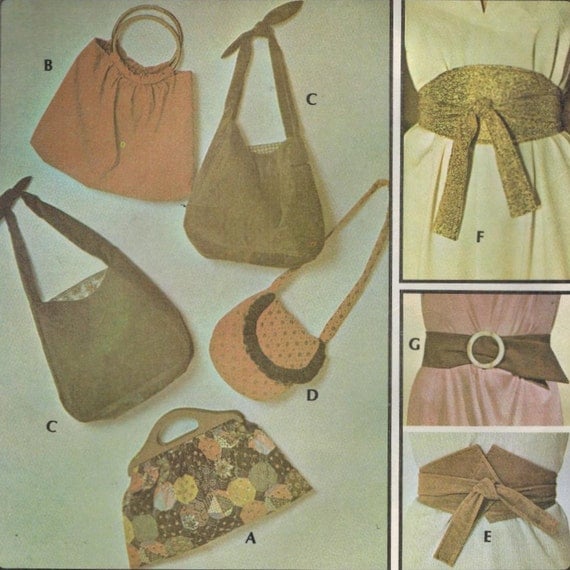
 and Mccalls 4613 after my hubby suggested it needed more umph!
1970s McCall's 4613 Vintage Sewing Pattern Accessories Belts and Bags One Size

I set to work and here is the end result.


I kept the original hem of the shirts and added the button details to the collar and the obi belt.

I think my hubby was correct in suggesting the belt was needed.
I love the drama of the collar.
These are colors I would never have chosen without the confines of what was available at the store. I like them together.


I whipped this project out in a hurry! I had so many ideas swimming in my head that if I didn't just dive in, I would still be considering. I am glad to be done so I can relax. Here's to hoping I do well and move on to the next round.

Happy Sewing,
Bianca

Monday, September 9, 2013

Vintage Tablecloth to Bohemian Style Dress

There are some fabrics you look at and just know what they are meant to be. They speak to you in a voice so loud, you have no choice, but to respond. While at an estate sale last week I had such an experience. I went in search of sewing patterns, notions and fabrics. The sale was promoted as having tons of sewing supplies but, the fabric prospects were less than stellar. I found myself in a room full of crocheted and embroidered holiday themed linens.

I was thumbing through a stack and came across a cream colored crocheted table cloth. It has ovals stitched in adorable groups of four and scallops along the entire edge. 


My cousin over at Bakerchet crochets and I am well aware of the time energy and work that goes into creating such a piece. The price was good so bought it and began to respond to what the fabric was calling me to. I was going to turn this tablecloth into Bohemian style dress or tunic.

I had the pattern for Simplicity 1757 in my stash and needed to figure out how to turn my tablecloth into it while maintaining the scallop details. I used view B as my base for this pattern.


First I folded the tablecloth lengthwise wrong sides together with the scalloped edges even. I wanted it wrong sides together to be certain my stitching lines were on the right side of the fabric. I then marked the center of the what would be the radius (Yes, you do use geometry after high school). Using the center line as a guide I lined up the top of each pattern piece to the fold. I did this to be sure the front and back would be the same length. You will see that the tablecloth extends past the sleeve and bottom hem. 


What you cannot see in this picture is that the front pattern piece was placed exactly like this on the opposite side. I used a disappearing ink pen to trace the top of the pattern on the fabric allowing the top sleeve extend to the end of the tablecloth. There is only one notch on the top so I was sure to mark it well before cutting it out. 

There are stitching lines on the pattern that need to be transferred to the table cloth. I found that those lines created a dress that had more ease than I wanted; it was too loose. If you want yours loose follow them and do not add the back casing, like I did.  For a more fitted dress, follow my steps explained later.

I cut the front and back pieces out along the top and followed the pattern instructions for View B. I used a longer stitch, about 4.0mm and changed my thread to mercerized cotton thread for sewing. This thread is stronger and thicker and I thought it had similar texture to the thread of the crochet.  When I  got to the elasticized  casing step, I repeated it for the back as well. With the excess length in my tablecloth sleeves, I found this step cinched the dress in more and made it less frumpy in back.

For steps 8-12 I used purchased bias tape to finish the neckline. I stitched it to the right side of the neckline, then flipped it to the inside and stitched it again.

Bias tape on the neckline
For the remainder of the steps, here is what I did (the photos show the wrong side of the dress, but this step should be done on the right side.) Using Bira, my custom dress form I pinned the side seams together and marked the stitching line. I took the lines up to just below the armpits.

If you do not have a dress form, you will need the help of a partner. Put the dress on and have your partner line up the edges of your trim or scallops and secure them with pins or clips. Then, have them pin the side seams along your body to suit your fit and pin and mark the seam line on front and back.

Pinning and marking the side seams
Side seams from underarm to dress bottom.
Once marked I took the dress off the form, realigned the stitching lines, pinned aggressively and stitched the side seams. I them stitched the side seams a second time to be certain it was secure. Voila! All done and ready to wear! I am wearing a black (nude ;-p) slip dress underneath.


I really like this dress! It turned out exactly as I hoped it would. If you make one come back and let me know; I would love to see it!

Happy Sewing,
Bianca