Showing posts with label ankara. Show all posts

Wednesday, December 8, 2021

Ankara Bound Luxe Cuddle Lamb Blanket

My son is obsessed with soft fabrics.  I have had the pleasure of working with Shannon Fabrics for several articles for Sew News Magazine and recently, I joined their brand ambassador team. They are a very generous company and I received several welcome packages with their yummy fabrics. With every delivery, my son wraps himself in the cuddly fabrics to enjoy the softness. Every attempt for me to disentangle him, has been met with reluctance because he constantly wants to be enrobed in them. On more than one occasion, I've had to unravel him from 6 yards of fabric.

When Shannon Fabrics heard that he routinely wears the single-sided fleece garments inside out, to feel the softness, they told me about the double-sided options. They sent him several yards to celebrate his recent birthday.

Top of his list of projects for me to make was a blanket. I decided to make a bound option using Ankara fabric that he selected from my stash. This is a quick and easy project that gives a lot of comfort and character with a little bit of effort.

Here's a quick tutorial

Supplies:
2.5 yards Double-sided Lamb Cuddle Luxe (54/56" x 90")
1.5 yards Ankara fabric or 45" fabric of your choice
Walking foot
A heap of pins 
A sharp rotary cutter
A rotary mat
6" quilting ruler
Iron and board
All purpose thread

If you are buying yardage, the 2.5 yards of Cuddle Luxe is ready to go. If you have more than that you will need to cut it down. I like to lay the fabric on carpet because the fibers keep everything from shifting. Measure 90" down the length of the fabric and cut across the width.

Use a quilting ruler to cut 8 strips of binding the length of your fabric (45") x 6" wide. If you are using wider fabric, you will require fewer strips.


With right sides together and raw edges even, stitch/serge the short ends together, Repeat on all strips, press open if stitched, to one side if serged.


Press .5" on both long sides of the binding. Fold long edges in to meet and press to create a long center crease.


Slide binding under one edge of the fleece so the edge meets the center crease.

Pin through layers of binding and fleece to secure in place. Allow the binding to extend beyond the fleece.


Tuck the binding under so the center seam meets the edge of the fleece. Adjust the corner to smooth the fabric and form a point.


View from backside.


Fold the binding to the front and adjust your corner to create a mitered corner. Pin in place. 


Continue to pin the binding  around the perimeter of the blanket. When you get to the beginning overlap and tuck the fabric ends in place. I pinned the entire perimeter before I began sewing. If your blanket feels too bulky and heavy this way, I suggest you pin then stitch each edge before continuing to the next.

Clear the area to the left of your sewing machine so there is room for the blanket to rest on the table. It can be unwieldy if the blanket hangs in front of the machine. Install the walking foot on your machine. Adjust the stitch length to the longest length. Align the edge of the binding to the edge of the foot and use it as your seam allowance guide. Stitch binding in place. Backstitch at the beginning and end, pivot at the corners. 


Press binding and enjoy!

Happy sewing,
Bianca

Wednesday, January 11, 2017

Challenge Accepted! Day and Night Dress Blog Tour

Happy New Year!
I hope you all have had a wonderful holiday season with the ones you love. I had an enjoyable time with my family. I have been working on my contribution to the Day and Night Dress Challenge hosted by Elizabeth Made This. 


Typically, I am a jeans and t-shirt kind of woman. When I wear dresses, they 
are usually shift or Mod style in bold prints. As my children get to big to be picked up and carried, I can now begin to expand my dress options. I have pinned thousands of dresses that I want to add to my wardrobe. When Elizabeth asked me to be a part of the inspiration team for her challenge, I was flattered and excited to have a reason to make one of these dresses.

Going into this challenge I knew I wanted to sew from my stash. I pulled a Vlisco Super Wax fabric that I bought last year and had planned to sew before buying more. I didn't keep that promise, but I came close.  I bought it in a 6-yard cut and planned to use most of it in a maxi length wrap dress. 


I chose to make McCalls 7185 in a sleeveless version of view c. I modified it by lengthening it to the floor and extending it by an additional 22 inches. The construction was pretty straightforward for most of it. I however, just about lost my mind on the waistband construction on step 20. I have mentioned before, that I have spacial orientation issues at times. It took me three times of stitching to figure out that the bodice facing needed to be flipped up toward the bodice and not down. When I figured that out, which is obvious to me now, it went along without a hitch.


A few of the dresses I admired on Pinterest had tie belts so I thought I would add one. Now that it is all made up, I don't think I need it. It is lost in the print. In addition to the tie belt, I added side seam pockets and I am so glad I did.


I was slow to make a maxi length Ankara wax print dress before now. I was worried that it would be too much of a good thing. Because the fabric is thicker than regular cotton it feels like a lot of fabric. I was also concerned that there would be too much bulk when worn. I am pleased to say if feels just right.


Now that I have made this, I think it is the right balance of print, pattern and visible skin (the "girls" don't normally see this much daylight).  


I love this dress! It has satisfied my long held dress envy and I don't know why I waited so long.


"I like to party and by party I mean stay at home and sew." I can relate to that quote so much. I don't have much of a night life and I have no complaints about it. I do however, get an occasional whim to have a glamorous night on the town. If I were to follow that whim, I would have nothing to wear. I welcomed the opportunity to add an evening dress to my wardrobe. 


I loved the dress I made for a friend to wear for her 60th birthday party using McCalls 7047. To satisfy my dress envy for that one, I decided to make a version for myself. I would have loved to make it in the same sequin fabric of the pattern cover and my friend's dress. The cost of that fabric and my lack of an occasion to wear the dress, I couldn't justify the cost. Instead, I found a Casa Embellish knit that is a cotton/poly/metallic blend. It has a soft drape and is lighter than the sequin fabric I used for that dress. It is light enough that I also used it as the lining for the skirt portion of the dress.


I made the dress straight from the pattern with no significant adjustments. I omitted the waistline elastic however, because the stretch of the fabric made it unnecessary. I hemmed the dress on my serger to make a rolled hem.


I really like my dress, but must admit to feeling a bit self conscious with how close fitting it is. I don't know what to do with my hands. 


I love that the cowl neckline can be worn on/off the shoulders as well as asymmetrically. 


To add a bit of pizzazz to the dress, I added a crystal belt. Now that it is photographed, I am on the fence about wearing it in real life. I think I prefer it without.

 
As I satisfied my dress envy with this one, I hope I have given you some.

                               
If I have, why not join Elizabeth's challenge today?  As a participant, you have the chance to win great prizes. In addition to that, some of the sponsors are offering discounts on their fabrics and patterns. Please let me know in the comments if you are taking the challenge.

Be sure to check our all the other participants in the blog tour for your dress envy: 


Sunday, Jan 8th: Elizabeth of Elizabeth Made This, Brittany of Brittany J Jones
Monday, Jan 9th:  Maria of How Good is That?,  Tonya of Sew So Petite
Tuesday, Jan 10th: Je’Tua of Robertswife, Meg of Cookin’ and Craftin’, Melanie of Its Melanie Darling
Wednesday, Jan 11th:  Linda of Elle Gee Makes, Tee of Maggie Elaine
Thursday, Jan 12th: Bianca of Thanks! I Made Them Sew Can You, Daniela of On the Cutting Floor
Friday, Jan 13th:  Melissa of Mahlicadesigns, Rachel of Sew Redy, Renata of Runnningnstyle, Sonja of Sewing ala Carte
Saturday, Jan 14th: Doja of Elewa blog, Judith of Judith Dee’s World, Tanya of Mrs. Hughes
Happy Sewing,
Bianca


Friday, October 21, 2016

My New Favorite Maxi Skirt in Ankara Wax Fabric

                        
I love a good maxi skirt! Don't you love a good maxi skirt? I especially love a African wax print maxi skirt. I have been on the hunt for a new pattern that was beyond the basic gathered skirt with a waistband, button and zipper. I had done it, liked it, but wanted to mix it up. My search brought me to The Lorelai Skirt by Cheryl of Paradiso Designs.


This Paradiso patterns are not like commercial patterns. You cut your size by calculating a formula using your measurements. Because of this, you can be make all sizes including plus sizes. The Lorelai skirt can be made 3 styles, maxi, midi & sport. The maxi length has 2 options, with or without a patchwork or contrast inset. You can choose to add pockets or not. 

Because this is not your typical pattern, you may be intimidated by the format of the instructions. My trick was to print them, choose my option and highlight my steps and illustrations. Once you identify your choice from the others, you will be able to follow the steps with no problem.


This skirt feels really amazing! The wide elastic waistband is worn low on the hips and is close-fitting before widening at the gathered lower skirt.  


The skirt back mimics the front skimming the body.


The sides of the skirt feature super sexy yet, discrete slits up both sides. The placement reveals just enough leg and nothing more even with a gust of wind.


I always feel confident wearing what I make. Taking a piece of fabric and transforming it into something wonderful is thrilling. The combination of cut of this unique pattern, my choice of bold fabric, and styling makes me feel particularly Badass! I have been on a duo making kick lately and plan to make another soon. If you want to feel Badass too, I suggest you get this pattern. You have to provide the big ass Afro, sunnies, attitude and 1960's filter yourself though.


Side Note: I will be at the Quilt Market October 29-31  and the Quilt Festival  November 3-6, 2017. I will be helping with Paradiso Designs and The Tunic Bible (CT Publishing) as well as enjoying the show. If you see me, please come up and say hello.


Happy Sewing,
Bianca

Thursday, June 9, 2016

On Trend and Off the Shoulder


So I was kinda in love with the Simplicity 8124 Cynthia Rowley off the shoulder dress when I saw it. It is fun and flirty and I thought it would be cute to make. I have seen pattern reviews and loved a few. I had doubts about the length and fabric fullness at the bust, but decided to give it a go.

                                       
My dress did not turn out as expected; it was a disaster! There is so much ease in this dress it was unflattering. The shoulders kept rolling up and when down, I felt like I could not raise my arms. I spent some time fiddling with it to make it work. In the end, decided to move on.


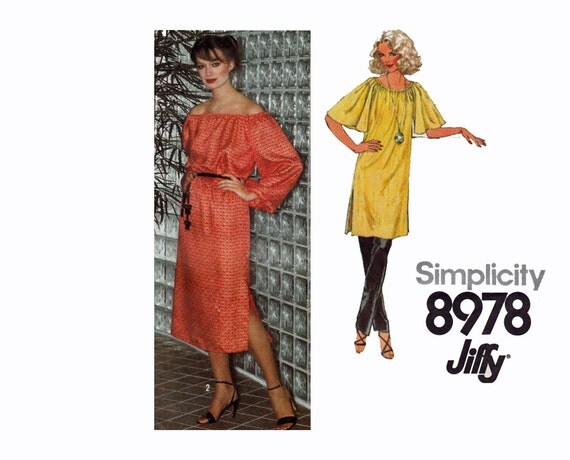
I thought I had a similar style in my stash and found Simplicity Jiffy 8978. I used it to make a dress a few years ago that was hidden in my closet. It was the look and feel for which I was going.

                                  
I shortened the dress to the point of the side slits of the pattern and whipped this up.


I love the narrower silhouette and wide drapey sleeves. The shoulders stay in place and are very comfortable.


I like that if I choose, I can wear the shoulders up too!


It feels good to bounce back from a sewing fail with a good result.


It was so fast to come together, I made another in an Ankara, wax print. 


The weight of the wax print is heavier than the lightweight denim of the other dress. This makes the sleeves stand up in a slightly more structured way and it gathers less on the elastic.


I love that a bold fabric like this wax print can take a simple shape and add some drama.


 This was the feel I was hoping for with my Simplicity 8124 version.


I compared the pattern pieces for both patterns to see the difference. There is an 4-inch difference at the fold on the front and back. That is a 16-inch difference around! The rest of the pattern is pretty much the same.

Cynthia Rowley -----------------------------------------Out of Print Jiffy
If you want a more streamlined version of the Cynthia Rowley dress, cut your size then fold that pattern down four inches before cutting your fabric. There is a wider triangular base on the C.R. pattern which you can taper down if you like. My concern was the bulk at the bust so I would leave that part alone.

Happy Sewing,
Bianca

Monday, November 30, 2015

A Pattern Hidden in Plain Sight

Oh my! I cannot believe I almost missed this one! Have you been so focused on one pattern element that you completely ignore another? That was me with Simplicity 1008.

 Simplicity Misses’ Fantasy Costumes - Size: HH (6-8-10-12) - Pattern: 1008
I bought this pattern earlier this year for the tulip hem dress and recently considered the maxi dress for the Renaissance Festival. It wasn't until last week when I was putting the pattern away did the cape catch my attention. How could I have missed this? I love the silhouette of this cape and the potential for a reversible option. I been looking for a pattern to showcase more of my Ankara Dutch Wax fabric and thought this would be a good match.


 The reverse side is nice too!


Here is a quick review of the pattern.

Pattern Description: 
This medieval fantasy costume is designed for travel and adventure. Pattern includes floor length gown, high low day dress and close fitting knee length cape with hood. 

Pattern Sizing:
I made the size 10

Did it look like the photo/drawing on the pattern envelope once you were done sewing with it?
It looks like the line drawings, but I think the cover photo gives the illusion of pleats or gathers.

Were the instructions easy to follow? Pattern alterations or any design changes you made:
The instructions were easy to follow, but I did not use them. I made this reversible, so I made two complete capes and stitched those right sides together leaving an opening for turning. I then flipped it through the opening and top stitched the entire edge. For the neck closure, I made two covered button and sewed them shanks together on one side. For the other side, I attached a cord loop.

Making covered buttons

Buttons attached back to back 

What did you particularly like or dislike about the pattern?
I bought this for the dresses, but the cape is underrated.


Fabric Used:
Ankara Dutch Wax for side A and a green linen look for side B. 

Would you sew it again? Would you recommend it to others?
I have recently made too many cold weather pieces for someone who lives in Texas! I will not likely make this cape again. But I would recommend it.


Conclusion: 
This one should not be in the costume section or it will be overlooked. It was fast to sew and the shaping is fun and interesting. The shape makes it a good candidate for reversibility because the other side is not glaring when worn.


I have vowed to use the Ankara fabric in my stash before allowing myself more. I am pretty happy with this make and love my use of the fabric. Now I am free to get more ;-p

Happy Sewing,
Bianca