Showing posts with label bias tape skirt. Show all posts

Tuesday, June 14, 2016

Playing Around With Bias Strip Applique Again


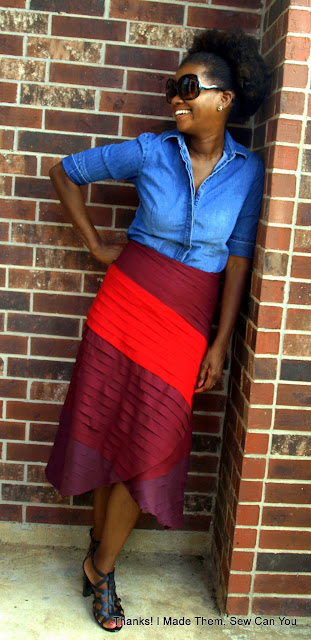
So, I was stumbling over my spools of bias trim wondering what my next project with them would be. I loved the skirt I made for Little Miss and decided I wanted one for myself.


This time, I decided make mine a bit different and used out of print McCalls 4457 pattern as my base.

I cut the pieces for cotton in my stash. I chose fabrics I would likely not use for anything else because they would be covered by the bias strips.  After sewing the long seam, I drew lines 1" apart and applied the strips 1/4" from the the edge of the strip. For this skirt, I only sewed one end of the strip down allowing the other to hang free. I began sewing at the bottom of the skirt allowing the succeeding strip to overlap the one before. 


I sewed past the edge of the fabric and serged them down when they were all done. 
I even like the stitching on the flip side.


Overskirt and underskirt
I got to this point of the construction and did not know what to do with the upper portion. I thought going in the opposite direction would be interesting so I changed direction. It was distracting to look at so I unpicked it all. I decided to continue on the same path as before using the color from the bottom.


I joined the underskirt to the outer skirt allowing it to be lined with wrong sides together. I installed an invisible zipper and applied facing to the waistband.


The last thing to be done was the hand-sewing of the hem. I slip-stitched the entire length of it by securing it to the lining. This was a tedious, but worthwhile task to not have any stitches show on the outside. 


For a project that I started without a complete vision, I am very pleased.
This skirt by the numbers:
✂ Base fabric: 3 1/8 yards 
✂ Rows of bias: 54 
✂ Shortest length: 2.5" 
✂ Longest length: 47"
✂ Total length of bias: 47 yards. 
✂ Length of hem to hand sew: 5.5 yards 

I love the lines of the bias and the texture it gives. The unfinished edges will weather with time, wear and washing. I am excited to watch this fall apart in the best way.


The completion of this shirt coincides with the PR Skirt contest so I have entered it. We will see how that goes.


I have yards and yards of these colors of bias as well as green and blue still. I am excited to see how I use them next.


Happy Sewing,
Bianca

Sunday, March 13, 2016

A Little Bit Biased: Skirt Inspired by The Party Dress Book.

About a two weeks ago, my thrift guardian angel directed me to a local store for a pop in. While there, I found spools and spools of flat bias tape. As a rule, try not to buy an item unless I have a clear plan for its use. I had a gnawing feeling that this tape was for me, but no clear plan. I broke my rule and bought them hoping the plan would become clear.


Sure enough, I got home and hit my sewing book collection to find The Party Dress Book by Mary Adams.


I have loved the Bias Strips dress from the first time I saw it on the cover and the others in the book.  I hesitated in making it for three reasons: 

  1.  I am miserable at making continuous bias strips without much waste,
  2.  I haven't had an occasion to wear a dress like that.
  3.  It looked complicated. 
Lucky for me I now have these spools that are already cut, I have been invited to a dance and I can do hard things (I am still recovering from knee surgery and am in no condition to dance this month or next. This fact will not stop me from holding up the wall in a new dress.) I knew I needed to use these strips to make a party dress. Before tackling such a project, I decided to test the technique on skirt for Little Miss. 

Bias tape circle skirt.


I used Simplicity 2356 to make a skirt perfect for twirling. The construction came together easily and relatively quickly. I cut the skirt pieces and starting at the top, applied the bias strips with an imprecise 1/4 inch seam. I cut the bias strips in half lengthwise because they were too wide and inflexible off the spool. I applied them randomly, overlapping the ends to join a new strip. 


I  used fabric from a sheet as the base and sewed the strips in a contrasting thread. After applying the reds, I decided it needed more contrast. I had regular grey bias tape on hand, cut it down to size and added it. The bias from the spools is firmer than what you find in the stores. It adds texture and weight in the best way. 

I just want to mount these and hang them on the wall.
I decided to sew french seams in the sides. I thought this would look nicer and encase all of the cut bias ends.


I applied the waistband and hemmed it with a single color of bias tape.
Hemmed in bias
What a fun skirt! I love how happy she is in this. The skirt has texture, personality, movement and is fun. I am excited to see what the raw edges do in the wash; I hope they get ragged in time. 


It even looks good sitting still.


After making this, I will definitely be using this technique for my dance party outfit. I am still uncertain if I want a dress or two-piece ensemble that I can separate and dress down like Little Miss. I am toying with the idea of playing with the colors of the bias strips with fabric paint or dyes on the blue and green strips for mine. 

This fun skirt doubles as a grown up cape for me. I took a photo and wanted to share it, but after taking her pictures, I decided against it. I don't want to compete with this dizzying cuteness. 

Happy Sewing,
Bianca