Tuesday, December 24, 2013

Over-sized collar tunic with contrast sleeves


It is cold here in Texas and time for more warm clothes! The window for warm clothes is very small so I have to be selective about I sew and it has to come together quickly. I had this out of print Vogue 8129 pattern in my pattern cabinet and have been waiting to make the over-sized collar tunic.

Vogue 8129
The pattern includes a misses dress, tunic, and pants. It has a loose fitting, slightly A-line dress, two inches below knee, ankle length or tunic. It has an over-sized bias turnover collar or standing collar and short or full length sleeves. To make the outfit complete there are straight-legged pants, without side seams that have an elasticized waist.

I cut this out about two weeks ago and ran out of fabric for the sleeve. At the time, I  was able to cut two smaller sleeves from the fabric hoping it would be enough. I have skinny arms, so I thought, eh, it would work out; I was so wrong. When I got ready to sew it, I completely forgot that I did not have enough fabric for the sleeve and sewed it up with no adjustments. The sleeve did not fit and I had a Tim Gunn "make it work" moment. 

I sewed the sleeve in flat on my serger and didn't want to cut through all of that stitching to fix the problem. I decided to insert a gusset in the sleeve under the arm in a contrasting color. I cut it in a black four-way knit I had in my stash. I chose a super stretchy knit because it allowed me to be less precise with the amount of fabric I needed for the gusset. The gusset was  a three inch wide rectangle that is as long as the sleeve and came to a point under the arm. It worked out great and I am so pleased with the result.
Adding a gusset
The pattern called for a 22-inch zipper for the back closure. I was torn between using an invisible or exposed zipper and asked for input on my Facebook page. The overwhelming opinion was for an invisible zipper. Many people thought the exposed zipper detracted from the look.

Exposed zipper option on B.I.R.A
I am really grateful for the input I got. Ultimately, I decided to omit the zipper altogether as the fabric has a lot of stretch and the neckline is large. I was leaning toward the exposed zipper before the poll and am so glad I asked because I think with the gusset, it would have been too much.
Vogue 8129
The pattern instructs you to tack the collar to the inside neckline seam. I decided to leave it free so I can adjust the drape to suit my mood.
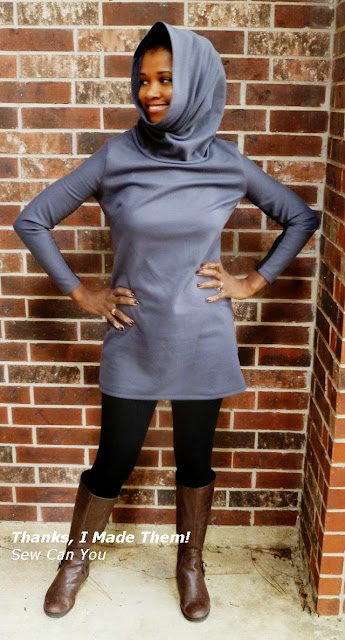
Over-sized Collar
 
Back
 
Gusset sleeve and no zipper
I haven’t seen many current turtleneck patterns in the pattern books. If you want a similar tunic, Vogue 8670 comes close if you cut the neckline wider, increase the size of the collar and add length.

V8670 
This is such a fun tunic. I want to wear it everyday! I have a green version cut and I like the idea of making one in a solid with a print collar. We will see, it is 30 degrees today, but it may be 80 tomorrow!

Happy Sewing!
Bianca
Thursday, December 19, 2013

Thrift Store Treasures!

The thing about Craigslist ads is, you sometimes have to weigh getting a killer deal with the possibility of getting killed by some psycho. This week, I responded to an ad for 1000's of vintage patterns for sale in nearby Baytown. After corresponding with the seller, Beau, via email, I determined that he and the ad were legitimate. I headed  down to Something Old, Something New resale store to get my retro pattern fix.

Beau did not exaggerate, he had thousands of patterns from the '50's -the '90's! Fortunately, they were sorted by decade and I was able to make quick work of choosing the ones I loved. Here are they are:

Holy Cow! Spats!
Dresses for the lady I strive to be (burp, excuse me!).
Possible candidates for Alabama Chanin stitching! Especially the yellow pinafore and racer back dress.   
Wrap around pants! I have been searching for this pattern all year!

This is a new pattern company for me; I am excited to stitch one up!

Bags, can you ever have too many?
More fun dresses and a reversible wrap skirt.
 
Mommy and Me pattern and two kinda quirky pieces.

Accessories

Just for fun.

I have not made underwear before...
Doll clothes for Abby, my daughter's American Girl doll.
 
Aunt Martha's Embroidery Transfers

Ruffler and walking foot attachments.
In addition to these sewing gems, I purchased two washers full of fabric which are drying or I would show them here. Beau was very patient with me as I searched and he even brought me patterns and fabrics that suited my tastes. I am happy to say I showed restraint in my purchases; I only bought what I absolutely loved! I did leave stock for others :)  

Beau cut me a great deal on everything I bought. He even gave me a bag of incomplete crochet items and yarns for free! I do not crochet, but I liked what the previous owner had begun and I knew I could figure something to do with them (and of course free IS free!). A few of the items are hats, a toddler caplet, beginnings of a few bags and squares and rectangles that I can turn to scarves and such. I am excited to see what I do with those, so stay tuned!

Free crochet items!
Free crochet items!
Free crochet yarns!
I had time constraints and did not go through everything he had in stock. I will try to find more time in the coming weeks and will visit again. In the meantime, comeback here to see what I make with my new treasures!

Happy Sewing,
Bianca

(The views expressed here are my own and I have not been compensated or frankly asked to promote this store in any way. I do it because I had a good time and got great deals!)

Tuesday, December 17, 2013

Sewing is part of our Journey.

As you may know, I have led a Journey Group at my church where women, both young and old, have united in the common goal of sewing for charity. All of our garments were made for the children residing in the House of Hope at Starfish Kenya, who are orphaned by the HIV/AIDS pandemic in Kenya. I wrote about the Summer experience here and beginning of the fall session here.

As with the last session, I went into this Journey Group session with a prayerful heart. I asked that the Group be joined by people who were excited about what we were doing, even if they didn't know what they were doing :). God answered with enthusiastic members who consistently showed up, worked beyond our time limits, and willingly took garments home to complete! I asked that I would get some help with administrative tasks and have a backup leader if I could not attend a meeting. God answered with a member who happily volunteered to read our devotional each week and has agreed to co-lead next session's group. I asked that we have fun each week and build good relationships with each other. God answered with great socializing each week and a fun social time at a local paint party.  Also, I asked that the group become self-financing beyond my fabric stash. God answered with financial and fabric donations that allowed us to purchase fabric and supplies to fund this session and part of the next. 

I have been so blessed with this group. This second session was different than the first, but it was no less rewarding. As with the first group, our registration reached capacity on our first day of sign-ups. This time we had many happy returners and added children accompanied by parents or guardians.  

Every week, I had the pleasure to observe the delight on someone's face as they worked on or completed a garment. I got to share in the joy of a parent or guardian guiding their charge on the iron, cutting fabric, or on the machine.


The skill levels of the members were varied, ranging from veterans to newbies. In this round of sewing, we shifted from pillowcase dresses to making shorts for outerwear; in addition, the shorts can function to enhance modesty under dresses. 


We spent many weeks working hard, and, midway through the session, we took a break. Karen and her staff at Arbor House Galley and Studio, hosted our group for a wonderful private paint and pour party. Here we were all guided in the painting of an antique Singer sewing machine, on which we could add our own twist. Karen worked with me to choose a suitable image that reflected our interests. 


While painting,  Kim Korenek of Tastefully Simple provided a delicious sampling of food for us to enjoy. A group member won party food as a prize at a home show and chose to share it with us.  It was and incredible time together!


After 10 weeks of sewing and 1 week of play, our Fall semester came to a close. In the 1.5 hours we met each week, we completed over 80 garments!

 
 Here is a small sampling of what we did.


I am proud of everyone who worked so hard to make this group a success. Moving forward, we are looking for a new and local group for whom we can to sew and donate items. The projects need to be relatively easy to sew to allow novice potential group members to participate. I am open to international possibilities, if there is a way to get the projects to these sites without added costs.

The Spring semester will begin sign-ups on January 19th, and the semester begins the week of February 9th.  If you are local and want to be a part of this group, please sign up; we would love to see you!

We are also accepting donations to help this ministry continue. We could use new or used sewing machines, cotton, and other apparel fabrics. In addition, we can us fabric, elastic, trims and other sewing notions. Please email me here, to make arrangements for local pick up of items you wish to donate. 

Monetary donations are gratefully accepted at Gateway Community Church, simply designate Sewing for... as the recipient and notify me here. 100% of the donations fund this ministry.  

If you wish, you can also donate to this cause directly below. I will email you a receipt for your records. Note, if you need a receipt for tax declaration of donations to a religious organization, please donate through the church.


Thanks for reading and happy sewing,
Bianca

Sunday, December 15, 2013

Pressing Forward on my Alabama Chanin Anna's Garden Dress!

I am so excited to be making significant progress on my Alabama Chanin Anna's Garden negative reverse applique dress. Inspired by this dress:

                   Image


I started hand-stitching this four panel dress in February when I got my new airbrush and Anna's Garden stencil.


I enthusiastically began stitching the panels every chance I got. I took it with me to appointments, on drives, to the gym, wherever  I went; I could not stop working on it. That was the way it was for a good part of the year. I was making great progress until one day someone said something to me that made me change my perspective on this one. It was a benign observation that eluded me until they mentioned it. It was not a bad comment in itself, but it just took the wind out of my sails. 

It was not a conscious decision to stop working on this, but it fell by the wayside while I worked on many other things. It was bought back into my focus by Dr. Fun who is making a full length dress in the Anna's Garden stencil for Mardi Gras. Her dress is going to be beautiful and I cannot wait to see it completed. She lit the fire under me again to get stitching. 

Back in August I had half of the dress stitched and wrote about it here.

B.I.R.A Wearing half of the dress

Now, after renewed inspiration, I am making tremendous progress. Here is where I am today:
 
Front Completely Hand-stitched


Back still a work in progress

Stitch Details. I decided to keep some of the white paint in my version.
Getting There


Underside stitching
Though I love this, I am on the fence about keeping this dress for myself or selling it to help fund my Alabama Studio Week (if interested, email me). If I keep it, I hope to have it completed by my birthday in January. I am also hoping to have a place to wear it by then. :) 

Happy Sewing,
Bianca

Wednesday, December 11, 2013

Alabama Chanin Bloomers T-Shirt

Back in August I made an Alabama Chanin Bloomers stencil with the intention of making a t-shirt and a four panel skirt.  My design plan led me to airbrush navy blue cotton jersey using white paint and use black cotton jersey as the backing fabric.


Painting skirt panels.

Skirt and shirt panels.

T-shirt all painted.


Summer stitching by the pool.
 I decided to stitch using the reverse applique technique with the knots exposed  and thread tails visible. 


All stitched and painted areas cut away.


I hand-stitched the front and back panels together per the instructions in the book (from memory at this point).  I felled the seems to the inside and bound the neckline using a beaded parallel stitch. I added three seed beads to each stitch and stitched it using a single strand of button and craft thread.

Beaded Parallel Stitch 

Completed Top on B.I.R.A
I am happy to have completed this top and I am steadily working on the four panel skirt to go with it. I will update when it is all done. I am not sure how long that will be as I am stitching away on a dress, and a beaded paisley top.

Happy Sewing, 
Bianca